Guide Placement
by Al Campbell
Guide placement is an important factor in any rod. Get it wrong and
your rod won't perform properly, or it will break. If you've purchased a
quality blank, marked the spine properly and have the guides spaced
right, you'll have a fly rod that will perform as good or maybe better
than the factory equivalent. Right now though, you have to space the
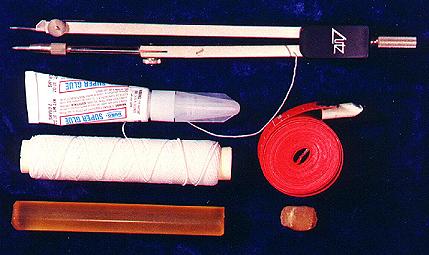
guides right. Here's a view of the tools I use to space and attach the
guides to the blank.
If you can, find a fly rod in the size and brand you
will be building and measure the guide spacing. If you can't find that
particular fly rod, you might write or call the rod company who made
the blank and ask for a spacing chart for that specific rod. Most rod
companies will share this information if you ask.
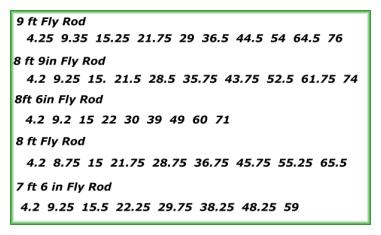
If all else fails, here's a sample spacing guide for
most of the common fly rods you might build. All measurements are
from the tip of the rod in inches with all of the sections assembled
In some cases (three or four piece blanks) you will have to alter this
spacing to accommodate the sections.
Mark where the guides should go with a piece of
bee's wax or a wax marker. That way you can easily wipe your marks
off the blank when you have the guides secured firmly in place. Be sure
to mark on the side of the spine so your markings won't interfere with
guide placement or wrapping. Never mark guide placement with anything
that will scratch the blank or is permanent.
When placing guides on the blank, work from the
bottom to the top. For the bottom section, you can place a reel in the
reel seat to help you align the first guide. Take your time and be careful
to get each guide aligned properly. You only get one chance to do this
right so don't get in a hurry and mess it up.
I use a piece of elastic string to hold the guides in
place. You can find this elastic string at a fabric store. Some people
use masking tape for this job, but I've found elastic string to be easier
to use when I'm aligning the guides.
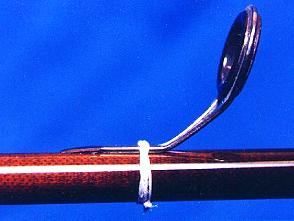 To attach the guide to the rod, carefully set the guide on the
blank as close to the right position as you can manage.
Hold the guide and one end of the elastic with one hand while
wrapping the elastic around the blank with the other hand. After
three or four wraps, tie the string off and trim close to your knot.
To attach the guide to the rod, carefully set the guide on the
blank as close to the right position as you can manage.
Hold the guide and one end of the elastic with one hand while
wrapping the elastic around the blank with the other hand. After
three or four wraps, tie the string off and trim close to your knot.
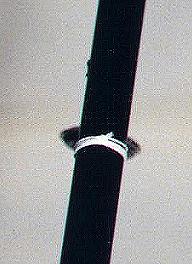
Once you have the guide tied off, check to see if it's still
positioned on the spacing mark. If you've used elastic string,
you can easily move the guide back to the spacing mark if it
moved while you were tying it to the blank.
When you're sure you have the guide on the spacing mark, align
the guide with the reel seat or the spine mark, depending on
which section of the rod you are working with. Again,
take your time and get it right.
Once you're positive you have the guide in the right place
and aligned properly, apply a very small drop of super
glue to the tip of the guide foot. Use the corner of a paper towel to
soak up any excess glue. If you're using traditional guides with two
feet, glue the other foot down also.
The first guide on any section of the blank will be the hardest
to align. It's also the most critical guide on that section
to align. All of the other guides on that section will be
aligned to that guide. Before you glue any guide down, check
it again to make sure you have it aligned and positioned properly.
You don't want crooked guides and you won't get a second chance
after the glue has dried, so check it again before you apply
that drop of glue.
Once you have the first guide glued in place, the rest
are simple. Like the first one, place the guides in the right spot on the
blank and tie them down with elastic thread. When you have them in
the right place, turn the rod over so the guides are on the bottom.
Holding the rod in front of you, look down the blank and slowly rotate
the blank until you have centered the first guide on the blank and an
equal amount of the guide is visible on both sides of the blank. A lamp
shining on a white or near white wall will help you with this step.
After you have the first guide centered on the blank, look up
 the blank to the next guide. Any mis-alignment will be very
visible to your eye. Slowly slide the guide you are centering
around the blank until it's aligned with the first guide, then check it
several times until you are certain you have a perfect alignment.
the blank to the next guide. Any mis-alignment will be very
visible to your eye. Slowly slide the guide you are centering
around the blank until it's aligned with the first guide, then check it
several times until you are certain you have a perfect alignment.
When you are certain the second guide is aligned properly, glue
it down and move to the next one. Align every guide with the
first guide you put on the rod. That way you will avoid
something called guide creep (the guides creep slowly around the rod)
which is caused by not having a set reference point. One by one, you
will place the guides on the blank, align them to the first guide, and glue
them in place. Use the same method to glue the tip-top in place,
except you need to use hot glue for the tip.
I've found guide alignment takes as long or longer to do than
wrapping the thread on the guides. Take your time and get it
right. No one wants to fish with a fly rod that has crooked guides.
Next week we'll start wrapping thread on the guides. Until then,
have fun with the guides, and if you have a moment, go catch
a fish. It's good for the attitude. ~ Al Campbell
|
