Gluing The Reel Seat
and
Handle to the Rod Blank
by Al Campbell
It's finally time to start playing with the rod blank. I know, you've
been waiting for this moment for seven weeks, and you can hardly contain
your excitement, right? I hate to be the one to burst your bubble, but
we still have a couple more things to do before we glue anything
together. But, don't put the glue away yet, we'll still get to use it
this week.
Before you can glue anything to the rod blank, you need to find the
spine or spline of the rod blank. The 'spine' is the stiff side of the
blank. It is created when the graphite is wrapped onto the mandrel
during the creation of the blank. The overlapping layers of graphite
create a stiff side and a soft side of each rod blank. Each section of
the rod blank will have its own spine. Blanks from the better rod
companies will have a less noticeable spine, and will be better casting
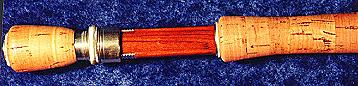
blanks because of it. The lengthwise line in this picture of a blank is
the edge of the graphite triangle that was wrapped around the mandrel.
This will often be the stiff side.

How you place the reel seat and guides on the blank will effect the way
the rod casts. If you place the guides on the soft side, it will cast
with more power, but the weakest side will be facing the fish during the
fight. If you place them on the stiff side, you will have more fish
fighting power, but you will be casting with the weakest part of the
blank.
You'll get two different answers on which side of the blank to place the
guides if you ask a few rod companies. They are both right, but we'll
take the problem a little farther than that. The most important thing is
to make sure you don't place the guides on the side (between the soft and
hard sides). That creates twist in the blank and produces a rod that
casts poorly and breaks easily.
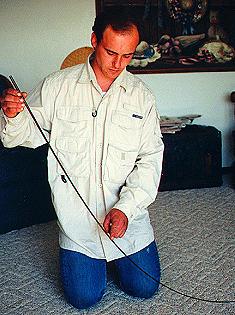
How do you get it right? Simple, you locate the spine of the blank. To
do this, place the tip of the rod blank on the floor, hold the butt end
with one hand and apply some moderate pressure to the middle of the blank
with the index finger of the other hand. With the tip of the blank bent,
turn the rod with the hand that's holding the butt end.
When you get to the soft side of the blank, you will feel a thump in the
index finger that's applying the pressure to the middle of the rod blank.
When you rotate the blank, the blank will naturally rotated until it
stops with the center of the soft side facing up. Mark this side with a
little piece of bee's wax, paraffin or a china marker. I use bee's wax
because it is easy to remove. Check it again several times to be sure
you have the soft side properly located and marked. Repeat this process
for each section of the rod blank.
Now you have to decide which side of the blank to place the guides on.
My suggestion is to let the rod's intended use determine guide/spine
orientation for you. If you're building a light weight rod for chasing
small fish, you might want the extra casting power and it might be nice
to protect light leaders by placing the guides on the soft side of the
rod blank. If you're building a rod for strong fighting fish, placing
the guides on the stiff side of the blank might be more appropriate.
You'll have to decide which is right for the rod you are building before
you can glue the reel seat to the blank.
Once you've decided which side to place the guides on, mark that side
with wax so you can align the reel seat properly. If it's the soft side,
you will already have it marked. If not, erase the old wax mark once
you've marked the stiff side. Again, do this to all of the sections of
the rod blank.
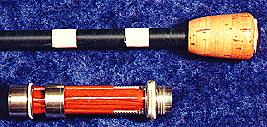
Once you've marked the blank's spine, very lightly sand the rod blank
with 200 grit sandpaper where the reel seat will be glued. The finish of
the blank must be scuffed for the epoxy to hold. Then, wrap 3/8 inch
masking tape around the blank in two places under where the reel seat
will be glued until the reel seat fits snug over the tape. This will
keep the reel seat centered on the blank.
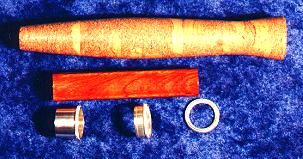
 Next, mix a batch of waterproof epoxy to glue the reel seat to the
blank. You'll need enough glue to fill in the bottom of the seat and the
gaps between the tape. First drop some epoxy into the reel seat center
to glue the bottom of the blank to the reel seat. Start the blank into
the reel seat adding epoxy as you slide the blank in so that the gaps
between the tape are completely filled. After the last wrap of tape is
in the reel seat, add a little epoxy, but not enough to completely fill
the seat. This extra gap will collect any excess epoxy that is on the
blank when you glue the handle down.
Next, mix a batch of waterproof epoxy to glue the reel seat to the
blank. You'll need enough glue to fill in the bottom of the seat and the
gaps between the tape. First drop some epoxy into the reel seat center
to glue the bottom of the blank to the reel seat. Start the blank into
the reel seat adding epoxy as you slide the blank in so that the gaps
between the tape are completely filled. After the last wrap of tape is
in the reel seat, add a little epoxy, but not enough to completely fill
the seat. This extra gap will collect any excess epoxy that is on the
blank when you glue the handle down.
Carefully align the reel seat with the spine marking and prop the blank
upright in a corner or on your work bench to dry. Although you can
normally work with your rod blank after the glue has been drying for
about four hours, it's best to let the glue set over night for the
strongest bond.
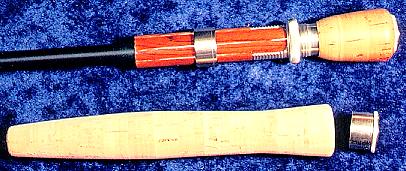
Next, carefully file the inside of the handle, using progressively
larger rat tail files until the handle slides snugly down to the reel
seat. I use a drill set in the reverse direction with the file in the
chuck to do this fast. You need to make sure it is a snug fit that
contacts the blank the entire length of the handle.
With the handle in place, mark the blank where the top of the handle
ends. Remove the handle and scratch the blank with sandpaper where the
handle will be glued. This will ensure a strong bond of the handle to
the blank.
If you're using an uplocking reel seat, you'll have to hollow out a
cavity in the bottom of the handle for the reel seat hood. You can use a
rotary tool and a grinding bit for this task. Be careful to center the
hole and check often to insure the hole is snug to the hood. Once the
hood will slide fully into the bottom of the handle, check the handle and
hood fit to the reel seat. If you did everything right, it should fit
snug in the handle and over the reel seat.
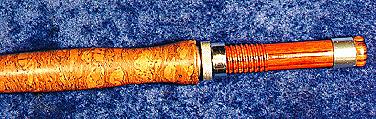
Mix up a small batch of waterproof epoxy and spread it thinly over the
area where the handle will be glued. If you're using an uplocking reel
seat, apply a thin coat of epoxy to the outside edges of the hood cavity
and slide the hood into place inside the cavity. Slide the handle gently
onto the blank, turning it as it slides down over the glue. This will
spread the glue evenly over the blank. Spread a thin coat of epoxy on
the inside of the reel seat hood on uplocking models. Continue turning
the handle down until it is tight against the reel seat. If you are
using a burl handle, turn the handle until the best grain is on top so it
will be visible when the reel is on the finished rod, or line the hood up
on uplocking models.
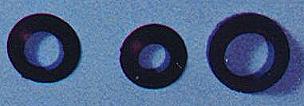
Using a paper clip or toothpick, apply a thin line of epoxy immediately
in front of the handle and slide the winding check in place. This line
of epoxy will glue the winding check to the front of the handle.
Wipe up any excess epoxy with a paper towel before it dries. On
uplocking models, you'll need to clean out the inside of the hood with a
paper towel and a thin screwdriver. If you need to, soak up a little
acetone in a paper towel to clean up any excess epoxy. Be sure to have
proper ventilation when using acetone. Also use care when cleaning the
handle area and wood reel seat barrel so that the acetone won't remove
the finish. Then prop the rod blank in a corner and allow it to dry
overnight.
Next week we'll start working with the guides. Until then have fun and
catch a big one. ~ Al Campbell
|
