The Rest Of The Components
by Al Campbell
Now that you've decided on the rod blank, you still have
to choose the rest of the components. This won't be an easy
task either. The choices seem endless, and the places where
you can get the components
seem endless too. With a little planning, I think we
can whittle the choices down to the right parts for
that new rod.
You need to think a moment on the type of guides you want
to use. Many people want to keep things traditional,
and that's OK. If you want to reduce weight, you might
want to consider going to single foot guides. Single
foot guides cut the guide wrapping in half, thereby reducing the
weight of the rod and reducing the stiffness that two feet
create. If you want the rod to load a little faster, and
you want to maximize the action of the rod, think hard on
single foot guides. If tradition is a bit more important,
or you want to stiffen the rod a bit, think double foot.
Don't forget color, these things come in several colors too.
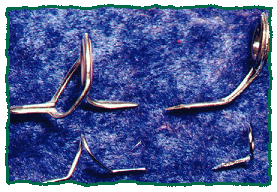
The choice in single foot guides is between ceramic and
wire snake guides. Snake guides are the fine wire guides
on the top half of a traditional fly rod, the others are
called stripper guides. Pacific Bay single foot snake
guides are the light wire guides that G.Loomis uses on their
freshwater rods. Ceramic guides are great for heavy weight
rods where line wear might be a problem. Ceramic is also
a bit slicker, so big rods can cast a line better through
ceramic guides. For light weight rods, wire guides usually get the nod.
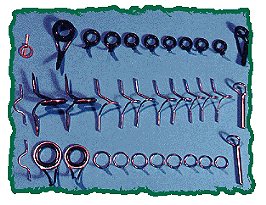
I usually use single foot, ceramic spinning guides in
sizes 12 and 10 as stripper guides. This reduces weight,
cuts down on wraps of thread, seems to funnel the line through the guides
better, and creates a fly rod with a different 'signature'
than the rest. Traditional stripper guides are two foot
casting guides in size 12, 10 or 8. Since this is your rod,
the choice is yours too.
Reel seats are available in a multitude of styles, colors
and prices. Some reel seats use wood or cork barrels (middle
of the seat) while others are graphite or aluminum, and don't have an
independent barrel. Some seats lock the reel into the
bottom of the handle (uplocking), while others
lock it to the bottom of the reel seat (down locking).
Some seats use threaded aluminum or nickel silver
tubes, hoods and nuts to lock the reel into place, and
others use slip rings. Colors include silver,
anodized aluminum in many colors, polished aluminum,
black silver, gold plated, and nickel silver. I've
even seen a few Black Hills Gold reel seats. Heavy duty
rods often have a fighting butt to increase the
pressure on the fish. Some fighting butts are detachable,
others are permanent. Once again, it's your choice.
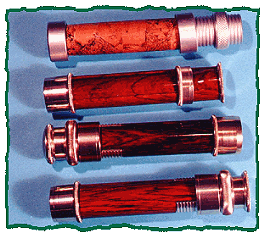
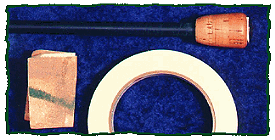
Handles come in a variety of shapes, lengths, and materials.
Although you can purchase foam handles, they don't last,
they kill sensitivity,and I don't recommend them. The most
common fly rod handle is made of cork. If you are buying
a pre-formed handle, your choices are foam and cork. If you
don't mind putting a little extra work into a pretty handle,
you can turn a hardwood handle on a lathe, or shape a handle
out of burl cork. Burl is a highly textured cork that is a
bit harder and heavier than standard cork. It also makes
very pretty handles. (See accompanying pictures.) I'll show you how
to create a burl cork handle in a future issue, so stay
tuned if you want to learn how it's done.
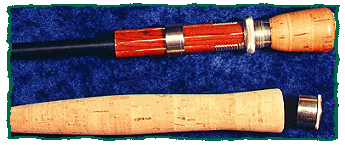
Another thing I associate to the handle is a winding check. This is a
pre-fit piece of rubber or nickel silver immediately in front of
the handle that the thread is butted up against. Nickel silver is
the prettiest type, but it is also the hardest one to buy since it
must be sized precisely to fit the rod blank immediately in front
of the handle. You'll need help from the rod component supplier on this one.
Tip-tops (the guide on the tip of the rod) and hook keepers (the
thing near the handle that you hook the fly to) are important too.
Choose a tip-top to match the style and color of the guides you are
using. You can also choose between standard and oversized tip-tops.
Most rods use standard sizes. Hook keepers come in several styles
ranging from a loose fitting ring and flip-up models to the standard
light wire model used on most rods.
Thread color is a matter of personal choice. You can buy thread
in dozens of colors, but I usually use garnet and dark green. (Garnet
for brown, gray and black blanks, and green for green blanks.)
Since it will be your rod, it will also be your choice. You
can buy thread in silk, standard nylon and NCP (no color preserver
required) nylon. Some of the prettiest rods I've seen (Sage,
Thomas & Thomas, Winston) use standard nylon and apply the finish without
color preserver. This allows the thread to become transparent
and show the guide foot. Color preserver keeps the true color
of the thread. If you want bright colored wraps, use NCP thread
or color preserver over silk or standard nylon thread. For 99%
of the fly rods you might want to build, the right thread
size is A. Never, and I mean NEVER use sewing thread to wrap a
guide. It simply looks like doggy do-do, and won't hold the
guide as well as rod wrapping thread will.
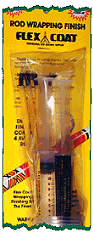
To complete the thread wraps, you will need some type of rod finish
(thread epoxy). There are many companies that make rod finish,
but you're likely to only see three brands. The three most common
brands are Flex Coat, U40 and Gudebrod. All three of these
companies produce fine finishes that will last a long time
without cracking, peeling or yellowing. You will also have
to choose between thin (two coats) and thick (one coat) types
of finish. I prefer two coats of thin finish to the single coat
finish. Two thin coats provide a smoother and glossier finish
than the thick finishes do. For simplicity, you can buy a finish
kit that includes the rod finish in easy to dispense tubes, brushes,
mixing cups and stir sticks.
Wait a minute, we're not done yet. You will need some strong
waterproof epoxy for gluing handles,
reel seats and fighting butts together and to the rod. You'll
also need a sheet of 200 grit sand paper (more grits and sheets
if you build your own handle), a roll of 3/8" masking tape, a
drinking straw (for removing bubbles in the finish) a box of
Kleenex and a small bottle of acetone (for cleaning up messes).
An old plastic breakfast bowl or tea cup is handy for holding
the rod finish. It needs to be wider than a small cup to let
the bubbles rise to the top and dissipate.
For attaching the guides, you'll need a tape measure, super glue,
elastic string, a school compass and a small piece of wax. Hot
glue type ferule cement is required for the tip top. You will
need some kind of motor for turning the rod while the finish dries.
Some folks might have an old barbecue rotisserie motor, but the
majority will need to purchase a motor and stands or borrow them
from a buddy who builds rods. For wrapping the guides, you'll
need a razor blade, small scissors, some kind of a stand to hold
the rod (homemade works fine) and a thread tensioning device (a sewing
machine thread tensioner or a big heavy book can be used here).
For that personal signature, you'll need a craft pen from a
stationary or craft store. You'll also need gold, white, copper
or silver paint (model railroad paint or Testors will work), and
a steady hand. Good lighting is important too.
Next time we'll look at the many places where you can buy
all this fun stuff. See 'ya then. ~ Al Campbell
|
