Signing Your Rod and Applying the Finish
by Al Campbell
Hopefully your new rod is starting to look like the dream rod
you've always wanted.Ā We're almost finished, but the next
steps are just as critical to a good looking fly rod as the rest
have been.Ā Don't get in a hurry now, just take your time and
it will turn out right.
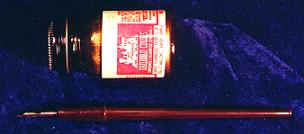
Before you apply the finish to the rod wraps, it's a nice
touch to add your personal signature to your new fly rod.Ā
For this, you'll need a marking pen and some paint.Ā
Model railroad and model car paints work very well for
rod signing.Ā I prefer gold or silver colored paint,
but this is your rod so you get to choose the color.Ā Who knows,
you might prefer to do each letter in a different color.Ā You
can use any color you like, you're the one who will ultimately
have to live with your choices on this one.Ā Marking pens can
be obtained at an office supply store, a craft store or through
a rod building supply outlet.
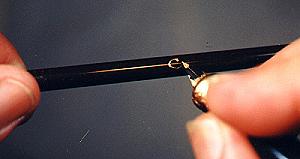
You might want to make a couple of practice
signatures on a steel rod or an old fly rod if you have one laying
around.Ā Signing your name to a rod isn't as easy as it might
appear.Ā For those of us who make mistakes, thank goodness
for acetone and paper towels to erase them.Ā Use your rod stand
to steady the rod while you sign it.
Be sure to include all of the rod information
like blank manufacturer, line weight and length if it isn't already
printed on the rod blank.Ā If the rod ever breaks, you'll need this
information to obtain a replacement section.Ā Oh, don't forget to
sign your name, this is what making your own custom rod is all
about, personalizing it to your tastes and placing your name
on your finished creation.
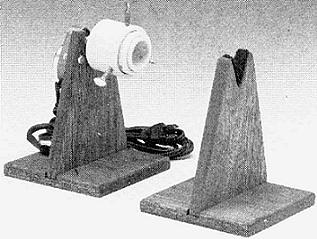
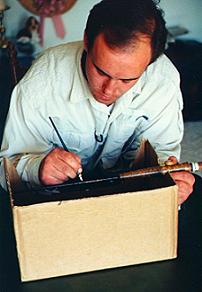
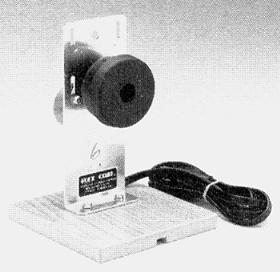
After the paint has dried, you'll need to
place the rod in a stand and attach the reel seat or butt to a
drying motor.Ā If you didn't buy a drying motor, you can make
one from a barbecue rotisserie, some PVC pipe and a few
wing bolts.Ā You can't get the finish to dry evenly turning the
rod by hand, so be sure to use some type of motor that turns
the rod between three and thirty-six times a minute.ĀĀ If you're
using a cardboard box as a stand, tape a paper towel to the
rod where the box will be supporting it so the finish of the rod
isn't scratched by the box.
Put all of the rod pieces together and
line them up with each other. When you have the entire rod
level, supported by some type of stands and attached to the
drying motor, you can think about mixing the finish for the
rod, but not before then.
If you want the thread wraps to keep their
true color, you'll have to paint them with a commercial thread
sealer (color preserver).Ā Be sure to use at least two coats of
color preserver so the finish won't have a chance to seep behind
the thread and discolor it.Ā If you prefer transparent wraps like you
see on many fine commercial rods, or if you used NCP thread,
forget the color preserver. Personally, I never use color preserver,
but those who do decorative wraps on their rods must use it to
preserve the true color of the wraps.
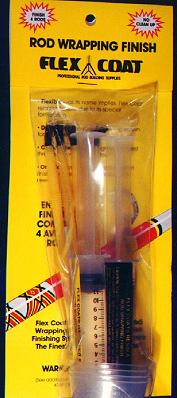
Rod finish comes in several styles and many
brands. The types of finish you're likely to encounter are thick (one
coat) and thin (two or more coats).Ā Thick finish is popular because
you only have to apply it one time, but it's more likely to have bubbles
in it, and it turns yellow faster than thin.Ā Thin finish is less likely to
create bubbles, but you have to apply two coats, and it will drip if
you don't keep the rod turning at least 6 revolutions per minute.Ā
Personally, I use thin finish because it results in glass smooth
guide wraps. Beginners usually find thick a little easier to use;
the choice is entirely up to you.
When you're absolutely sure you're ready,
mix the finish in a plastic or glass cup (since most rod finishes
are two part, I'm assuming yours is too).Ā If you purchased a
finish kit, cups and brushes will be supplied, if not, here's a
warning; never mix rod finish in a wax or paper cup, it just
doesn't work well, and the finish won't cure properly.Ā Mix it
very thoroughly for at least two or three minutes (it won't cure
evenly if it isn't mixed right).
When the finish is thoroughly mixed, pour
it into a small bowl or a wide cup.Ā This will allow the bubbles to
rise to the surface and dissipate. Turn on the drying motor and
grab a small paint brush.Ā Start 'painting' the finish onto the wraps,
starting with the tip-top and working your way to the handle.Ā Use
the drying motor to turn the rod so you only have to hold the paintbrush
steady.
Don't paint the finish on too heavy, that would
only result in funny looking guide wraps.Ā Apply just enough finish
to completely cover the thread wraps; no more than 1/32" beyond
the thread on any guide.Ā You'll have to work fast to apply the finish
before it starts to set and get thick, but don't get careless.Ā You
won't get second chances with the finish.
If you're using a thin type of finish, you'll have
to wait until the first coat is dry and repeat these steps.Ā It's
especially important not to gob the finish on when using thin
finish; you'll have to apply a second coat over the first one.
Try to keep the thickness of the finish consistent between
guides.Ā
Once you have all of the guides coated,
go back and look for bubbles in the finish.Ā You can pop most
bubbles while the finish is liquid by blowing gently through a
drinking straw on the bubble.Ā If that doesn't work, a touch of
flame from a butane lighter will pop it.Ā Don't scorch the finish
with the lighter, just getting close to the bubble usually works.
If you missed any tags of thread before
you applied the first coat of finish, you can cut them off with
a razor blade after the first coat is dry but before you apply
the second coat.Ā The second coat of finish will hide the error
so well you won't be able to find it.
Always check for fuzz and anything else
that's not right before you apply any coats of finish.Ā Another
hint be careful not to get finish on the guides, it's hard to remove
and it looks like a second rate job at best
Be sure to allow the rod to dry at least a
day before you put a line on it and cast it.Ā It takes that long for
the finish to get hard enough to withstand the line running across it.
Hey, you're done!Ā How does it look?Ā I built
six rods during this series, most of them for customers.Ā One of the
rods was built on a Gatti blank and it's now my own personal rod.
Ā Next week I'll review a few steps with you and show you some
pictures of my new rod.Ā Until then, I'll be playing with my new fly
rod.Ā It casts better than any rod I've ever owned.
~ Al Campbell
|
