Assembly of the Reel Seat
by Al Campbell
The reel seat is an important part of your fly rod. This is the
thing that holds the reel to the fly rod. If you've had the misfortune
of owning a rod with a reel seat that was always working loose, you know
how important a quality reel seat can be. Choosing the right reel
seat for the intended job is important too. Some reel seats were
designed to be used on light creek rods, and some were created
for the stress of two handed saltwater use. You'll want to select
the right reel seat for the type of fly rod you're building.

Proper assembly of the reel seat is just as important as selecting
the right seat. One day on the Bighorn River in Montana, I noticed
a fisherman slicing, with his fly rod, at the guide who was
trying to row the boat and keep from getting hit. They pulled
up to the island I was eating lunch on and prepared to duke it out
over some misunderstanding they had over a fly rod. Being the
nosy person that I am, I decided to get involved.
It seems the client had a very expensive fly rod made by the company
this guide service was affiliated with. The reel seat of this
client's twenty-five-year-guaranteed rod was in several pieces
in the bottom of the boat, the client was ready to draw blood
on anyone who was affiliated with that rod company, the guide
was ducking and running, and the other client was just standing
there with a stunned look on his face. To make matters worse,
the rod had been sent back to this company twice to get the
problem fixed, but it was broke again.
Fortunately, I always carry a stick of hot glue and a lighter
in my vest. A little scraping with a hook file and a little
glue were all it took to temporarily fix the rod, settle the client down,
and get the island and my lunch back to myself. I even got a
free Dr. Pepper for my troubles. The point of this story is
that it's very important to assemble all of the components
of your fly rod with the utmost care if you want it to perform
flawlessly in the years ahead.
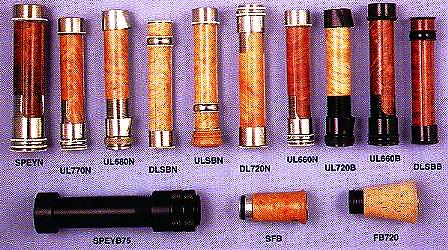
Reel seats come in several styles. Some are 'uplocking', meaning
the reel is locked into the butt of the handle. This design
is nice if you want to use a reel that is a bit heavy or large.
Some are 'downlocking', meaning the reel is locked downward to
the butt of the reel seat. This design is nice if you are using
a light reel and want to achieve a proper balance between rod
and reel. Several designs use sliding rings that let you choose
between uplocking and downlocking or something in between. Some have
a large inside diameter and are designed to be used with a fighting
butt on a heavy rod. Still others have a small inside diameter
and are designed for light freshwater use. You'll need to choose
the one that best fits your needs.
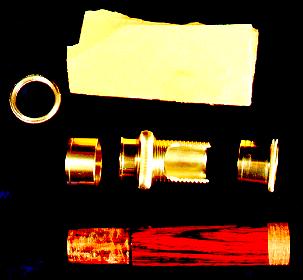
The first thing you need to do with your reel seat is to make sure
it fits over the butt end of the rod blank. If you chose the reel
eat properly it should, but there's no room for mistakes here,
so check it first. Next, you need to lightly sand any parts
of the reel seat 'barrel'that will be glued to the reel seat
hardware. The barrel is usually made of finished wood, and
you must rough up this finish if you want the glue to hold.
Be careful to only sand the parts that will be hidden from
view, you don't want to scratch up a pretty piece of wood
by being careless.
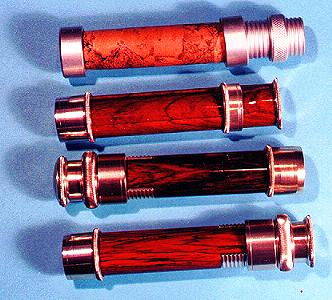
If the barrel of the reel seat is round, check it for grain.
You will want to make sure the prettiest grain is on top so it
is visible when the reel is attached to the finished rod.
Some reel seats are 'channeled' for a close reel fit. You
won't have a choice of grain with this type of reel seat, but the
reel will probably fit in the reel seat better.
Assemble the reel seat several times before you glue it. This
will help you get familiar with the assembly, and will give
you a chance to identify exactly how the reel seat should fit.
If the reel seat has a loose sliding ring, tape it to the barrel
with a small piece of masking tape to prevent it from sliding into
the glue during the gluing process. This will also get it out
of your way during assembly. Look things over carefully. You
want to be sure you have everything right before you glue it into place.

Next, mix up a small batch of slow drying, waterproof epoxy. Make
sure you use waterproof epoxy, the fast drying type is usually
not waterproof and will fail you at the most inopportune time.
I use a type of epoxy that is rated in tons, and is guaranteed
to be waterproof. It takes about two hours to become tack free,
and overnight to achieve maximum strength.
 Carefully glue and align the reel seat components. If you are
using an uplocking seat, don't glue the hood that goes into the
handle yet; you'll glue this part when you glue the handle on the rod.
If you need to, you can hold things in place with masking tape,
but gravity will probably be sufficient.
Carefully glue and align the reel seat components. If you are
using an uplocking seat, don't glue the hood that goes into the
handle yet; you'll glue this part when you glue the handle on the rod.
If you need to, you can hold things in place with masking tape,
but gravity will probably be sufficient.
It's wise to have a supply of tissue on hand to wipe up any spills
or to clean up any places where you applied too much epoxy. A tissue
lightly soaked in acetone will remove any sticky epoxy from the places
you don't want it to be, like the reel seat barrel or your fingers.
Take it easy with that acetone, it can remove the finish from the
wood barrel if you're not careful. Make sure you have plenty of
ventilation too. Sniffing acetone can cause brain damage and
other harmful side effects that could lead to bait fishing. How
would you explain a sudden fetish for stink bait to your friends?
Enough of that! A special thanks to Anglers Workshop for the use
of the first two pictures in this week's article. Next week we'll
glue the reel seat and handle to the rod blank. See ya then.
~ Al Campbell
|
