Creating Your Personalized Fly Rod Handle
by Al Campbell
Fly rod handles can be as personal as you want to make them. If you
look in the catalogs, chances are you'll find more handle types than
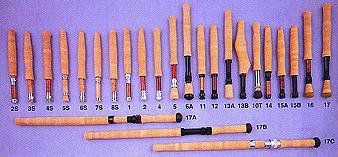
you thought were possible. For instance, here's a look at the
handle selection in the Anglers Workshop catalog. If you want
to take it a step further, you can create a handle that fits the contours of
your hand and looks nicer than any you'll find in a catalog.
It doesn't take a lot of work to make your own handle. You might
have to do a little bit of shopping at the hardware store for some
of the materials you require. If you have a lathe that accepts a drill
type chuck, great. If you have a rod lathe, it's even better. You
don't have any of these things? No problem, a drill will do the job.
With a little creative thinking, you can turn a drill into a handle
lathe in no time.
The first thing you'll need to create a handle is some cork. I like
to use burl cork, a type of cork with swirls of dark color. This
is a hard cork with an inconsistent grain, but it makes beautiful handles
that will give any rod a custom look. You can purchase burl rings at
Anglers Workshop, Bob Marriott's and many other cork suppliers. Be
sure to purchase twice as many cork rings as the handle's length in
inches will be, they come in 1/2 inch thickness.

You can glue the rings to the rod blank, but you'll need a rod lathe
to turn your handle if you do. Most people form the handle off the
rod, and then fit it to the rod after it's formed. It's your decision on how
you want to do it. For now, I'll show how to create a handle off the rod.
You'll need a cork ring clamp. You can fashion one of these tools
from a 12 inch threaded rod that's 1/4 of an inch in diameter. In
addition to the threaded rod, you'll need two large washers and two wing
nuts that will fit the rod.

While you're at the hardware store, pick up some Weldwood Plastic
Resin Glue. I've tried dozens of types of glues over the years,
but the Weldwood glue you have to mix yourself is the best cork glue
I've used. You'll also need to pick up a 12 inch section of smooth
1/4 inch steel rod to insert in a drill so you can turn the handle
while you sand it. Oh, don't forget 60, 100 and 320 grit sandpaper
for sanding the handle into shape.

You'll need some type of cork filler and sealer when you get the handle
sanded to the shape you desire. U40 Cork Sealer is an excellent
sealer that's available from most rod component catalogs. I've also
used water based polymer sealers that you can find at the hardware
stores with good results. The best filler for burl cork that I've
found is walnut colored wood filler, (almond color for regular cork);
also available at the hardware store.
The first step in creating your custom handle is to glue the cork rings
together. First place a washer and one wing nut on the threaded rod,
leaving enough room to attach a drill to the end of the rod. Mix
the plastic resin glue to a consistency slightly thinner than regular
wood glue. Slide one cork ring down the threaded rod until it is
resting firmly against the washer. Apply an even coat of glue to
one side of each cork ring and slide the ring down to the previous
ring. Repeat this process until all the rings are glued together
and stacked on the threaded rod. Slide the other washer on the
rod and secure it tightly with the remaining wing nut. If glue seeps out
of the joints and the wing nut is hard to turn, you have the clamp
tight enough.

You will need to place the clamped rings in a warm place to dry
for at least 12 hours for firm glue joints. If you have glued
the rings properly, the joints should be stronger than the cork rings.
Once the rings have dried, remove one of the wing nuts and washer.
Using a drill attached to the other end of the threaded rod,
reverse the drill's direction and turn the cork 'blank' off
the threaded rod. You will now have a handle blank that is
ready for shaping and sanding.
The next thing you need to do is place the handle blank on your
lathe if you have one. If not, balance the smooth steel rod in
your drill, turning it 1/8 of a turn at a time until all the
wobble is removed when the drill is running. Then, slide the
handle blank onto the steel rod. Running the drill will make
sliding the handle onto the rod easier.
Fasten the drill to a solid object to hold it steady while sanding
the handle. If you don't have a way to fasten it, you can squeeze
it between your knees, but this is not as steady as a firmly
supported drill would be.
Start sanding the handle with the coarse sandpaper. Stop the
drill and check the handle dimensions often to insure a proper fit.
If you have a fly rod with a particularly comfortable handle, you might
want to measure its dimensions to make this handle fit the same way.
After you've achieved the approximate shape you want, switch to
a finer grained sandpaper to further define the handle. Keep
switching to finer sandpaper until you have a smooth handle
with the right fit for your hand.

Fill any voids in the handle with wood filler and sand until smooth.
It's easier to sand the wood filler when it is semi-hard than it
is if you wait for it to dry completely. Be sure to use fine sandpaper
and don't sand any more than is needed to remove the excess filler.
After you have filled the voids in the handle and the filler has
dried, you should apply a cork sealer to the handle to prevent any
opportunity for the cork to absorb water or solvents. Sealing the
cork also makes it easier to keep the handle clean. If you use
a polymer type sealer, you will need to apply two coats. A light
buffing with fine steel wool after each coat will smooth the handle's
surface and create the proper surface for a second or third coat
After the sealer has dried, place the steel rod in your drill.
While the drill is turning slowly, remove the handle from the
steel rod. Your handle is now ready to use on a fly rod.
Keep the drill handy; it will be useful when you file the inside
of your handle to fit the rod blank. Next we'll select a reel
seat and assemble it properly. Until then, may your fly line
be tight with fighting fish. ~ Al Campbell
|
