Guide Preparation
by Al Campbell
Hopefully, you've already purchased the guides you want to use. Just in
case you're not there yet, I'll review the choices for you.

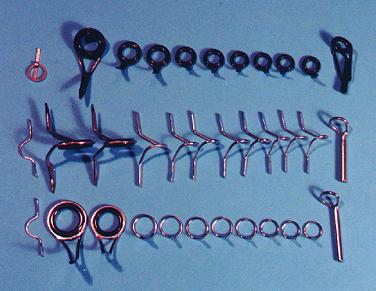
First, there is the traditional guides you see on most fly rods. These
guides have two feet and consist of one or two stripper guides (ceramic
guides closest to the reel) and snake guides (wire guides farthest from
the handle). If you're looking for the traditional look, these are the
guides for you.
Next, you could use single foot guides. I usually use single foot
strippers like the ones you might find on a spinning rod. The rest of
the single foot guides are wire snake guides (made by Pacific Bay).
These guides are lighter and require less thread and finish than
traditional guide sets.
Finally, you could use single foot ceramic fly rod guides. These
guides are unlikely to wear out and usually provide more casting
distance than traditional or single foot wire guides. They also r
equire less thread wraps and finish, so the rod will be lighter
and have a lighter action than rods built with traditional guides.
After you've selected the type of guides you want to use, you need
to select the size of guides you'll be using. Some people like
to use over-sized guides on larger rods, but this isn't always
necessary. If you purchased a kit, the guides will be selected
for you; if not, you'll need to select the right size and number
of guides for your new rod.
For size, I usually use size 12 and 10 stripper guides, and sizes
4, 3, 2, and 1 snake guides. Depending on the type and size of
rod you're building, you might need to alter this size range by
one size, but for 90% of the rods you'll be building, this is a
good size range. I never use an over-sized tip-top unless it is
requested by the customer. I feel over-sized tip-tops look out
of place on the rod, and usually create a slight loss of control by
failing to direct the line to the target properly.
Listed below is the number and sizes of guides I use on most fly
rods. You might want to change this a bit, but for most rods I've
found it to be a good range to work with:

Most guides need some preparation before they are ready to use.
If your guides were delivered with the feet already filed, you are
blessed. Usually the guide feet must be filed on the ends so the
thread can work its way up the guide foot without gaps or skipping.
If you use guides without filing the feet, you're likely to have
spaces in the thread or a tendency for the thread to start wrapping
back on itself when it reaches the guide foot. Neither of the above
possibilities is acceptable if you want a good looking rod with secure guides.
To file the guide feet, clamp the guide in a hemostat or similar device.
This will give you a firm grip on the guide while filing. Using a small,
fine tooth file, carefully file the end of each guide foot. You want
the foot to have a smooth transition from the tip to the main shaft
of the foot. Make sure all of the edges are rounded and smooth and
no burrs are present. Don't forget to check and prepare the hook keeper.
The same rules apply to the hook keeper.

If you use a rotary tool to sand the feet, be careful not to sand too
much or get the foot too hot. Keep in mind the guide and hook keeper
feet are thin and overheat easily. Be sure to use a hand file to remove
any burrs caused by the rotary tool.
Next, you need to check the guide foot for straightness.


|

