Red Quill Spinner
By Dave Hughes
Spinner typically ride the water with their wings
upright at first, then semi-spent, or held at half
mast, after which their energy is exhausted and they
collapse onto the water in the spent position, with
their wings flat in the film. Trout might take them
in any of the three positions, but most are taken
spent, which is the position that is most difficult
for an angler to detect.
It's not uncommon to fish over rises, some of them
vigorous and even splashy, though most merely sipping,
without ever being able to tell what the trout are taking.
This is specially common in the low light of dusk or dawn.
If it happens to you, look into the air for dancing spinners.
If you see none, pin your nose to the water and look for
insects stuck there. Spent spinners can be almost impossible
to see. At times you'll have to suspend a net in the current
and examine its meshes before you'll notice the presence of
mayfly spinners.
Mayfly duns come in a narrow spectrum of colors that can
be condensed to a few repeated themes, with some important
variations. Spinner can be condensed even further. Most
duns, when they cast that final skin, become either reddish
brown or some shade of bluish-gray. It's no accident that
two of the most effective spinner dressings are the old Red
Quill Spinner and Blue Quill Spinner. If you arm yourself
with those two, each in a narrow range of sizes, you'll
have nearly all spinner falls covered.
Materials: Red Quill Spinner
*Hook: Standard dry fly, 1x fine, size 12 to 18
Thread: Brown 6/0 or 8/0.
Tails: Brown hackle fibers, split.
Body: Reddish-brown dyed hackle stem.
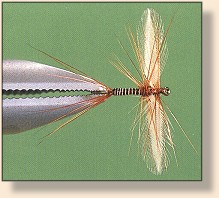
Wings: Light blue dun hen hackle tips, tied spent or semi-spent.
Hackle: Brown, trimmed from top and bottom.
*NOTE: You'll most often find these delicate and low-floating spinner styles listed to be tied on 4X fine-wire hooks, for increased flotation. I have had far too many of those fragile hooks straighten out and release trout, especially the large ones that I'd most like to catch. I never tie with them, and never recommend them. 1X is the finest hook on which I tie trout flies. They float well enough, and they hold trout.
Tying Steps:

1. Fix hook in vise and layer the shank with thread.
Form a small bump of thread at the bend. Select six to
ten long and stiff spade feather fibers, and remove them
from the feathers so their tips are even. Measure them
just a bit longer than the entire hook length. Tie them
in against the thread bump so they are splayed, or split.

2. Remove a pre-soaked quill from a dish. Determine a
tie-in point on the stem that will give you a well-segmented
body without running short of hackle stem. Tie the stem in
at the base of the tail, and wind it forward to a point
one-third the shank length behind the hook eye. Tie it
off and clip the excess.

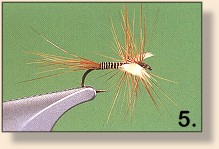
3. Select two hen hackle feathers, each approximately a
hook gap wide. Pair them with their concave sides together,
and measure them the length of the entire hook. Clip all
fibers below that point away with your scissors. Cutting
the excess fibers, rather than peeling them, will make it
easier to tie them in flat, without twisting.
|