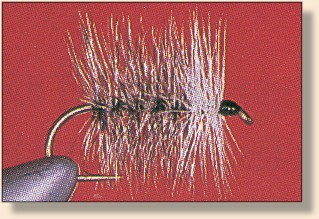
Fly Of The Week
Grizzly Bivisible
Previous Flies
Fly Tying Terms

Grizzly Bivisible
By Dick Talleur

I began tying Bivisibles back around 1960, and I recall having a tough time finding hackle that would accommodate the design. Usually, I had to use two feathers in tandem for the main hackle. Today, a good-to-excellent-quality neck hackle will adequately dress a bivisible. However, if you have a dry-fly-grade saddle . . . I suggest using it. . .You'll be able to tie several Bivisibles from one high-grade saddle hackle.

I should mention that the Bivisible may be tied with or without a tail. If you want to add one, make it the same color as the main hackle and the length of the hook shank.

Materials: Grizzly Bivisible

    Hook:  Daiichi #1180 dry-fly or comparable.

    Hook Size:  For this exercise, size 12 or 14. [publisher's note: this may also be tied much smaller.]

    Thread:  8/0 Uni-Thread on comparable; black.

    Tail:  Optional, same as main hackle.

    Main Hackle (Rear 3/4):   Saddle, grizzly or high-quality cape hackle.

    Front Hackle (Front 1/4):   Either saddle or cape, white.

Tying Steps:


Step 1. Tie on about 1/3 of the shank length behind the eye, and make very neat, contiguous wraps to the bend. An aid in making contiguous wraps is to not trim off the tag of the thread but instead hold it tightly with your left thumb and forefinger at about a 45-degree angle. This coerces the wraps into neatly aligning. When you're within a few turns of the bend, trim off the tag.


Step 2. Now for sizing the main hackle. I suggest you do this before you remove the feather from the pelt. If you have a hackle gauge, use it. If not, hold the feather near the gape of the hook, so that you can "eyeball" the proportions. Remember, you're looking for barbs that are about equal to the gape in length in that portion of the feather that will be used to form the hackle, as barb length can vary throughout the length of the feather. Very high-grade saddle hackle can be a bit deceptive in the sizing process because the extra-long barbs resist standing out perfectly straight when the quill is flexed. When the feather is wrapped around the hook, the barbs will fully extend. This phenomenon needs to be taken into consideration when judging size. As a rule of thumb, a high-quality saddle feather will come out one hook size larger than it appears when merely flexed for sizing.


Step 3. Take hold of the feather near the butt and pull it off the pelt. Strip materials off the butt end until you encounter quality hackle. With top-quality saddles, dry-fly hackle may start almost at the butt end and continue throughout. If soft stuff runs well up the feather, though, simply cut back nearly to where the good material begins and start stripping from there. Do one side at a time to avoid breaking the quill. Don't "flare" the hackle, as is commonly done for wet flies; this is not good for the health of dry-fly hackle.

Step 4. Tie in the feather by its butt end, beneath the hook, at the rear, pretty-side-forward. Important: Leave a tiny bit of bare quill exposed. This allows the quill to rotate into a 90-degree attitude to the shank before barbs begin peeling off, which guards against having the first half-turn lie at a rearware angle. You want the hackle to stand out at just about a right angle to the shank. Then wrap the thread forward with neat, contiguous wraps, binding down the quill as you go. When you've reach a point about 1/4 shank length rearward of the eye, stop and trim off the tag end of the quill.


Step 5. Pick up the feather and start wrapping. If you're using one of those long, good-quality saddle hackle, you won't need hackle pliers. Each turn should lie contiguous to the one before. Be sure to keep the pretty side of the feather facing forward; this is very important. If you're wrapping by hand and the feather becomes too short to grip comfortably, attach your hackle pliers and continue. Ain't dry-fly hackling fun?


Step 6. When you reach the thread, tie off the feather. If you have good, stout hackle pliers, you may wish to use them now - whether or not you used them in the wrappings - as they'll help you tie off hackle feathers. Clamp them onto the feather as shown, and let their weight maintain tension on the quill. Work the thread in among the barbs and take four or five very firm thread wraps behind the feather to bind the quill to the hook shank. Try not to tie down any barbs if you can help it.


Step 7. Trim off the rest of the feather by cutting the quill. If there's enough feather left for additional flies, do this carefully. With today's saddles, it's not uncommon to get several flies from a single feather.

Step 8. Select a white feather with the same length of barb as the main hackle feathers. It can be either a cape or saddle feather. Prepare it exactly as you did the grizzly, and tie it in beneath the hook shank in suck a position that the first turn will abut the last turn of the grizzly. Remember: pretty-side forward, and keep a tiny length of quill exposed.


Step 9. Advance the thread to the eye, then back two or three turns. Wrap the hackle forward as you've been doing and, when you reach the thread, tie it off as you did the first hackle, and trim the excess. Secure it with a few firm housekeeping wraps, whip-finish, and lacquer. ~ Dick Talleur

Credits: This fly is an excerpt from Basic Fly Tying, published by the Lyons Press which was previously reviewed here.

For more great flies, check out: Beginning Fly Tying, Intermediate Fly Tying and Advanced Fly Tying.


[ HOME ]

[ Search ] [ Contact FAOL ] [ Media Kit ]

FlyAnglersOnline.com © Notice