Hook: Mustad 94840, #10.
Thread: Thread - Danville 6/0, olive.
Tail: Crystal Flash, red.
Abdomen: Haretron, medium olive.
Wing: Deer hair, dyed light olive.
Legs: Medium rubber, Olive.
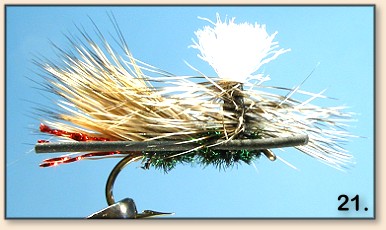
Post: Yellow Widow's Web.
Hackle: Dun Grizzly.
Thorax: Hare's ear, dark olive.
1. Pinch the barb and mount the hook in
the vise. Prior to attaching the thread
to the hook, slide a short length of plastic
soda straw over the tube of the bobbin. The
straw will be used during a later step to
hold the rubber legs and wing out of the way,
while building the post and wrapping the hackle.
Attach the thread at the 60% point of the hook.
The point of attachment marks the transition
between the abdomen and thorax.

2. Dress the rear portion of the hook. Tie
in the crystal flash at the bend of the hook
and trim to a length slightly shorter than
the length of the hook shank.

3. Wrap the tag ends of the crystal flash and
return the thread to the bend in the hook.
Clean and stack one bunch of deer hair. Measure
and trim the hair to length. The correct length
for each bunch of hair is the distance from the
bend of the hook to the end of the tail plus the
butt section. Tie in the hair at the bend of the
hook.

4. Secure the hair with tight thread wraps
through the hair butts. Dub the thread and
wrap dubbing over the hair butts.


5. Repeat steps #3 and #4, tying in a second
bunch of hair and wrapping and dubbing over the
hair butts.
6. Repeat steps #3 and #4 again, tying in a
third bunch of hair and wrapping and dubbing
over the hair butts.
7. Tie in a fourth bunch of hair and wrap over
the hair butts. Dress the front portion of the
hook shank and return the thread to the base of
the wing. Do not dub the hair butts at this stage.

8. Tie in rubber legs on either side of the
hook shank and immediately in front of the wing.
Leave the front legs long. Wrap dubbing over
the tie in point and complete the abdomen with
a couple of dubbing wraps immediately in front
of the rubber legs.

9. Slide the piece of straw up the thread and
over the eye of the hook. Pull the rubber legs
rearward and slide the piece of straw over the
legs and wing.

10. Select a strand of Widow's Web. The size
of the strand should be half of the diameter of
the completed post. Hold the strand parallel
with the hook shank and tie in the strand
immediately in front of the legs. Secure Widow's
Web by alternating thread wraps in front, behind
and between the two halves of the post; repeat 3
times. Pull the front and rear portions of the
strand upright and together. Build a thread base
by wrapping the lower portion of the post. Trim
the post to a height equal to the length of the
hook shank.


11. Secure hackle to the shank, immediately in
front of post, with the feather trailing off to
the near side, toward the rear of the hook and
shiny side up. Bind the hackle to the post with
spiral wraps up the post. Take a locking wrap
to secure the hackle stem at the top of the post
and spiral the thread back down to the hook shank.
When tied in properly, the shiny (convex) side
of the feather should be flush against the post
and a short length of bare stem should extend
above the locking wrap. This set up will
facilitate a clockwise wrap of the hackle and
the hackle should wrap shiny side up.


12. Dub the thorax. When the thorax is complete,
the final wrap should leave the thread immediately
behind the post. Leaving the thread in this
position will make it easier to secure the
hackle without trapping stray hackle barbs.

13. Wrap the hackle beginning at the top of
the wrapped portion of the post. Make several
clockwise wraps of hackle, with each wrap under
the preceding wrap. Clockwise wraps are
important because, for a right handed tyer,
the whip finish will also be accomplished with
clockwise thread wraps. For this pattern, I
prefer a full hackle, typically seven wraps
of hackle. The final wrap is complete after
the hackle has been wrapped around the front
of the post, with the tag end coming of the
near side of the hook. Pull the hackle tight,
while securing the hackle with two clockwise
thread wraps around the post. Use simultaneous
tension on the thread and the hackle to ensure
a tightly wrapped parachute.

14. Whip finish on the post. Be careful to
take each thread wrap under all of the hackle
barbs. I make a 3-turn whip finish before
trimming the tag end of the hackle. Then,
make a second whip finish. With a double
whip finish, it is not necessary to glue
the finish knot.

15. Slide the piece of straw off the rear
of the hook. Trim the front legs to the
length of the hackle.

The pattern could be tied with double legs
on a streamer hook to imitate larger hoppers
or stoneflies.
The pattern could also be tied as a variation
of a gray hackle peacock.