Hook: Tiemco 7999 #6.
Thread: Red Uni-Thread 6/0.
Tag: Flat silver tinsel.
Butt: Peacock herl.
Body: Hareline, STS Trilobal, Red.
Ribbing: Green, UTC Utra Wire,
size: medium.
Underwing: Florescent white Calf
tail with strands of multicolor holographic flashabou.
Overwing: Red marabou barbs, topped
with green marabou barbs.
Cheeks: Jungle Cock.
Throat: Peacock herl.
Head: Red Uni-Thread 6/0, topped
with Loon's UV Knot Sense.
1. Place hook in vise and tie in thread
approximately Ľ inch behind the eye. Wrap
the thread back to the hook bend, just above
the barb of the hook.
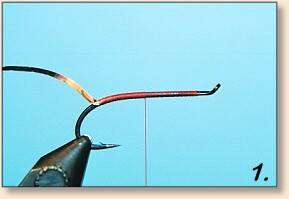
2. Tie in a single strand of flat silver
tinsel, and then wrap the thread forward
in tight touching wraps, approximately Ľ
inch or so. Wrap the tinsel forward about
a Ľ to a ˝ inch. Tie it off and clip excess.

3. Tie in one strand of Peacock herl and
make about 3 to 4 wraps forward. Tie it
off and clip excess.

4. Wrap thread forward to your "thread
tie-in point". Tie on a piece of medium
sized green wire for the ribbing, then
attach the wire to the underside of the
hook by wrapping the thread back to the
peacock herl butt.

5. Spin the dubbing onto the thread and
create the body up to the "thread tie-in
point". Then rib the body in wide, even
symmetrical wraps with the wire. Tie off
the wire with 3 or 4 tight wraps of thread
and clip excess.


6. Tie in the "underwing" of florescent
calf tail hairs, trying to make it as
uniform as possible, and not too bulky,
on the top half of the hook, with the hairs
extending to just barely beyond the bend of
the hook.

7. Once the calf hair is tied down and
secured, clip excess and attach about
6 - 8 strands of holographic flashabou,
dispersed evenly over the hair with about
3 to 4 tight wraps of thread. At this point,
I place a small drop of head cement over the
tie-in point of the hair and flashabou to keep
it from twisting around the hook.

8. When the head cement is semi-dry, attach
8 - 10 long red marabou barbs, dispersed evenly
over the calf hair and top half of the hook,
extending just past the tips of the hair. Clip
excess.

9. Once you have the red marabou tied in,
and in place where you want it, tie in the
green marabou barbs over the red. Try to
disperse it evenly but be very sparing with
it because the green will most definitely
overpower everything. Secure them with tight
even wraps of thread and clip excess.

10. Pick out two symmetrical Jungle Cock
feathers and trim off the fuzz with your
scissors. This leaves some short barbs on
the stem, which helps hold the feathers in
place when you tie them in.

11. Tie in the Jungle Cock feathers on
each side of the fly, trying to keep them
as symmetrical as possible and with the tips
even with the ends of the calf hair. Secure
them down with several tight wraps of thread
and clip excess. At this point, I again place
a drop of head cement over the tie-in point to
keep everything from twisting around the hook.

12. Attach a strand of Peacock herl to create
the neck and make about 4 to 5 wraps forward
to the eye of the hook. Leave enough room to
the eye of the hook so you can create the head.
Tie off and clip excess.

13. Spin your thread clockwise to create a
rope with the thread, and make multiple wraps
back and forth from the eye to the Peacock
herl neck to create a nice tapered head of
the fly. Whip finish and clip thread. At
this point I use "Loon's UV Knot Sense" to
make a nice glossy head, but if you'd prefer
to use Epoxy, that's entirely up to your
preference.


