
 |
|
Copper John
|
|
 1. Place bead on hook.
 2.With the bead in place, wrap three turns of .020 ga lead wire as shown.
 3. After trimming the lead, slide/push the wraps into the bead hole. Three wraps fill a 1/8" bead almost flush to the outside edge of the bead. A drop of cement here is a good idea.
|
|
 4. Once the lead is in place cover the hook shank with thread in an even and tapered manner. I like "Ultra" thread or any other that will flatten. Uni-Thread or other round threads will not flatten.
 5. Here I have slipped two biots that are aligned "opposed" up to the hook shank. The shank separates the two biots. The tail length should approximate the hook gap.
 6. I have changed hands and now have pinched the biots in place for the tie in. Note the thread is in the shank center.
|
|
 7. The biots tails are tied in and ready for trimming.
 8. Tails are trimmed and the tapered thread body is enhanced and maintained. Note the thread is at the bead.
 9. Here the end of the Medium Copper body wire is placed _under_ the hook shank and up against the bead. We want to bind the wire in on the bottom of the hook shank.
 10. Work the thread back toward the hook bend tying in the wire.
|
|
 11. Secure the wire firmly here at the body end point. You could "kink" the wire with your thumb nail here to start the winding process.
 12. Completed wire tie in. Leave the thread hanging right here.
 13. The first five wraps...Note the thread is advanced underneath along with the wire turns.
|
|
 14. When you wrap the wire, do so with each wrap a bit on top of the prior one in as much as the wrap slides forward off the prior wrap. This ensures a close wrap. Andy Burke suggests the thread applies some pressure to the wire, helping it align closely. I tend to agree and find this method works better than having the thread forward and out of "play" so to speak.
 15. Wrap the wire up snug to the bead or as close as you can.
 16. Trim by rapid flexing of the wire and cover the end with thread. Try and maintain or build the thread height here the same as the wire height at the bead.
|
|
 17. Apply a single strand of pearl Flashabou to the top of the thorax area.
 18. I have, by thread wraps, defined the thorax area. Apply a narrow strip of Thinskin here.
 19. Flashabou and Thinskin tied in.
|
|
 20. Tie in two or three strands of Peacock herl, tip first.
 21. One could and probably should loop the peacock herl to reinforce the thorax...but, I for the sake of brevity, did not. Wrap the herl to form a full thorax area.
 22. Here is a Partridge feather. Find one with nice even tips.
|
|
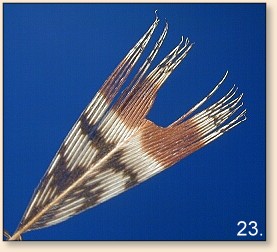 23. Clip the center stem out about one and a half times the length of the thorax. The cut looks "ratty" but hey, it's going to get covered.
 24. Place the feather atop the thorax as shown. The thread is at the base of the bead.
 25. Pinch the feather atop the thorax. We want the thread to maintain the pinch position, so, two loose wraps and then a third tight one will hold the feather in place.
|
|
 26. "Legs" tied in. Fold the waste end of the feather back, place one wrap to hold it back and trim.
 27. With the thread still in the gap between the thorax and bead fold the Thinskin over the legs and thorax.
 28. The Thinskin tied in. Again, fold the unwanted Thinskin backwards and trim.
|
|
 29. Pull the Flashabou strand forward and down the center of the thorax. Tie off.
 30. Completed tying steps.......
 31. The Thinskin thorax as seen from behind. A drop of epoxy is now called for.
|
|
 32. It will not take much. Experiment with quantities before you attempt to dab a bit of epoxy on the Thinskin.
 33. A little dab will do 'ya....Finished. I would tie a half a dozen or more before I'd mix a batch of five minute Epoxy.
 34. The epoxy gives the "wingcase" area a real nice shine. Very Nice fly. Available for sale in my store. ~ Harry Mason (bones) Credits: This fly is just one of many tutorials available on Harry's website, www.troutflies.com. Harry is also a Sponsor of Fly Anglers OnLine. Thanks Harry!
|
|
|
[ HOME ]
[ Search ] [ Contact FAOL ] [ Media Kit ]