 Al's Poly Sucker Al Campbell, Rapid City, SD
|
|
|
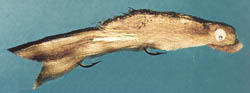
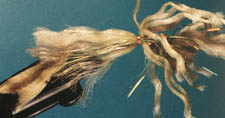
2. Tie multiple strands of poly to the short
hook. Space the colors to look like the natural coloring of a sucker..
3. Comb out the poly and cement, shaping
the tail by hand as the cement dries. Trim tail to look natural.
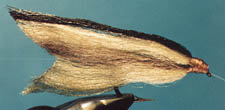
4. Slide bead onto long hook and tie down the
loose end of the monofiliment, attaching tail to the large hook.
5. Tie in multiple strands of poly yarn in
front of bead, near the hook eye, extending over the hook eye.
Layer the color to match the natural when they are pulled back
to form a head.
6. Tie poly yarn to the bottom of the
hook to form a sucker mouth. The method is the same one used
to tie an egg fly. You will trim the mouth later.
7. Tie more poly yarn behind the bead,
some extending forward over the bead, some extending back
toward the tail. Again, space the colors to match the natural
color of a sucker. You can add crystal flash if desired.
8. Whip finish and trim the thread behind
the bead.
9. Comb out the yarn behind the bead.
10. Comb out the yarn that extend over
the bead. Pulling the yarn back, cement and shape by hand
as the glue dries. This will give the fly depth, and the
cement will hold the body's shape.
11. Comb the poly out near the head and pull
back to form head. Make sure the poly covers the bead on both
sides of the hook. Again, use lots of cement and shape the head
by hand as the cement dries.
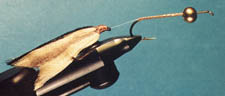
12. Clip short the poly that forms the mouth,
shaping it to look like the real thing.
13. Paint or glue eyes on. If you wish
to add color and markings with a waterproof pen, do so now.
14. Epoxy, hot glue or apply Loon Hard
head finish to the head to make it firm enough to last through
many toothy fish. Smooth the head out as the glue dried to
form a nice looking head. Make sure the glue covers the eyes
too, so they won't fall off or get chipped by teeth.
15. Trim, glue and shape any loose
strands of body material to form a smooth body. Check
that the tail swings freely and isn't bound up by the
rest of the body. This is important if you want the fly
to swim naturally.
For more great flies, check out: Beginning Fly Tying, Intermediate Fly Tying and Advanced Fly Tying.
|

[ HOME ]
[ Search ] [ Contact FAOL ] [ Media Kit ]