Hook: Daiichi 1280 Size #8, or any quality,
2X-Long, 1-X Fine, Dry Fly Hook.
Thread: UNI-Stretch 1X-300 Black yarn.
Cricket body: Rainy's Black Medium Float
Foam (round, coiled).
Wing: Black Polyimide Film-2 Mil, or
substitute using Tyvek film colorized black
with a marker, or use other black films: such
as black, heavy gage plastic drop cloth or
Black Mylar.
Jumping Legs: Crazy Legs
or other suitable terrestrial style legs.
Walking Legs: Perfect Rubber brand black
rubber strands.
Antenna/Cerci: Hollow "Bio Fiber" dyed Black,
or substitute two Moose Mane hairs, or course waxed
thread such as Kevlar.
Prismatic Lens: Lateral Scale Flashabou-Pearl.
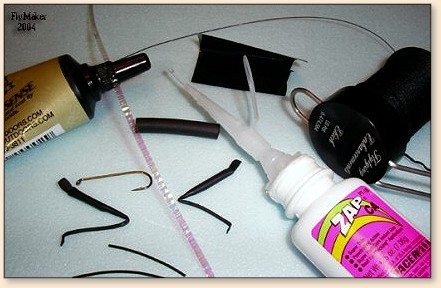
Liquids and Adhesives:
- Zap CA, Super Thin
- Loon UV Knot Sense, or substitute 5-Minute Epoxy.
- 5-Minute Epoxy.
- Fluorescent Dye, Holographic Glitter or
Hi-Viz colorant of choice.
Special Tools/Safety Equipment:
- Vise: Rotary Tying vise, such as
the Dyna-King "Barracuda Indexer."
- UV Curing Lamp/UV Flashlight/UV Pocket
light.
- Alternative: The Sun (mandates
daytime tying process steps).
- Orange UV Filtering Goggles (UV Light can
damage vision).
- Single Edge Razor Blade-Unused.
- Curved Scissors.
- Long Needle Nose Pliers.
Note: Most of the materials needed for
tying the "Electric Cricket" are available from
fly shops. The black polyamide film for the wing
and the hollow "Bio Fiber" for the antenna are
specialty materials. You will likely need to use
substitute materials for these as noted. UV
filtering Goggles can be purchased from a safety
equipment supplier or your Optometrist.
Step One(1) Prepare the foam body.
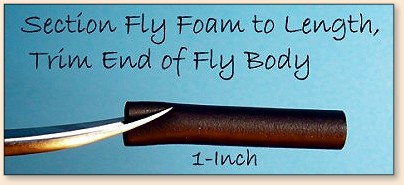
Start by sectioning the coiled Float Foam to provide
a fly body measuring 1-inch in length. Use curved
scissors to trim the ends to a point.
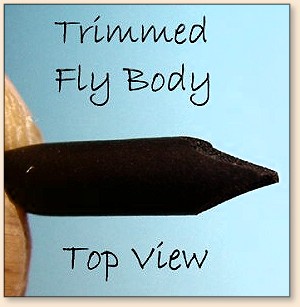
Trim the tail end of the fly body with two scissor cuts.
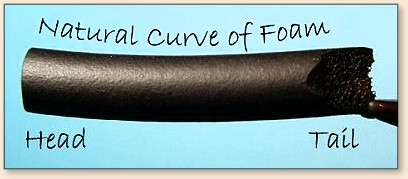
Important Note: The short section taken
from the coil will have a slight curvature.
Orient the foam segment relative to this "curve"
while fashioning the fly body as shown.
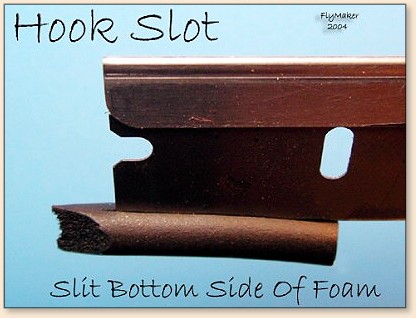
Cut a shallow hook slot into the bottom (convex)
side of the fly foam body. Pinch and grip the
fly body wedge between your fingers and carefully
execute this controlled depth cut using a sharp
(new) single edge blade. The hook slot is
centered on the body.
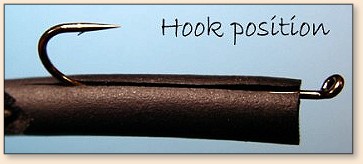
Position the hook in Float Foam body. The hook is
set just below the surface of the foam. The
front-end of the foam body is located one hook
eye length behind the hook eye.
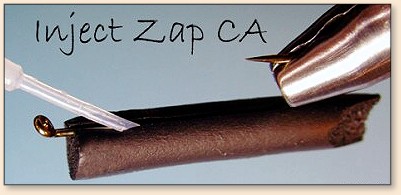
Inject a small amount of Zap CA Super Thin
adhesive into the hook slot. It only takes a
drop or two. The adhesive will quickly wick
along the entire length of the hook shaft.
Working quickly, align the hook vertically in
the hook slot and then clamp the foam body
closed using long nose Needle Nose Pliers.
Pinch the foam closed over the top of the
hook shaft. Hold the foam closed for
approximately 10-12 seconds. Note the Hook Gap.
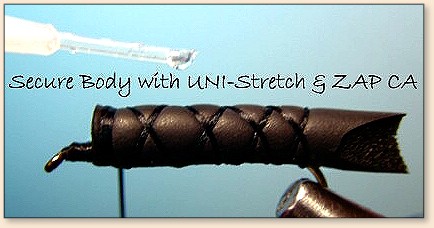
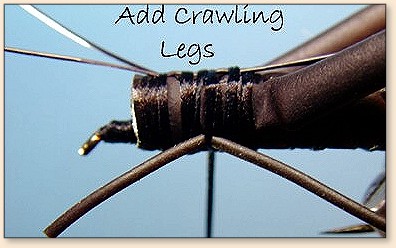
Step Two (2) - Attaching the Legs & Antenna.
Start the UNI-Stretch behind the hook eye. Using
very little pressure, loosely criss-cross the
UNI-Stretch along the foam body. Make four (4)
equally spaced X's. Take a few additional wraps
at the front edge of the head.
Apply a few drops of ZAP CA Super Thin adhesive
at several locations along the yarn wraps. The
UNI-Stretch will amazingly wick the CA adhesive
all around the foam body. This capillary bonding
step secures the foam to the hook and provides a
foundation for tying the rest of the fly. Only
apply enough adhesive to wet-out the yarns.
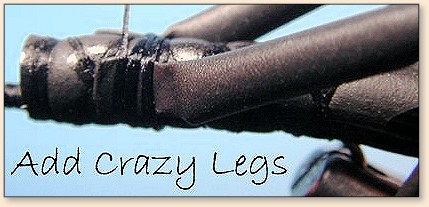
Advance the thread and attach the pair of Crazy
Legs to the foam body using a minimum number of
wraps. You need to conserve weight in order to
keep the fly buoyant.
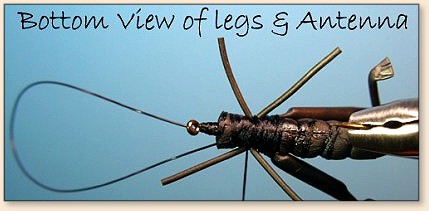
Fold a Six-inch long (6") strand of antenna material
in half making a loop. Orient the looped end forward
and the loose ends evenly aligned and extending 1
inch behind the foam body. Secure the loop with
two loose wraps of yarn. If using Moose Mane, then
add two each, 3 inch long hairs side-by-side.
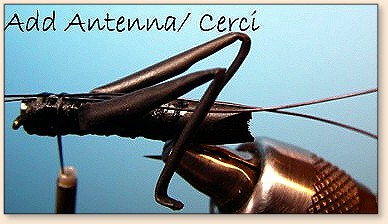
Cut two (2) 1-Inch long strands of black "Perfect
Rubber" leg material for use as crawling legs.
Locate these legs low along each side of the foam
body. Adjust position to make the rear crawling
leg a little longer than the front leg. Apply
enough pressure with the yarn to splay the legs
outwards as shown without crushing the foam body.
Adjust the legs and antenna into their final positions
and secure the yarn build-up with a few more drops of
ZAP CA adhesive.
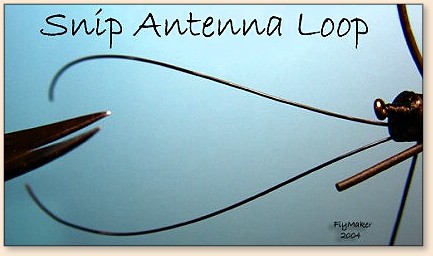
Snip the loop to separate the antennae filaments.
3. Making and Attaching the Wing.
Cut a 1˝ Inch square piece of wing material and
fold it in half. Permanently crease the film.
Using curved scissors, rough trim the wing in
the general shape shown above.
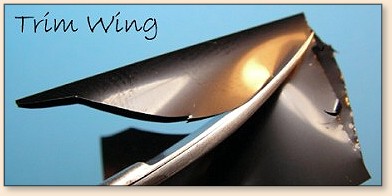
Trim the rough-cut wing pattern into a wing with
smooth edges and the above shape.

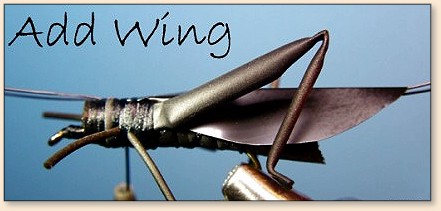
Position wing so that the narrow front portion
sits on top of the head. The wider section of
the wing should nest inside of the Crazy Legs
as shown. Trim the wing as required to fit.
The rear portion of the wing should extend
approximately one-half (˝") inch beyond the
end of the foam body. Secure the wing with a
few loose wraps of yarn.
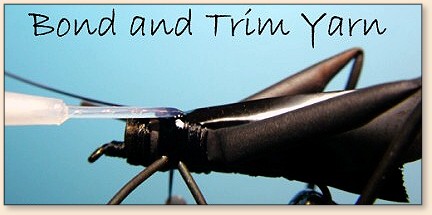
Bond the yarn wraps with a drop of ZAP CA.
Allow the adhesive to harden somewhat. Trim
the yarn flush under tension using the single
edge razor blade. Pat down any loose yarn
fibers into the semi-cured CA adhesive.
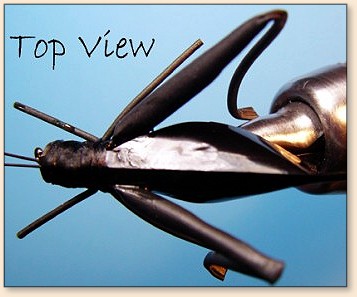
Place a single drop of ZAP CA on the face of
the foam wedge. Using your fingers, lightly
pinch the wing onto the wetted face and hold
until set. Repeat on the opposite side.

Bonding the wing to the rear of the foam body
forms the realistic tapered shape of a cricket's
body. Additionally, the secured wing is now
stabilized to withstand the rigors of fly-casting.
Trim the Cerci evenly as required to extend
slightly aft of the wing.
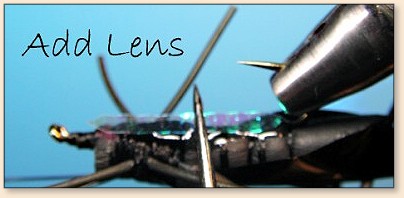
Step Four (4) - Making and Attaching the Prismatic lens.
Section a single strand of Lateral Scale
Flashabou-Pearl to provide a piece approximately
ľ-inch long. Trim the ends into points as shown.

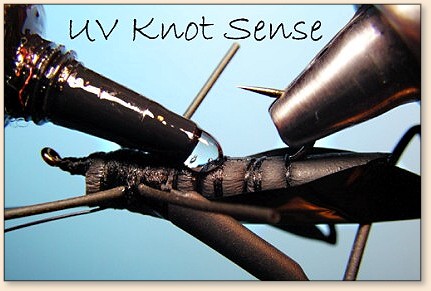
Invert the fly in your vise and apply a single
drop of UV Knot Sense to the underside of the
foam body. You may alternately use 5 Minute
Epoxy if you are not set-up for using the light
activated, instant adhesives. Use a bodkin to
spread the adhesive evenly along the hook shaft
area of the foam underbody. You need to apply
a thin even layer of adhesive. Prevent it from
running down along the sides of the fly.
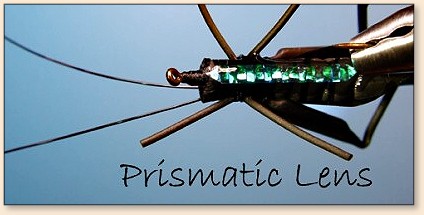
Locate the prismatic reflective material as
shown and use your bodkin to center the "lens"
on the bond area. Press the lens down into the
adhesive and flash cure it in position using a
UV Cure lamp. Note: Protective Eye Wear
Recommended when using UV Lamps.
Overcoat the top surface of the prismatic
reflective material with an addition thin
layer of UV Knot Sense adhesive and cure it.
The Prismatic lens will capture small amounts
of light from varying angles. This effect
creates a very active, fish attracting display
of light as the fly floats and moves upon the
surface of the water. This lens material,
which is based upon diffraction gradient
holography, begets the name "Electric Cricket".
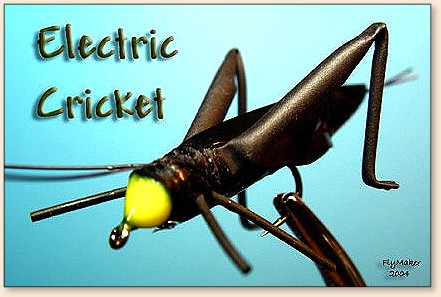
5. The finishing touch- Adding a High Visibility Head.
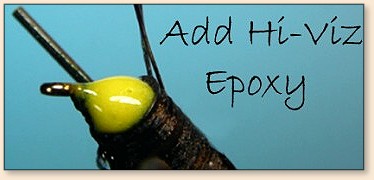
There are several ways to make this black
cricket pattern have more visibility on the
water. I like to use 5 Minute Epoxy mixed
with a touch of fluorescent dye. Alternative
"Hi-Viz" treatments include using a holographic
glitter mixed with epoxy. Another method is
to use Day-Glo paints in place of the epoxy
in treating the front face of the fly.
Mix your Hi-Viz material of choice and apply
it to the face of the Float Foam body using a
bodkin. Control the flow of the material
until it has set. It helps to hold the fly
in a vertical position. Your "Electric Cricket"
is now completed.
Fishing Tips:
-
I throw the "Electric Cricket" with a fast action,
5 WT fly rod on a weight forward floating fly line.
I like using a furled leader and moderately short
tippet to help the fly turnover. I normally use a
3X fluoro tippet on terrestrials this big. Make
the fly presentation known to the fish. Pitch it
with vigor towards a likely fish-holding area; or
better yet, directly to a fish. If the fly is not
hit immediately, then a few twitches and pauses are
all that will be needed to draw a strike if that fish
is feeding. I would recommend pinching down the
barb of the hook to aide in releasing your catch.
~ Richard A. Lewis (FlyMaker)