This fly rod has broken in the center of the tip-most guide. While many rod
builders believe such a break cannot be effectively repaired, and that a replacement
tip section is in order, the fact is that such a break can be repaired and the
section returned to a very usable state.
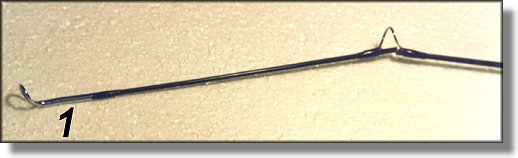
Number 1. The fly rod tip broken in the center of the last guide is a very
common break area. I'm not sure why, maybe the guide was wrapped too tightly
and caused the section to go oval in shape under flex. For whatever the
cause, this is a very common repair area in high modulus fly rods. First we
must remove the guide in such a manner as not to damage or alter the area to
be joined. Not only must the guide be removed, we also must remove all
residual thread finish (epoxy). We must work with a clean section of
graphite in order to obtain a satisfactory splice. This break is quite
clean and all we have to do is a gentle squaring off of the ends. This is
done with a sandpaper block of about 220 grit. The OD of each piece must
match as closely as possible. At this point on the rod, the ID is a
nonentity. OK, now we have two pieces to splice together. What do we splice
it with? Remember that our goal is to maintain the original properties,
therefore we must use the same materiel that is in the rod, right? So we
scrounge up a piece of graphite from an old scrap fly rod and very carefully
fashion a nice fitting sleeve splice, bond it together, and tie the guide in
place. When completed we admire the handiwork and give it a test flex and
promptly break the tip again just forward of the original repair.
What happened?
Our goal is to maintain the 'properties of the rod'; this doesn't
mean that we have to use the same materiel as is in the rod. When we made a
graphite sleeve, we increased the OD of the rod at the repair point. This
increased the "I" moment - stiffness, at that point, and the area on both
sides of the sleeve are subjected to a bending force far beyond their
capability. So if a graphite sleeve won't work on graphite, what do we use?
The answer is simple. Keep in mind that whenever we use a sleeve, we are
increasing the OD of the rod at that point. If we use a materiel of the same
modulus, we are increasing the stiffness to an unacceptable level and
inducing a break adjacent to the sleeve area. The answer is to use a
materiel of LOWER MODULUS so as not to increase stiffness, and that materiel
just happens to be our fiberglass rods. When repairing any graphite section
with an external sleeve, always use a lower modulus materiel. Modulus is
defined as STRESS divided by STRAIN. Think of it as relative stiffness.
Now letąs do our splicing correctly.
SPLICING
We have cleaned the repair area of the two pieces to be spliced, a
micrometer shows us that the two pieces are the same diameter, further
miking shows us that there is very little taper at this point on the rod.
Obtain a piece of fiberglass fly rod tip section, cut it to fit snugly over
the end of the main rod section. You will start the joining with a section
about 1&1/2 inch long. Once you are sure that both pieces fit snugly,
reduce the section by tapering the ends to about a 15 degree angle. You will
want to wind up with an overlap of both pieces of about 1/2 inch, the taper
will consume about 1/8 inch, so your structure is about 3/8 inch overlap on
both pieces approximately 1 inch long total. At this point, the taper of
the rod has little or no bearing on our repair procedure. It is very
significant on other sections of the rod. The idea now is to join the two
pieces by using a suitable paste epoxy (what is more suitable than
RodBond?). We left the tip in place so be sure it is aligned properly; set
it aside to cure.
When cured, we need to re-install the guide that was in
that area, but at the same time since this is on the tip of a light rod, we
do not wish to increase the mass anymore than what is absolutely necessary.
We must reinforce our sleeve by wrapping it with size A thread but we do
not wish to double wrap it when adding the guide. Tape the guide in place,
mark the inside area where the thread will end, remove the guide and wrap
the inside area between your two marks. Put the guide in place again and
wrap the feet. Your wrap should end where the inside wrap ends, and they
should blend when the finish is applied. Nobody will be the wiser and I'll
never tell. I used an epoxy finish on this one, but a lighter (Urethane) finish
should be the choice here. Now try your flexure tests, bend it and observe
how it bends progressively - - it merely follows the path of the graphite,
and dutifully holds the structure together.
~ R. O'Quinn

Next Time!
|