
COLLARED CADDIS
Like most trout fishermen, I fish the major hatches on most any river I'm on, but I am most fond of 'caddis' fishing. The insects are on the water most any time of the year. My fly box(s) contains a variety of pattern styles, sizes and colors. That's the problem … I carry so many caddis patterns that I'm overwhelmed! The last few years I have promised myself to reduce the number of caddis pattern in exchange for a fewer number that are more productive. My first great success was the development of the 'Caplis' (go to the search engine on this site). My latest success is the fly I give you today, the 'Collared Caddis.' I have been tinkering and fishing with prototypes for a couple of years now and have finally developed it to the point of perfection.

Materials:
- Hook: Mustad #94833 Size: 8-18
- Thread: Black, 6/0
- Abdomen: Dubbing (natural or synthetic)
- Wing: Natural Elk Hair
- Thorax: Peacock Herl
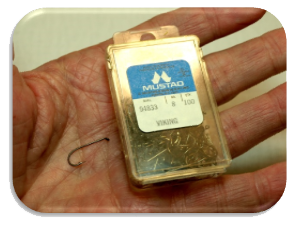
Over the years I have used many hooks by many manufactures. But in the end, I always come back to Mustad. They are well made and dependable. When designing a dry fly that requires exceptional floatation I always fall back onto my favorite, the Mustad #94833.
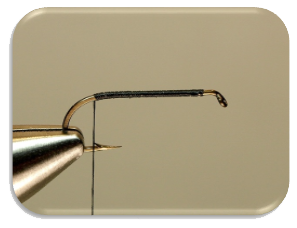
Lay in a good base of thread from just behind the eye all the way along the shank to the bend of the hook. This step is often ignored by beginners. They don't realize that coating the hook shank prevents material slippage throughout the tying process.
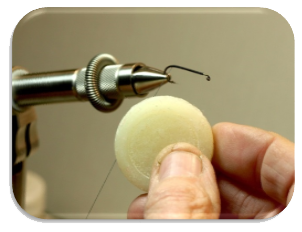
I am about to apply dubbing to my thread. Most of the thread I use today is pre-waxed. But when applying dubbing I always like to add a little extra to help secure the dubbing material to the thread. This also adds a little extra water proofing to the body of the fly. I'm from the old school, so I still use bee's wax (although any wax will do).
Secure your dubbing onto the thread. I prefer to use Super Fine Dry Fly Dubbin because of its floatability and the fact that it is permanently water proofed, but, you may use any of your favorite natural or synthetic dubbings. I tie this pattern in black, tan, brown, green and yellow but feel free to adjust the body (abdomen) color to match the caddis insects in your area. Tie this fly pattern very heavy (plump). Wrap the dubbing forward covering about 2/3rds the total length of the hook shank. Secure the thread.

Select a rather large clump of Natural Elk Fibers from a premium hide. Selecting 'premium' material may be new to a beginning tyer; if you don't know how to do this I would like you to check out the following website called 'Frankenfly.' Go to www.frankenfly.com/ Using the search engine; type in, Kelly Galloup, and scroll down to an article entitled, "Grading and Selecting Deer Hair" (same grading used for elk).
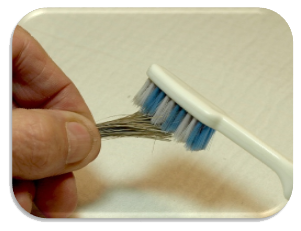
Now that you have cut a large clump of hair from the hide, brush out all of the cut hairs and the underfur. You can use whatever comb or brush you prefer. This is an important step … underfur left in will affect your ability to tie the fly securely and also it will affect floatability. The amount of hair you select will depend on the size of the hook you have chosen. This will take some experimentation and practice

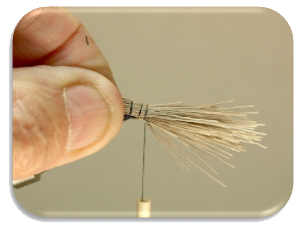
Place the hair in a hair stacker … I prefer nice even tips when I tie caddis patterns. Many tyers prefer the more natural look and do not use a stacker. Commercial tyer don't have time to use stackers and have trained themselves well to cut clumps of hair naturally and tie them in without stackers.

Lay the hair over the hook so that the tips extend to just beyond the bend of the hook. This step becomes personal with some fly tyers. Some like to lay the hair closer to the eye and still others like to extend it a little longer. The 'caddis' you normally come in contact with in your area may play a role in your decision.
Take a couple of quick wraps with thread where the elk hair and the dubbing meet … now take a couple of more wraps forward to the base of the eye. The idea here is to lay out an area to wrap the thorax in … between the eye and the dubbing. This area must be defined before we trim the butts of the elk hair to form the head.
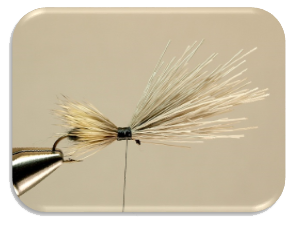
Now that the thorax area has been well defined wrap the entire area from dubbing to eye with tight wraps of thread.
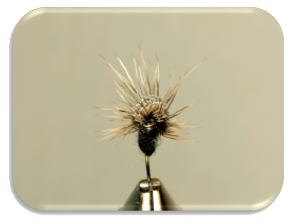
Adjust your wings. Pull out any extraneous materials. Trim the butts to form your head to either a 'caddis style' or 'crown style' head.
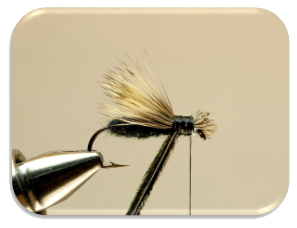
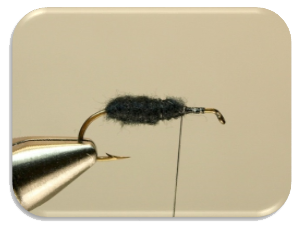
In the threaded thorax area, tie in three to four strands of peacock herl. Twist the peacock herl. This provides for a stronger and more durable fly.
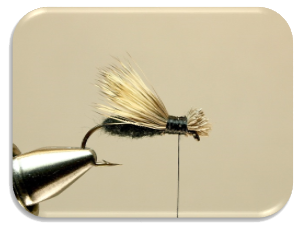
Wrap forward, being generous with the herl (tied heavy). Secure your thread between the head and the eye. Be generous with head cement.
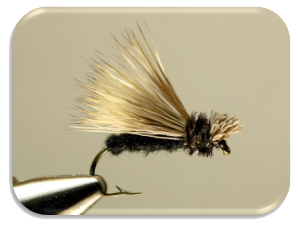
After a couple of years of testing prototypes of this pattern I've decided that this is as close as I can come to developing the perfect 'caddis.' It's a terrific floater, easily visible and it catches fish, a lot of fish! It's a light wire hook, the dubbing is waterproof, elk hair floats well and the magic ingredient is the peacock thorax … that very reflective, iridescent material that trout just can't resist!
Examine the front view of this fly. The rear portion of the abdomen sits in the water low into the 'surface film.' The base of the wing is positioned horizontally to the surface of the water to allow it to rest directly onto the water without breaking the surface tension.
Over my thirty some years of fishing and tying I have created many productive fly patterns. Some have been moderate successes and some have been better than moderate successes. Yes, some have been complete flops! But this fly … this is the magic!
See you on the water…..
Tom Deschaine
~www.michigandryflies.net~
Copyright2014©Deschaine
 Tom is a retired biology instructor who hails from Westland, Michigan. He has over 30 years' experience on the water and at the bench. Tom is a historian of old Michigan dry flies and their creators. His flies, tying tips and articles have appeared in such publications as American Angler, Fly Tyer, Flyfishing & Tying Journal, Trout Fisherman and Cedar Sweeper.
For more great info, check out:
Beginning Fly Tying | Intermediate Fly Tying | Advanced Fly Tying.