|
ĀI am not really sure where and when this fly was invented. I'm not really sure either who concocted it!
Rumor has it that it was invented in Canada, as most of the fly's magnificent history seems to be there.
The Canadian record for atlantic salmon was a fish of 55 pounds taken on June 27, 1939 on Quebec's Grand
Cascapedia River by Esmond B. Martin. Between 1938 and 1974 there were no less than nine years' records, as
compiled by Field & Stream Magazine, which were taken on "Lady Amhersts". It is definately one of my favorites,
but mostly for its exhibition properties and not for its ability to take large salmon. It is a favorite of the ladies
worldwide. It's my wife's favorite!~Maxwell MacPherson, Jr.
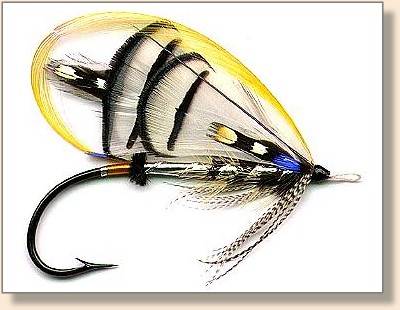
Materials List:
Hook: Best done on hooks between 3/0 and 10/0, steel eye or gut eye
(this particular fly is on an 8/0 blind eye hook with silkworm gut eye.)
Tag: Tag Silver thread and yellow floss.
Tail: A topping and Blue Chatterer (substitute kingfisher or hen neck dyed blue).
Butt: Black ostrich herl.
Body: Flat silver tinsel over an underbody of white floss.
Ribs: Medium oval silver tinsel.
Hackle: A badger hackle.
Throat: Teal.
Wing: An inner wing of two
extended Jungle Cock feathers (set back to back)
going back to a position about one-quarter inch lower
than the tip of the tail; over the Jungle Cock are two
sets of Amherst Pheasant tippet feathers, the first set
of which extends back so that they do not cover the tips of
the Jungle Cock; the second set of tippets cover the
first set so that the first black bar of the second set align
with the second black bar of the first set. Both of
these sets are back to back.
Sides: Jungle Cock.
Cheeks: Blue Chatterer
(kingfisher or hen neck dyed blue); Topping over
all.
Horns: Blue and yellow
Macaw (sometimes the horns are left off).
Dressing (Tying) Instructions:
Salmon flies are not easy to dress, especially for the beginner. But the effort and perseverence
of a dedicated fly dresser will make these feathery concoctions look like works of art. And, they
are thatĀ indeed!
1. The silkworm gut is first twisted and left to dry
for about twenty minutes. It is then doubled and a loop
formed in the middle. The gut isthen lashed to the bottom of the blind eye hook
with the ends extending as far back as a position over the hook point.
2. Then the fly dressing commences with the tying in of
the silver thread (or fine oval silver
tinsel). About four turns of tinsel should suffice.
3. Next the yellow floss is applied starting about one-quarter
inch ahead of where you left off with the tinsel. A single
strand of yellow floss is used for this. It is wound back to the tinsel
and then wound forward to the tie-in.
4. Here the Topping is tied in on top of the hook shank
so that it is inĀ line with the top of the hook shank.
5. The blue feather is then tied so that it lays flat on
the base of the tail. It should only extend
over the tail about three-eighths of an inch.
6. The ostrich herl butt can now be tied in. Be careful
to do this so that the fibers of the herl
point to the rear of the fly or straight up (never to the front).
7. Tie in a length of oval silver tinsel so that
you have enough to make five evenly spaced turns.
Now bind down the remnant end of the tinsel to the
underside of the hook shank up to a position
about one-quarter inch short of the front end of
the hook. Leave the usable end of the rib hanging
out of the way for the time being.
8. Next tie in a length of white floss where you
finished up. The length of the floss should be about 12
inches. Wrap it back toward the butt with nice even
turns so that no black from the hook shows through.
Once you are at the butt, reverse direction and wrap
until you are at the tie in point again. The idea
here is to make a smooth surface for the flat silver
tinsel which follows after the next step.
9. The next part is to take your tying thread to
mid-shank. Prepare the badger hackle by "doubling" it.
This is done by attaching your hackle pliers to the
butt of the hackle, holding the hackle pliers with three
fingers (which frees your thumb and forefinger). Grab
the tip of the feather with the thumb and forefinger
of the other hand. Now wet your thumb and forefinger
of the hand holding the hackle pliers. Immediately
stroke the fibers of the hackle with the wet fingers
so that the fibers bend and form a "V" of the two sides
of the hackle. The hackle can now be tied into place
near the tip (where the fibers begin with the "V").
When tying it into place make sure that the open part
of the "V" is facing you or slightly to the rear of the
fly ( when you actually go to wrapping it the fibers
will point to the rear, as they should). Don't wrap the
rib or hackle until after the next step.
10. Carry the tying thread to where you originally tied
in the white floss (near the head area). Here attach
a length of flat silver tinsel of about 18 inches in
length. Wrap the flat tinsel toward the butt, around
the hackle going back. When you reach the butt, reverse
the direction and wind forward, again around the
hackle, and then tie off at the starting point. The
object here is to make a body that looks like it was
painted on. Nice close even turns with no floss showing
through.
11. Now wrap the rib (which was left hanging in a
previous step) in five, evenly spaced turns, the third one
of which should come just to the right of the hanging
(prepared) hackle. The fifth turn of the rib should
be right where the flat tinsel was tied off. Tie off
the rib tinsel here also.
12. Next, carefully wrap the hackle forward so that
each turn comes just behind each turn of the third,
fourth and fifth turn of rib. The hackle pliers should
still be attached to the butt end of the hackle.Tie
off the hackle at the place where the other materials
were tied off. You should have about a quarter inch of
space left between the tie off point and the end of
the hook.
13. The rear half of space left will be occupied by a
Teal hackle throat. This is prepared from a Teal hackle
fashioned using the same method as for the badger hackle.
Once you have it made up, tie it in and give
two or three close wraps and then tie off. The remnant
ends of the hackle can be cut out of the way in
preparation for the wings.
14. Build up the area where the head and wing material
is to be fastened so that the head area is about
one-eighth inch in diameter. You're now ready for the wing!
15. Tie into place two back to back Jungle Cock
feathers so that they are in line with the hook shank
standing on edge and extending to a point about
one-quarter inch below the tip of the tail topping.
16. Now tie into place the first set of Amherst
Pheasant tippets so that they too are in line
with the top of the hook shank and reaching back
so that they do not quite cover light spots on the
Jungle Cock. You might need to do some adjustments
after you have given a few turns of thread over
the butt ends of the tippets.
17. Once you have them where you want then apply a
second set of tippets over the first set so that
the first bar of the second set overlaps the second
bar of the first set. Again, adjust the feathers with
your fingers after a few wraps of tying thread.
18. You're ready for the Jungle Cock sides, which
should be flat against the tippets and going back
to about the first black bar nearest the head of the fly.
19. The blue feathers should go over these and occupy
a position about one-half inch from the head area.
20. Next prepare the topping by aligning it to judge
the length from tip to tie in point. Nick the topping
at the proposed tie in point and bend the butt section
up. Give a few wraps around the nicked point and adjust the
topping so it sits properly.
21. One fiber of Blue and Yellow Macaw should go on
each side of the top portion of the fly, with the blue
side of the fiber facing out on each side.
22. Fashion a nice head, lacquer with black lacquer
and let dry overnight before packaging. Viola! There
you are... a "Lady Amherst"!~ Maxwell MacPherson, Jr.
For more information on Atlantic Salmon Flies we recommend that you also
check out the
MaxFlies website or if you have questions or
comments contact MaxFlies
|