 Al's Stonefly Nymph Text and Photos by Al Campbell - Rapid City, SD, USA
|
|
|
|
Tying Instructions: 1. Dub a small ball of dubbing at the hook bend. Select two similar hairs from the back of a peccary skin and tie them down to the top of the hook (as shown) so that the tips will extend beyond the hook bend.
 2. When your thread nears the dubbing ball at the hook bend, separate the hairs with your finger and tie them down the rest of the way so that they form a split tail.

|
|
3. Tie a piece of clear Larva-Lace or v-rib to the hook as
shown.
 4. Tie it down all the way to the dubbing ball on the bend of the hook.
 5. Weight the thorax area of the hook with lead wire as shown. (optional)

|
|
6. Select a feather from the shoulder area of a pheasant skin or any
similar grouse or hen feather as shown.
 7. Tie the feather in by its tip. You want to keep it lying flat on top of the hook as much as possible.
 8. Secure the feather down to the place where the tails are tied.  9. Wrap or dub an abdomen. I used punch embroidery yarn here, but dubbing or any similar fine yarn will work. Move the thread to the place where the abdomen will end.

|
|
10. Pull the feather stem over the top of the abdomen and secure with
two loose wraps of thread.
 11. Pull the feather tight and secure it firmly with the thread.
 12. Trim the feather stem and add a drop of cement if desired.
 13. Wrap the larva lace over the abdomen as shown. This will bind the feather down to the top of the abdomen creating a two-toned effect similar to the coloring of a real stonefly nymph.
 14. Tie off the larva lace and trim it at the mid-point of the hook shank. Your abdomen is now finished.

|
|
15. Dub a small patch of brown dubbing at the rear of the thorax as
shown.
 16. Select two similar sized peccary hairs to use as legs. Again, you can substitute hackle quills or any similar hair for this task.
 17. Tie the legs in, points facing back, as shown.
 18. I like to use black plastic craft bead chains (shown) for nymph eyes. They are inexpensive, easy to use and look nice. If you can't find black beads, a waterproof black marker will color pearl beads fine. Heavy monofilament line can be melted at the ends to form similar beads if needed. Tie a pair of these beads to the hook just behind the hook eye with figure 8 wraps. A drop of super glue will hold the eyes securely after the figure 8 wraps are completed.
 19. Select three multicolored feathers from a pheasant skin, grouse skin or hen back.

|
|
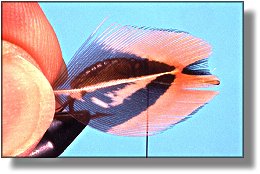
20. Dip the feathers in Angler's Choice thin Soft Body resin and hang
by the stem to dry. You can also use any clear vinyl resin or Flexament
for this task. When the feathers are dry, they should have a soft plastic
texture. Trim a v-notch in each feather as shown.
 21. Measure a prepared feather for the wing case. The back of the feather should extend slightly over the front of the abdomen, just like it does in a real nymph.
 22. Make two loose wraps of thread over the feather, slide it into place on top of the nymph, and secure it with several more tight wraps of thread.
 23. When you have the wing case secure, trim the excess.
 24. Once the first wing case is secured and trimmed, dub a small amount of dubbing over the thread wraps used to secure the first wing case and legs. Then, attach a second set of legs, just like the first set, and secure in place.

|
|
25. Select and measure a second wing case feather as shown.
 26. Secure this wing case to the hook the same way you did the first one. A small drop of head cement or super glue will hold the legs and wing cases in place.
 27. Dub over the second wing case base, add a third set of legs and a third wing case. Do not trim the stem of the third feather just yet.
 28. Fold the excess feather back over the wing cases as shown.

|
|
29. Secure the feather back with thread. Add a set of peccary hair
antennae between the eyes. I like to use the thread to secure each antenna
to the eyes.
 30. Dub lightly around, over and between the eyes to form a head. Pull the remaining tag of feather over the head and between the eyes. You might need to fold the antennae back to allow room to tie the tag of feather off at the hook eye.
 31. Tie the feather off and trim at the hook eye.
 32. Whip finish behind the hook eye. I like to use a Thompson style whip finisher for this task because it works so well in tight places.

|
|
33. Use your fingers to adjust the antennae back to the right place. A
drop of head cement will secure them and keep them from moving
later.
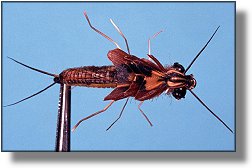
 34. From the top, your fly should now look something like this.
 35. Use needle-nose tweezers to bend and shape each leg. After shaping, trim any excess leg material.
 36. Your finished nymph should look similar to this from the side. Notice the two-tone abdomen and large black eyes?
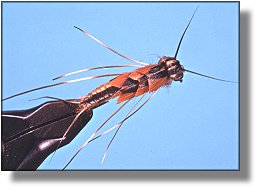
37. From the top, your finished nymph should look similar to this. Real stonefly nymphs only have two wing cases, but I use the third wing case to simulate the hard plate that exists just behind a real stonefly nymph's head. The visual effect is nice, and I doubt there are any trout out there that count wing cases while they feed.
 38. The bottom view. Notice the missing leg? A little too much pull on the tweezers that did that, but since injured nymphs are a fact of nature, the missing leg will rarely be noticed by a trout.
Tiers Comments
|
[ HOME ]
[ Search ] [ Contact FAOL ] [ Media Kit ]