
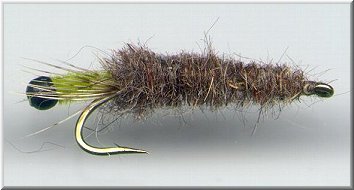
 The Peeking Caddis By Ralph D'Andrea, Grand Junction, Colorado,USA
|
|
|
|
Tying Instructions:1. Select a tungsten bead and place it on your tying table. Most beads are counterdrilled; i.e., they have a large hole on one side and a small hole on the other. Make sure the large hole faces up.
 2. Clip a piece of ultra chenille or vernille about the length of the hook shank and carefully place a small drop of superglue on one end. Note: Trying to place a drop of glue on the hollow bead instead of the vernille is a good way to glue a tungsten bead to your table..
 3. Before the super glue has set, carefully touch the glued end of the vernille to the hole in the bead and push it in as far as it will go. Let the bead/vernille assembly set for a few minutes. If tying several flies in a session, steps 1-3 can be done ahead of time.
 4. Start the thread just behind the eye, wrap back to build a neat thread base. Tie the vernille on top of the hook at the hook bend, roughly at the barb, with the bead facing the rear and about one hook-gap of vernille between the tie-in point and the bead. This will later be the little wormy caddis larva partly out of his case. Lash the vernille to the hook neatly all the way up to the tag end and back to the tie-in point.
 5. Select a grouse, partridge, or hen feather with barbules about as long as the amount of vernille projecting beyond the tie-in point. Pictured is partridge. Strip the barbules off the left side (as the feather faces you) and tie it in by the tip with the butt facing rearward as pictured, right at the point where you tied in the vernille. Grasp the butt of the feather in your hackle pliers and wrap 3 wraps of feather while coaxing the barbules backward. Tie off the butt of the feather with 3 or 4 tight thread wraps, and clip the excess tip and butt of the feather.
 6. Spin a large amount of dubbing in a dubbing loop. About 3 inches of loop should be enough for a #12 hook. Advance the thread to the hook eye. Caddis cases are built by the larvae from materials at hand, either plant debris, mud, or other detritus. Consequently, you don't want to use a pure-colored synthetic. I prefer a hare's mask or hare's ear dubbing with lots of guard hairs, brownish gray in color to match the caddis tubes I have collected from whatever stream I am fishing. If you do choose to use a synthetic, choose one that is a blend of various colors, as it will look more realistic.
 7. Wrap the dubbing loop forward to the hook eye. Build a nice, tight, dense, fuzzy body. Tie off with 3-4 thread wraps, whip finish, and clip the thread. I do not use head cement, but if you do, now is the time to apply it.
 8. Tease out as much dubbing as you can with a toothbrush, bodkin, dubbing teaser, or your fingers. Trim the dubbing closely to the typical conical shape of a caddis case. Most species of Grannom have neat square-sided cases, although some have cases that are round in profile. Trim the case to match the naturals where you fish. Since the case is built as the insect grows, it should be narrower at the bottom (eye end of the hook) than it is at the top (bend end of the hook).
9. Continue trimming till you are satisfied that the finished fly matches the size and shape of the natural you are trying to emulate. Note: be careful you don't trim off the hackle collar when you get to the "bend" end of the hook. ~ Ralph D'Andrea
Tying Tip
|
[ HOME ]
[ Search ] [ Contact FAOL ] [ Media Kit ]