As I promised last week, it's time to tie our
first fly. First we need to look at the traditional
way you will see flies listed in fly tying books. If
you know how they are usually presented, it will be
easier to pick out the key things you need to know.
First, there is usually a narrative that describes
something about the fly and how or when to use it.
Next, there is a list of components used in the fly.
Then you'll probably see a short list of tying
steps, sometimes assuming you know a lot about fly
tying. Finally, there is often more narrative about
the fly and how it is useful.
Since I tend to be a little less conventional, you
might not see this series of events listed this way
in my fly tying series. Don't worry, it isn't
written in blood anywhere that you must do things
the conventional way. Just kick back and enjoy,
it's about to get fun.
List of materials:
Mustad 3399A or 3906B hook or equivalent Size 10
to 16.
Pheasant tail feather - A long one from the center
of the tail, can be dyed.
Black 3/0 or 6/0 thread.
Tying steps:
1. Start the thread on the hook. You did this
last time, so I won't go into detail again.
2. Pull about 12 strands of feather fiber from
a large pheasant tail feather. Since length is important,
be sure to get these fibers from the upper 2/3 of the
feather. Trim the base of feather stem material.

3. Position the butt ends of the feather fibers
about 1/5 of a hook shank back from the hook eye.
This leaves room for the head of the fly later.
Using two loose wraps, start tying the fibers down
to the top of the hook. If you don't start with
loose wraps, the fibers will twist around the hook.
Once you have the loose wraps in place, you can
snug them with downward pressure of the bobbin.
This is a rule any time you start tying any material
to the hook.

4. Use a slight upward lift on the fibers
as you wrap them down to the hook.
This will prevent twisting of the fibers and
keep them on top of the hook. This is also a
rule any time you tie in a tail or any other
material that will extend over the bend of the
hook. Tie the fibers down to the hook bend
adding a couple of extra snug wraps of thread
at the hook bend end of the fibers to keep them
securely in place and prevent twisting.
Wrap the thread back to just behind the hook eye.

5. Start wrapping the fibers forward toward
the hook eye. As you get closer to the
hook eye, you'll probably need to use your index
finger to hold the fibers in place so you can grab
them and continue wrapping. Try to
adjust your wraps to cover the hook shank yet leave
enough fibers to extend to the hook bend or just
beyond it.

6. When you reach the place where you started
tying the fibers down, tie the fibers off behind the
hook eye. Be sure not to crowd the head area just
behind the hook eye. This is one problem beginner
tyers seem to always have, they crowd the
hook eye and don't leave enough room for a proper
head on the fly.

7. Tie the fibers down to the hook eye. There
should not be any fiber wraps in the head area of the
fly, just tied down fibers.

8. Using your thumb and index finger, fold the fibers
back toward the hook bend. Grab the fibers with the
thumb and index finger of the other hand and
pin them to the hook. The fibers should be evenly
distributed around the hook, not just on top. Tie
the fibers down in the head area of the fly, forming
a smooth head. You don't need to make
too many thread wraps here, just enough to form a
smooth head.

9. Whip finish the head with six to ten wraps
of a whip finisher. Since you are tying in the head
area of the hook, any whip finisher will do.

10. Cut the thread and cement your wraps
with a thin head cement. I've found Griffin Thin
head cement to be a good type of cement for this
task, but Flexament or any other thin cement will
work.
You can add a bead head to this pattern very easily.
I often use gold or black beads with this fly to
get it down deep. To add a bead, here's the steps.
Bead Head Version
1. Slip a bead on the hook and push it to the
hook eye. Tie in the fibers to the hook bend as
you did in the first fly. Bring the thread back
to the head.

2. Wrap the fibers forward, leaving a small
amount of room for the head. Tie the fibers off
like you did in the first fly. Tie the fibers
right up to the bead.

3. Flair the fibers back and tie down like
you did in the first fly. You should now have a
small amount of room behind the bead where the
thread has the fibers tied down. You could whip
finish it here if you wanted, but it's nice to
fill in this area if you can.

NOTE: Dubbing is available in many textures and colors.
Some of it is fine and works well with dry flies.
Some is course and works well with wet flies and nymphs.
You can obtain dubbing ready made, or you can make
your own by blending up yarns and furs in a blender or
coffee grinder. I have a coffee grinder at my tying
bench all the time to blend dubbing to the desired
consistency and color. If you wash and dry a throw
rug, be sure to check the dryer screen for some great
sparkle dubbing that might have collected there.

4. Take a small amount of dubbing in you hand
and pull a few strands of dubbing fibers loose from
the rest. Since beginners tend to use too much dubbing,
a good rule is to select half the amount of dubbing you
think you'll need, cut that in half, and then you'll
only have twice as much as you really need. Place the
few strands of dubbing up to the thread and roll it
between your thumb and finger until it becomes a tight
yarn around the thread. Use only a few strands at a
time, you can always add more if you need it.

5. Wrap the dubbing around the hook behind the
head to fill the gap behind the bead. If you twisted
the dubbing around the thread properly, it won't unravel
when you wrap it around the hook.

6. Whip finish and trim the thread. This time
you'll need to use a Matarelli style whip finisher
to work around the bead.

7. Cement the thread just behind the bead, allowing
some of the cement to absorb into the dubbing.

I often tie this fly with pheasant tails that have
been dyed black or olive. If you wish to dye up
some feathers, a Rit dye with some boric acid or
vinegar to help the dye set will work just fine.
Be sure to rinse the feathers well after dying so
your fingers wont turn black or olive.

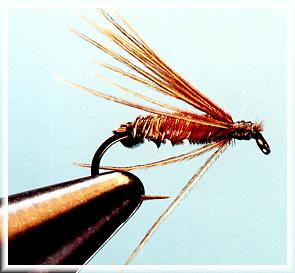
The EZ-nymph isn't completely my creation. It's
more an adaptation of the 'teeny nymph' than anything.
I've found it to be more productive in small sizes
than its predecessor, and also easier to tie.
This is a killer when fished as a soft hackle wet fly.
It also works well as a nymph, especially with a
bead head. When you've finished letting it drift,
lift the rod tip slightly and allow it to swing to
the surface. This imitates the rising motion of an
emerging insect and often entices the fish into a hit.
In lakes, the non-bead version of this fly is a
favorite of mine for perch, crappie bluegills and
trout. During the first few weeks after ice out
on northern lakes, this fly will often bring strikes
on every cast. It's also a great wet fly during the
spring months on local rivers and streams.

On the Bighorn River, I've used this fly in olive
colors to match caddis pupa that were emerging in
the riffles. I've hooked dozens of trout over 20
inches during the caddis emergence on that river
with the ez-nymph.
Several buddies of mine have used it successfully
on salmon and steelhead in Alaska and on the west
coast. I've even managed to catch carp, bass and
suckers in several lakes and streams during the
early summer months with it.
This fly is easy to tie and easy to fish, but it
gets its name from how easy it fools fish.
See ya next week. ~ Al Campbell
Beginning Fly Tying Archives
|