|
Please keep this in mind when you consider passing up one form of
instruction because you have another form handy. You will never know the
value of that jewel you may be passing up. I encourage you to dig and prod
for any form of information you can find on the subject of fly tying, and
fly fishing for that matter, whether it be here or elsewhere.
Now, on to this week's tying!
One of the items we use in fly tying on many flies is hackle. Hackle is
the fuzzy stuff on the front of most flies, especially dry flies.
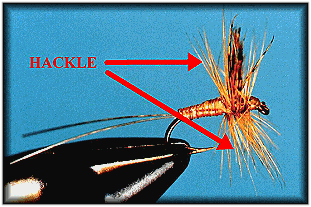
Depending on how the hackle is applied to the fly, it will help
it float or help it sink. We'll look at the three most common hackle
wrapping techniques this week. You'll see the difference, and what you
learn this week will be used often in the weeks ahead.
Hackle on a fly is created by wrapping feathers (usually from the neck
or saddle of a rooster) around a hook.

Most of the time when we refer to hackle, we are talking about the
hackle on the fly, but sometimes we are talking about the feathers used
to create the hackled effect. Since hackle feathers vary in quality and
type, we need to look at some of the differences.
You can buy hackle in several forms. Sometimes you'll find it sown
together in a bunch. This is called strung hackle, and it is often of a
poor quality for anything but streamers or woolly worms. Most of the
time it is found on the skin, either in a neck or saddle form. This is
usually the best quality hackle, but it can be defined more than that.
Hackle feathers have several qualities that make them suitable for dry
fly, wet fly or streamer uses. For dry flies, you want a long thin
feather with short, stiff barbules and a flexible stem. For wet flies,
the feather can have softer barbules, but they still need to be fairly
short. For streamers, long, soft barbules are the best.
Quality saddle hackles provide the best dry fly hackle, but are limited
in the sizes of hooks that can be used. They are much longer than neck
feathers and are more consistent in size from bottom to top. They have
the highest barbule count per inch, and the barbules are stiffer than
those found on a neck feather.

A good neck from a bird that was raised for fly tying feathers (Metz,
Hoffman, etc.) will have a larger variety of feather sizes than a saddle,
and is probably more versatile for the beginner fly tyer. You need to be
aware that all feathers are not created equal. Good neck feathers will
have similar characteristics to saddle hackle feathers, they just aren't
as nice to tie with. On the other hand, some neck feathers are shorter
and softer than others.
Cheaper necks and saddles have more web and softer barbules
than good quality necks and saddles from the
better growers (notice the web and thin barbules in feather
on the left in the picture above).
Imported necks and saddles look like they cost less at first, but in the
long run they cost a lot more because you have to use up to four
feathers to tie the same fly you can tie with one quality neck feather.
You can tie up to five good dry flies with a quality saddle feather
because they are much longer and have a higher barbule count.

You also get more feathers and a greater size selection in a
quality cape (neck or saddle) than you get in an import. You'll tie more
flies with one good half neck than you'll tie with four import capes, and
they'll be better balanced and better floating flies.
So, let's tie a fly or two and see how it works. We'll tie the Woolly
Worm several ways and you'll see how the method of wrapping hackle is
important to how it looks and reacts when it hits the water.
List of materials:
Hook: Streamer 2xlong; Eagle Claw L058,
Tiemco 5263, Mustad 9672, Daiichi 1720.
Body: Chenille, any color you wish.
Hackle: Saddle or neck, saddle is preferred.
Color to match the body if desired.
Thread: 3/0, color to match body or black.
Rib: - Wire (used in one method of tying).
Tying steps:
Type 1 - Dry style.
1. Select a good neck or saddle feather (saddle is preferred). The
length of the barbules should be 1 1/2 to 2 times the hook gape. You can
determine the barbule length by wrapping the hackle around the bottom of
the hook or bending it near the hook.

2. Strip the fluff and web from the bottom of the feather. Trim the
stem to leave a short stem without barbules to tie to the hook.
3.Tie the stem of the feather to the back of the hook just in front of
the bend, curvature (dull side) facing up.

|