Number 4. This repair is more in the category of reconstruction as a goodly
piece of the very heart of the rod had to be removed. A heavy tackle box
lid slammed shut with the rod in the wrong place at the wrong time and it
was no contest. The damage to the rod extended a little more than an inch
in both directions from the impact area. It is very important to determine
precisely where the damage ends, so careful examination with the aid of
whatever magnification you have available is in order.
REMOVING DAMAGED AREAS
The first step is to remove the guide that just happens to be next to the
damage. This must be accomplished very carefully so as not to expand the
damaged area. Next, we have to remove all the damage. Once the extent of
the damage is identified, mark each end where the damage stops. Wrap a
piece of 1/2 inch masking tape around the rod at that point, add another
1/10 inch or so just to be sure. You need to remove this part of the rod
and that means two cuts which must be clean cuts or you will extend the
damage further. I use a Dremel tool with the flexible shaft and attach a 1
inch rotary abrasive cut off disk. Used properly this makes a very clean
cut. In the absence of a power tool, you will need a triangle file. DO NOT
USE A SAW OF ANY KIND. Graphite will ruin any saw that I know of and saw
teeth tend to delaminate the fibers and fray the ends. Diamond wheels or any
of the small abrasive cutting wheels are the way to go. A triangle file is
just as good. Use the edge of your tape as a cutting guide, make a groove
all the way around the blank and keep making the groove deeper until it is
parted. Once the damage is removed, you will have to square off both ends.
With the damage removed (I took out a piece 2 & 1/4 inches long) and two
pieces of rod needing to get back together, you can join the two pieces at
their respective ends which will mean shortening the rod by the length of
the removed portion - or you can maintain the original length of the rod.
The latter is a bit more difficult, but it is the better choice in this
case. In your scrap box, find a piece of the same taper as our patient and
drop it through the butt end . It must protrude about 5 or 6 inches to be of
any value. This piece should be graphite, not fiberglass. Slip the
protruding end of the plug into the tip and measure the distance between the
two rod sections. Ideally this distance will be 2 & 1/4 inches as that is the
amount that we removed, but ideally is something that is non-existent in my
world. This distance was 4 inches and I couldn't find a piece with any
better fit. The piece I chose was from a non-sanded blank - a rough out -
so I had a little tolerance to play with. Light sanding on the tip end
closed the gap to 3 inches. Any more sanding would have touched the
graphite fibers so I settled for this. The overlap on the butt end was
established at 1 & 1/2 inches and 1 & 1/4 inches on the tip end. Now you have
an internal plug which joins the pieces, the piece is of smaller diameter
than the original which means it is not as stiff even though it is also
graphite, but we expect to add some stiffness with our outer sleeve.
However, we cannot put on our outer sleeve over this 3 inch gap. This gap
is filled with a 'spacer' made from fiberglass, not graphite, and cut to fit
snugly over the graphite plug. The OD of the spacer must be net or slightly
less than the OD of the rod at this point. Otherwise it will interfere with
the outer sleeve. With the spacer made and in place we can now construct
the outer sleeve.

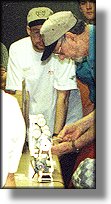
When a large area of damage is removed, the remaining pieces will not mate
properly due to variances in diameter. (Photo above) Thus it is necessary
to fabricate a 'spacer' to restore the area that was removed, making it
possible to then utilize an internal plug and external sleeve in restoring
the rod to good usuable condition.
OUTER SLEEVE CONSTRUCTION
This sleeve is made the same as in #3. We have a 5 & 3/4 inches inner plug
and need about 1/2 inch overlap on each end so we need a sleeve about 6 & 3/4
inches long. Size the butt end first but size it with the spacer in place,
then taper the other end and fit it over the tip section splitting as
necessary as we did in #3. Now you have 5 pieces of rod section ready to
bond together - as in picture #4. The outer sleeve must be slipped onto the
tip section, the inner plug gooped and poked through the end of the butt
section. Now install the spacer onto the plug and the plug into the other
(tip) section. The sleeve can now be slipped into place with a liberal
amount of epoxy and wrapped tightly for curing. After the epoxy cures, the
temporary wrap is removed, the area cleaned up and the permanent wrap
installed with your favorite finish. In our illustrated example we removed
a guide which must be replaced. The proper position for the guide falls on
the aft end of the outer sleeve. This is no problem. Simply wrap the
sleeve in entirety, position the guide in its proper location and wrap it in
the usual way - bare thread to bare thread. Now you must be selective with
your finish, the popular so-called high build epoxies will not hack it here.
You need a high penetrating epoxy such as DuraGloss LS or other similar
finish. Otherwise you must wrap the sleeve, apply your epoxy and allow it to
cure, wrap the guide, and apply another coat of epoxy over the whole thing.
Whichever method you choose to follow you should wind up with a finished rod
as in picture #5 and the rod will act and feel like it did before the accident.
In this type of repair I have attempted several times to make the inner plug
from fiberglass instead of graphite, and the rod always feels mushy. If we
had chosen to shorten the rod by joining the two pieces with no gap to be
filled between them, then fiberglass seems to be satisfactory for the inner
plug. But whenever there is this extension a graphite plug for a graphite
rod is necessary. ~ R. O'Quinn

Next Time!
|