|
A couple of weeks ago I mentioned thread tension problems
when discussing common fly tying problems. I didn't get
the message across the way I intended then, and it started
a string of comments on the bulletin board that eventually
led to one or two people having hurt feelings. This week I'm
going to try to further explain thread tension and bobbin
adjustment, and maybe clear up a few misconceptions in the
process.
One of the most common reasons thread breaks, especially with a
new bobbin, is an improperly adjusted bobbin. Other factors
like sharp edges and hook points often cut the thread, but if
the thread actually breaks, it's usually a case of too much
tension, and often that's due to an improperly adjusted bobbin.
This problem isn't limited to cheap bobbins either. The bobbin I'm
showing in the following pictures is an expensive Tiemco ceramic
bobbin fresh out of the package. The pictures will help you see
why a new bobbin needs adjustment, and how to make those adjustments.
Remember, this is the first time this bobbin has ever been used.

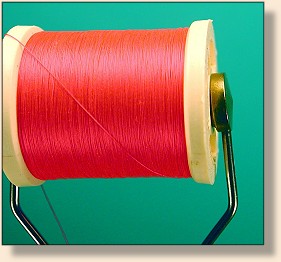
This is a picture of a new, unadjusted Tiemco ceramic bobbin.
Notice that the arms of the bobbin rub on the sides of the thread
spool. Fresh from the package, this bobbin was tight enough on
this spool to break the 6/0 thread every time. That won't work,
and merely opening the arms to relieve some of the tension won't
solve the problem of the arms rubbing on the spool.

The first step is to remove the spool and increase the angle of the
bend in the arms. You may need pliers for this step to keep the
bend in the right place and increase your leverage on the arms.
This will initially increase the tension on the spool, but we'll
adjust that next. Try to adjust the angle evenly so that the arms
clear the spool by the same amount on each side of the spool.
It's important to make this adjustment first because the next
adjustment will set the tension. If we did that adjustment
first, we would have to do it again after we adjusted the angle,
so adjust the angle first.

Now, spread the arms to decrease the tension the arms apply to the
spool. Again, try to keep the amount of spread equal on both sides
so that the arms clear the spool at equal distances on both sides.
You'll probably have to adjust the tension several times to get it
just right. Actually, the tension the bobbin applies to the spool
doesn't have to be much more than the tension needed to keep the
bobbin hanging. Test the tension on the lightest thread you have
to make sure it's light enough to allow the thread to move freely
from the spool to the hook. If you get the tension too light,
just bend the arms the other way until you achieve the tension
you want.
In time you'll learn how much tension you want applied to the
spool and adjustments will come easy. You'll also learn how
to control thread tension while tying by adjusting your grip
on the bobbin. A squeeze or allowing your finger to drag on
the bobbin is usually all it takes to adjust thread tension
to the desired level while tying.
This is how a properly adjusted bobbin arm should look. Notice
how the arm clears the spool so that the edge of the spool won't
be able to rub and influence the thread tension? It's a simple
task that many fly tiers have never performed or even considered.
I'm guessing that there are a few who have never heard about
bobbin adjustments and others who have heard but didn't know
how to adjust their bobbin for the best performance.
While your bobbin tension should usually be set fairly light, your
thread tension while tying will often be heavier than the bobbin
tension. Certain tying steps require light and loose tension to
keep the materials from spinning on the hook, while other materials
will need a firmer tension. Better than half the time, you'll want
to squeeze the bobbin or drag a finger on the spool to keep the
tension fairly close to the braking point of the thread. That's
the best way to insure that your fly is tightly tied.
Some folks intentionally break the thread a few times when they
first start tying with a new spool or bobbin, or when they tie
their first fly for the day. That's their method of determining
how much tension the thread can take. If you're new to fly tying,
it's a good idea to know how much tension is required to break
the thread you're using. It's all part of learning.
Another factor that affects thread tension is how long the thread
is. If you keep the thread length short, the hand and bobbin can
control thread tension and reduce sudden jolts that can result in
broken thread. Keeping the thread short also helps you control
where the thread lands on the fly. A bonus you'll enjoy if you
keep your thread length short is the fact that it takes less time
to make one full revolution around the hook with your thread.
That will increase your tying speed and control.
If you have more than an inch of thread between the tip of the
bobbin tube and the hook, you'll have a hard time controlling
thread tension. If the thread length is long, you'll have a
greater tendency to allow the tension to relax at some point,
and your fly won't be as solid as it should be. Another hazard
of long thread is the greater chance of catching the point of
the hook with the thread and cutting the thread. You'll never
have a firm control of where the thread goes if you tie with
a lot of thread between the tip of the bobbin and the hook.
Ultimately, you'll tie better flies if you learn tension control.
The first step to tension control is a properly adjusted bobbin.
Try it. In the end, you'll tie better and suffer fewer cases of
broken thread.
Tight lines. ~ AC
|