|
When somebody says bloodworm, what do you think
about? Most of us think about something so small
we cringe over the thought of tying one of those
things on the tippet, let alone the idea of tying
one in a vise.
In reality, the bloodworm is a common name for the
larvae of a midge. Fortunately, most bloodworm
patterns are fairly easy to tie, so it isn't all
that complex a process to create a workable
imitation of the midge larvae. Probably the
most common bloodworm imitation is the Brassie.
For sure, bloodworm imitations are productive.
One of the heaviest insect hatches in most tailwater
fisheries is the midge. Some days on rivers like
the Bighorn, midges hatch in huge numbers and the
trout gorge themselves on the feast. Most days,
trout feed heavily on midge larvae, so anything
that imitates that insect is a good bet if you
want to catch trout.
Midge larvae can be found in a variety of sizes
and colors. They might be as large as a size 12
in a prairie lake, or as small as a size 28 in a
cold tailwater river, but the most common sizes
range from 16 to 22. You might see them in white,
yellow, green, black or red, but red is the most
common color. I can't think of any other insect
that plays as big a role in the diet of trout and
many other fish, as the midge does.
Like I said before, most bloodworm patterns are
pretty simple, and this one is very simple. It uses
four materials, counting the hook and head cement.
Even if you just have beginner skills, this pattern
is easy to tie. And, the best part about it all is
that it catches fish.
Too Simple Blood Worm:
List of materials:
- Hook - Any standard nymph hook, even
cheap ones will do. I'm using a size 18 Mustad 3399A hook.
- Tail - None.
- Body - Clear monofilament thread (sold
as hemming thread at sewing stores).
- Legs - None.
- Thread - 6/0 Colored to match the natural
in your water. I'm using bright red.
- Cement - Sally Hansen's Hard as Nails.
Tying steps: Too Simple Blood Worm:

1. Start the thread.

2. Secure the monofilament thread and build a tapered
underbody.

3. Build the thread head, whip finish and trim the
thread.

4. Start wrapping the monofilament thread, trying to
keep the wraps close together. Since this thread comes
on spools, I use a bobbin to hold it.

5. When you have about 2/3 of the hook shank wrapped
with monofilament thread, stop.

6. Use your whip finisher to make the last four or
five wraps of mono. This is also your finish knot.

7. Your fly should now look something like this.

8. Coat the whole fly with a thin coat of Sally
Hansen's Hard as Nails fingernail polish.
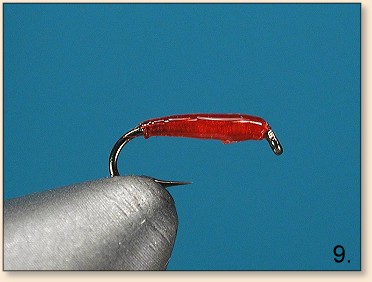
9. This is how the fly looks while the nail polish
is still wet.

10. When the nail polish dries, the segmentation
caused by the mono body will be visible, and the
body will have a translucent appearance.
There is nothing difficult about this fly, and you
won't bust the bank buying exotic materials to tie
it. You'll find that it is a tough, durable fly
that resists damage from toothy fish. You might
even learn to like tying midge larvae patterns.
Well, maybe.
~ AC
|