In the introduction to this series I told you that
I would try to focus on the “small things” that are
often overlooked in books, presentations and magazines.
Well, hard as I try, I am bound to miss something. Also,
as we all know, there is always more than one way to
achieve the same or similar results.
So, we thought adding a question & answer section would
be a good venue to offer things missed or multiple ways
of doing them. This will also be a direct link for your
input into the final shape of the series.
If you have any questions or concerns regarding tying Salmon
and/or Steelhead flies regardless of how simple or complicated
you think they are, please contact us.
You may also have information that you wish to share
with others and that is welcome here too! What I can
offer is only one little slice of the tying picture.
In the final analysis, this is your series and it
will and should be whatever you make it.
As I said, the questions asked may have more than one
answer and we will try to provide those to you.
Towards this end, I am happy to let you know that
several highly talented and accomplished Tyers have
agreed to add their input into this section when
questions are asked about the types of flies they
tie.
Marc Madore is one of Canada’s finest Tyers.
Marc ties mostly flies for Salmon for fishing the
waters near his home in New Brunswick. He’s tied
commercially for several years and many luminaries
both from Canada and abroad have fished his flies
with great success. Be sure to view many examples
of his work here in the series. All of the flies
he has here to this writing are his “fishing grade”
flies. I have a hard time tying a display fly so
well! Marc’s work has graced the pages of many books
and the walls of collectors.
Duane Vigue is another fine commercial Tyer
from the Eastern half of the US, Maine to be exact.
Duane is a hard core Tyer and fisher of the so called
“Rangeley” style of streamers that were popularized
by the likes of Carrie Stevens and Herb Welch. His
flies are the result of countless hours on the water,
testing and refining his tying skills and patterns.
He not only ties the patterns of Stevens and Welch,
he also innovates his own. Like Marc, Duane’s “fishing”
grade flies are wonderfully crafted and his display
patterns are a must have for any serious collector.
Duane’s flies can be seen here and in such publications
as the Art of Angling. We will be hearing much
more from Duane in the years to come.
Dr. David Burns is a Tyer who needs no
introduction to the world of the Atlantic Salmon Fly.
His award-winning flies have appeared in countless
publications. Dave has a passion for detail and for
fishing the flies he ties. His flies have won
contests worldwide and are the centerpiece of any
collection that is fortunate to include them.
The collective knowledge of these Tyers is impressive
and I thank them for their input into this section
of the series.
There will also be other great Tyers that will offer
their input here as well. Not all of them are well
known or “published” but they have one thing in common
with the rest of us here, to share our tying knowledge.
When there is info offered by someone other than the
“listed” group, I will let you know a little about
them. Actually, you might even be one of them and
not know it! Let me know if you have any tips or
techniques that might further someone else’s tying
efforts. Even though you might see a question here
and it has an answer or two, if you have another method
or answer, let us know. We will be more than happy to
update and expand on any of the questions/answers.
All questions will be answered either directly with you
and/or here by one or more of us. And those questions
that deal with info that should have been in a particular
section or lesson before will be added as soon as possible.
It is my hope that with this section and the rest of
the series, you will learn skills and knowledge that
will make you a better Tyer and even stimulate your
creative side and encourage you to try tying styles
of flies that you might have only given passing
consideration before. Remember, none of this is
rocket science or brain surgery. All it requires
is a thirst for knowledge and the desire to learn
new things. ~ Ronn
Please send your questions or information to me at
rlucas@cybcon.com,
by mail to:
Ronn Lucas, Sr.
13535 SE Beech
Milwaukie OR 97267
or, by phone at 503-654-0466.
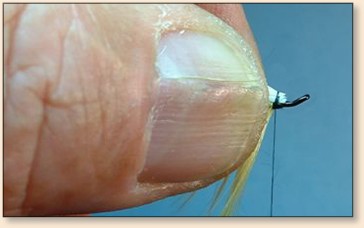
FLAIRING HAIR
Q.
I have trouble with my hair wings and/or tails flaring too much.
What am I doing wrong? ~ Steve
A.
There can be a number of things that could be going on
to make this happen. If you are using bucktail for the
wings, select the hair towards the tip of the tail
rather than the base. This hair is solid where the
hair at the base is “hollow.” Solid hair is less
prone to flair but it can roll to the sides as it
is tied in which can also appear as though it flared.
If you are tying the hair onto a soft bed, it will
flair as it is pulled into the base. Make sure the
base is flat and solid. If the hair is tied against
an irregularity such as a lump or tinsel, the hair
will flair as it is pulled against the surface. Lumps
can be flattened with smooth face pliers. ~ Ronn
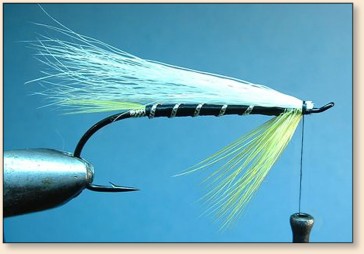
Some might try to attach the tail when the tag is too high, I build up using
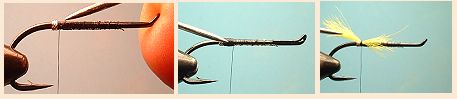
thread so the base is level with the tag otherwise the tail will lift and/or flair.
The wing will rise for several other reasons, I
recommend tapering the body a little so the wing
will not come up against a high pitch
.
To save materials one sometimes has to use hair
further down the tail, what I recommend is to tie
the wing on and run the thread up the wing a little
to break down the fibers, several times if required.
I also start tying the wing a little forward, tying
it down from right to left.
The finished fly. ~ Marc
HOW TO MAKE TINY HEADS
Q.
How do I make those tiny picture perfect heads I
see in the books & magazines? ~ Bill
A.
Bill, a book could be written on heads alone. Every Tyer
has his/her own twists on making their heads small and
neat.
From my perspective I would sum it up in two words,
plan ahead. Think about where you tie in and tie off
a material and how that area/s will affect the next
part on the fly. As you near the head of a fly, you
may have as few as one material to tie off or a couple
dozen in the case of a fully dressed fly. The planning
for the first fly isn’t too involved or complicated
while the latter can be extremely challenging if not
down right frustrating. Here, every turn of thread
even 8/0 adds up as do often bulky materials.
One strategy employed by many Tyers, now and in the
past is to tie off a material well behind the eye
and cover that area by the next material and stagger
the tie off’s in that manner so that all of them (or
no more than absolutely necessary) don’t converge
in the same spot at the head. This technique is shown
in the streamer tying section
here. The same technique can be employed in other styles of
flies too.
The most difficult heads to make small are those on
hairwing flies. Usually solid or “hollow” hair simply
by its structure creates bulk even in the most skilled
hands. How to control the bulk of any given hair is
the question.
Bucktail on the classic streamers can be tied on in
several steps. By tying in a smaller bundle one on
top of another, you can get 100% compression easier
and make a more durable wing. You will add turns of
thread though so consider that. Thankfully, tradition
is that the heads on many streamers will accept larger
heads than on other styles of flies. In fact, I find
myself going out of my way to increase and elongate
streamer heads. It’s purely a matter of style though.
If you are using loop eye hooks you can employ the
Ed Hass winging method that is described in
the hairwing section in the Silver Monkey lesson. This
technique results in a bulletproof wing and allows for
a tiny head that will impress your friends and everyone
who sees them but doesn’t know the Hass secret.
Another factor in making a “minimalist” head is the
amount of material to have on a wing. Often times we
will select too much hair for a wing. Try to fight
the tendency to use too much material in your flies
and particularly on the hairwings.
Finally, the size and methods for using the thread can
have a big influence on the size of the finished head.
Unlike the days in the past, we have access to many
materials our ancestors would have killed for. They
were forced to use large threads that quickly built
bulk. This presented challenges to the Tyers when
tying the full dressed flies. Our micro threads
allow us to make many more turns of thread with
less bulk than the larger threads. Even though
you use small diameter thread, this does not mean
you can just pile on the thread without consequence.
Most Tyers know that you can flatten the thread by
untwisting it. This allows the same amount of thread
to be spread over a wider area which helps hold a
material better with the same turns of twisted
thread and to do it with minimal buildup. It does
weaken the thread though so care not to break it
when wrapping should be taken.
I prefer 8/0 UNI-Thread for the majority of my thing
but other Tyers like other threads. Generally, a
strong thread is better than a weaker one. You need
to be working with the thread at 99.9% of its breaking
point to allow you to achieve 100% compression of the
materials. If you don’t get 100% compression, you
stand the chance of having flies that will blow
up on you. Not a good thing for fishing or display flies.
So, the main way to tie flies with small, neat heads
is to plan ahead and keep focused on ending well
behind the eye. ~ Ronn
The technique I use for building a head is based
on a few tricks I picked up when studying Alec
Jackson at the vise and from reading about John
Shewey’s “flush-cut wing method.”
Let’s start with the ‘right’ thread. I use a Danville
UNWAXED 6/0 Flymaster thread for my heads on 99% of
my mangy flies. White or Yellow Bennechi 12/0 thread
is my ‘working’ thread only, and I’ll usually change
from my working thread to my ‘head’ thread somewhere
along the hook shank or before I wrap my first collar(s)
depending on the type of body I’m tying.
The UNWAXED thread though is very important for two
reasons. First, it’ll turn in to a flat ‘ribbon’ when
twisted counter-clockwise therefore reducing bulk when
wrapping - and second it allows for very even and deep
head cement penetration. I’ll address head cements
and their application in a moment.
Properly trimming and preparing the material under
the head is also important. I’ll use hair as an
example. Clip the requisite amount of hair and remove
the under fur and short fibers. Even the tips in a
hair stacker (if needed) and after measuring the wing,
cut the butts off close to your thumb and forefinger.
Mount the hair against the shank (normally the return
loop) and secure with a FEW wraps of thread. There
should be nothing left to cut away. If there are a
few bits of fiber extending too far ahead of the
thread, they can be gently nudged back using your
bodkin or a fingernail. At this point, if I’m making
a presentation fly, I’ll add a drop of THIN head cement
to the thread to help ‘bind’ the first wraps of thread
and the hair. I’ll also let the cement set or dry for
at least 30 minutes before I finish building my head.
Another method you can use is Ed Haas’ “reverse wing”
technique for minimizing bulk in the head - that’s
something I personally haven’t mastered yet but is
certainly worth trying.
After my cement has cured, I’ll twist my bobbin
counter-clockwise to flatten the thread and whip
finish my head. The flattened thread makes a smooth
head with little bulk. ~ Scotty
Note: Scott (Scotty) Howell is a gifted Tyer
from the Seattle Washington area. Scotty humbly calls
himself a “rookie Tyer” but rookie or not, his work
is that of a well seasoned and expert Tyer by any
measure. Some of his work can be viewed at
www.angelfire.com/wa/salmonid/contributor14.php
and here in the coming weeks.
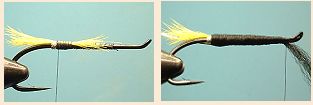
Producing a fly with a bullet shaped head is quite
simple, however the most important feature remains
the same the wing must be well anchored and not come
apart after being tied in. The first three or four
turns are the most important; these turns are at 90%
thread strength.
Once the throat is tied on, prepare the base for the
wing high enough to insure a low profile of the wing.
As shown I only prepare a base for as wide as the head
will be, finishing with the thread close to the throat.
I tie my wing on with the first wraps tying from (right
to left) as this grabs the materials; I find that tying
from left to right the thread has a tendency to push
away the materials.
Measure the length of the wing desired and cut,
before tying on ensure the wing is flat against
the hook shank, and the butt of the wing is only
as long as the base that was previously prepared.
With slippery materials such as squirrel etc., I
tie the wing on in two stages. You start with the
thread which is close to the throat bring it slightly
to the right insert it through the first half of
the wing, then bring it straight up then down at
90% strength, take the thread and complete the
turn while tying in the second half, the subsequent
couple of wraps should be to the left of the first
wraps. These are the most important wraps (anchors)
these are also tied with the thread twisted and at
90% strength.

At this stage I unwind the tread (counter clockwise)
until it is flat if you are not sure just let the
bobbin hang free and it will unwind itself.
With the tread flat it is easy to climb up the squared
hump of the wing with a little practice you can form
a nice neat small head. ~ Marc
WING LENGTH
Q.
What are the proper wing lengths for various styles of flies?
~ Mary
A.
That’s a question that will vary with the style of
fly, the Tyer’s taste and what “looks normal.”
I think that looking at as many flies tied by as
many Tyers as you can, you will be able to recognize
what are pleasing wing proportions. This applies to
hair wings, strip wings, Speys & Dees, streamers,
married wing classics or free style flies. These
proportions will be what you will judge as normal
and may not be the same for other Tyers although;
this “normal” proportion will be close to them.
It’s a matter of “balance.”
When I tie a fly, I pay attention to body length
and hook size because those two items dictate maybe
90% of the size of the wing. Of course, when tying
an abbreviated “low water” fly, you disregard the
hook and just downsize the dressing one or more sizes.
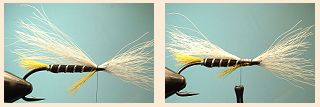
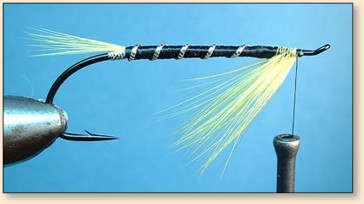
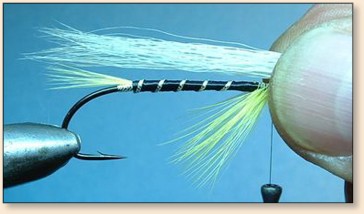
To illustrate a bit on wing size, here are three photos
of the same fly.
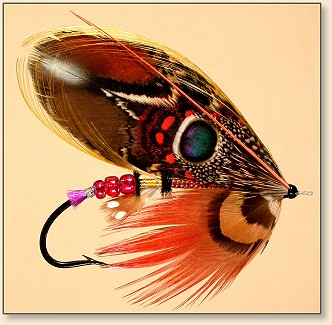
Photo A. shows the fly with the wing
about as large as you would want to have it on that
size hook. The throat feathers help “balance” the fly
with a shape a bit smaller than the wing.
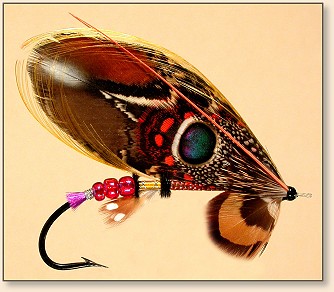
Photo B. shows the same fly with most of the throat
removed. You can see that the small throat doesn’t
really balance the wing and it doesn’t seem to look
“right.”
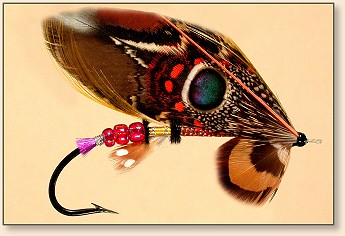
Photo C. shows the same fly with some of the wing
reduced. The lower profile and length of the wing
now has better balance with the small throat.
Any of these three proportions can work but they
all take on a different look. One is not any more
“right” than the others.
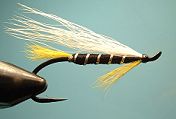
Party Favors, by Ronn Lucas, Sr., free style
Party Favors is a fly I tied that is not a particularly
successful attempt on my part. I used a pair of Macaw
feathers for the main wing and proceeded to tie the
tail too long for the hook size. When I got to the
point of tying in the wing, the feathers were too
short. Since these were the only two feathers like
them I had, I was stuck with a real problem. I decided
to proceed with the fly and to try to balance the wing;
I used some bucktail and lovebird feathers as the main
components of the throat to try to balance the main wing,
another wing if you will. In hindsight, I should have
just cut the fly apart before tying in the wing and
using another pair of great feathers for the throat.
I keep it around to remind me to keep focused as I tie.
People don’t usually want to put bad work out there
for others to be able to criticize and, believe me,
I thought awhile before adding this to the series.
I decided to add it to show a couple things. One,
proportion is important and even minor things can
have a major effect on the look of a fly. Second,
every Tyer ties a stinker now and then!
Streamer wings. When talking about bucktail and hackle
tip wings on Rangeley style streamers, the wing length
again, has an accepted “norm”. There are at least two
factors to consider with these styles of flies. Hook
fowling by a streamer wing is always a factor to keep
in mind. Generally, a wing slightly beyond the bend of
the hook will not interfere with hooking fish. I might
add here that an underbody of bucktail should not be
too heavy/thick since this could reduce hookups on
streamers just as on smaller flies. So, watch the
hook gape. Generally a 1/3 the length of the streamer
body is a pleasing and effective wing length beyond
the hook bend.
Hairwings. I like the wings to end at or slightly
beyond the bend. Stripwings should end at about
the bend.
TOPPINGS
Q.
How many toppings should be used on a tail or wing?
~ Frank
A.
Most flies using Golden Pheasant crest for tails
and/or toppings use one on each. There are patterns
that call for and Tyers who routinely use multiple
toppings either for full topping wings or just
regular toppings. I generally use one on my flies
so the effect of the tail and topping will be subtle
and not detract from or hide the wing. ~ Ronn
Originally published c. May 1, 2004 on Fly Anglers Online.