My wife and I used to go to the Rotorua lakes area quite often
(not so much with the birth of our daughter, but we will again once
she’s a wee bit older). We would stay at a campground that has
the Waiteti Stream running through it. There can be some very
good fishing at the stream mouth, especially in the heat of the
summer when the lake warms up and the fish come in to the cooler
water. I would fish there a lot, got to know some of the locals, and
while they would haul in fish after fish, I wouldn’t get a touch. Finally,
I took a closer look. Although much of the stream is quite shallow,
leading me to use a floating line, at the mouth there was a large and
deep pool and the fish were staying very deep. I should have been
using a sinking line to get down to them.
Back home, while tying up some flies, I was trying to decide what
to do with some squirrel tail that I had. I didn’t have any pattern
books at that time that listed any squirrel tail streamer patterns. I
played around a bit, and came up with this one, which I called the
Hammlim Minnow (combining my last name with my wife’s maiden
name). At that time I just tied it on a regular straight shanked hook,
2 x l length size 10, and used yellow fibres for the tail (rather than all
the fancy touches I’ve added since getting these TMC200R hooks).
Anyway, on the first occasion I had to use it (and my sinking line) I
landed a 7.25lb brown just after sunset. Since then, I’ve caught
browns and rainbows in both day and night conditions. It has
become my most productive lake fly, along drop offs, weedbeds,
river mouths, where ever you would expect small fish to gather.
John Scott has done well with it in moving water as well, and he’s
landed cutthroats, along with rainbows and browns as well (I think).
I hope you find this a useful addition to your fly box as well.
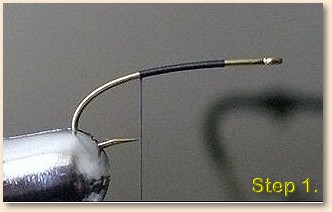
Step 1: Tie on and form a smooth underbody of thread. Stop
with the thread hanging down at the point. I tie in quite far back
from the eye to act as a landmark. This helps me (at least) to
avoid crowding the eye when it comes time to tie in the wing
and cheeks.
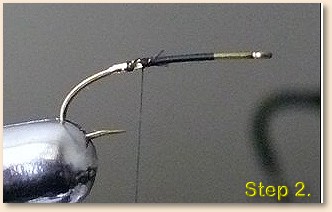
Step 2: Tie in a short piece of gold tinsel and form a small tag to
mid-way to the barb. Bring it forward a bit larger than you want
then tie off. This way, the tie off gets covered by the tip in the
next step.
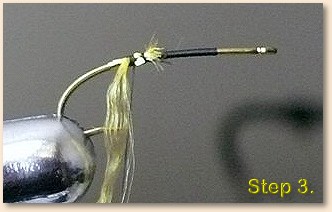
Step 3: Tie in a short strand of golden yellow floss. This piece
was about two inches at most.
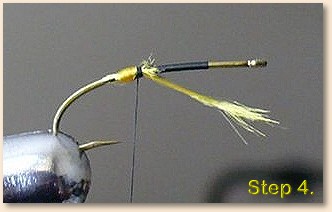
Step 4: Wrap the floss in more or less one place to form a small
ball. Then bring it forward to tie off. Again, the tie off will get
covered by the body tinsel in the next step. Trim the excess floss.
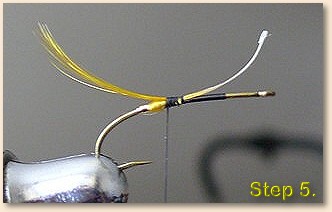
Step 5: Lay the golden pheasant crest in for a tail. This is
a great natural material for tails. It’s brightly coloured,
almost wiry so it holds it shape, and has the translucence
that natural material has. Tie in with loose wraps at first
to prevent it flaring though.
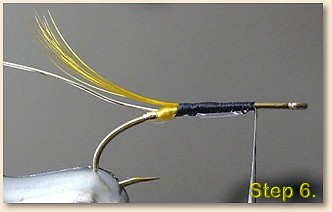
Step 6: Tie in the wire for the rib along the bottom of the
hook shank. At the front, tie in your silver tinsel with the
tag going towards the tail, the idea is to always have your
tie in location in a spot that is going to get covered up.
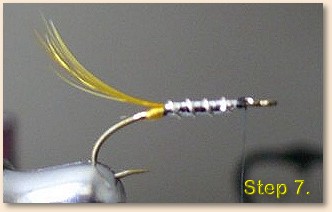
Step 7: Wrap the tinsel back to the tail and forward. Tie in,
then wrap the rib from the tail to the front and tie it off too.
Hold your thumb nail against the wire and wiggle the tag of
the wire to get it to break off at your nail. This saves your
scissors.
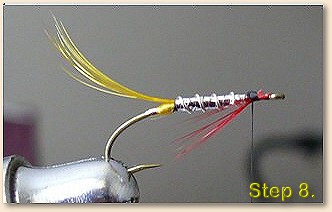
Step 8: Tie in a few bright red hackle fibres as a throat.
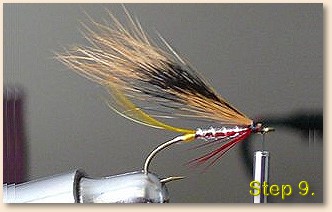
Step 9: Tie in a clump of fox squirrel tail hair as a wing.
Start by doing one wrap around the hair only to form the
clump, then tie this down firmly. It can help after a few
good firm wraps to pass the thread over the top like a
normal wrap, pull the hair forward, then wrap the thread
behind the wing, come over the top again, and wrap a
few more good firm turns. This can help elevate the wing.
When you trim the waste, add head cement to the exposed
tips then wrap to cover. Squirrel tail hair doesn’t compress
like deer hair, so wings made from it will “explode” if you snap
the fly during your cast (guess how I know that!) .
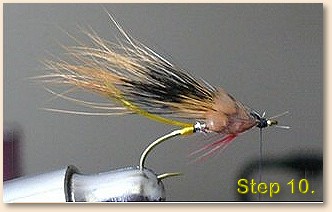
Step 10: Tie in two tips from Woodcock wing feathers. I
also use the brown feathers from golden pheasant wings.
Basically, a mottled brown feather is what you’re looking
for. They should extend about half the hook, so there’s still
some sliver exposed.
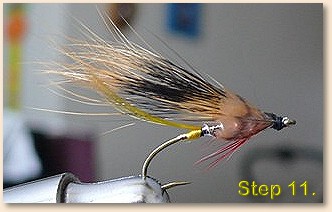
Step 11: Trim the stems, form a head, whip finish and that’s it!
You can, if you wish, drop the fancy bits at the tail, and
just make a tail of yellow hackle fibres. I tend to do that
if I use a straight shanked hook, but with these hooks, I
like the bits and bobs and they don’t take any real amount
of time to do. ~ Jeff Hamm
For more great flies, check out: and
Originally published November 17, 2008 on Fly Anglers Online by Jeff Hamm.