**The
Caseless Caddis
By Hans van Klinken, (Holland)
Drawing by Aideen Canning
Examine the gullet of just about any trout caught at just about any time
of day, and just about any time of year, in just about any water, and the changes are you
will find at least one caddis larva. Examine just about any submerged rock of stick, or
disturb the bottom sediment on just about any piece of fresh water, and the changes are
you will find caddis larva. A large number of them are those omnipresent little buggers
that make those cases out of spruce needles, or tiny sticks or even fine gravel or weeds.
On the other side you have a large group of caseless ones. For trout it doesn’t matter if
they are cased or not. Trout really love them. On a season-long base, caddis larva’s are
arguably the most prolific trout food and we are crazy not to use them. A caddis larva
imitation should be in our fly boxes at all times.
IMITATIONS
In 1986 I started to collect caseless caddis species from several
rivers, which I tried to imitate as close as possible during the winter months. The first
patterns I tied were not pretty looking creatures, but rougher bottom bouncers. They were
a little too heavy and too bulky and did not look like the real insect I was trying to
copy. However, the flies worked reasonably well. Despite this, I discovered that it was
not easy to tie realistic nymphs! Improvements were made several times but still I was not
satisfied. My large Scandinavia nymph was even better and I had more confidence in them
because he had proved to be very effective all over Europe. It is no secret that the
caseless caddis imitations, which I use today where, developed after some long discussions
with England’s Oliver Edwards, accepted as one of the finest fly tiers in Europe. I told
him a lot about my large Scandinavian patterns, fishing techniques and thoughts. We are
good friends and share each other secrets and techniques without hesitation. Oliver taught
me not only how to study the anatomy of an insect, but he also showed me how to combine
and handle natural and synthetics in a more effective way. He also convinced me that
heavily leaded patterns are not always better catchers then sparsely weighted nymphs.
Nowadays I even believe that under some circumstances unweighted patterns can be more
effective then weighted ones.
The first prototypes of the Caseless Caddis in my series were
developed in the winter of 1987. At that time I still tied my patterns in probably 15
different colours. The first successful attempts to use the caseless caddis occurred in a
Germany river where my friend Jack and I caught plenty of fish with this very effective
nymph pattern. Now I use mainly yellowish and greenish variations. Therefore I have large
quantity and sizes of those colours in my fly-box today
IMPROVEMENTS
After my conversations with Oliver, it was time to experiment. I
improved several of my patterns in the first months of 1988 and tried to give them a more
realistic and better-looking appearance. One of them was my imitation of the caseless
caddis nymph. I think I had learned a lot from Oliver vision about realistic nymph
patterns very much. About the same time Gertjan Doedens, another Dutchmen designed a
similar caddis larva. His idea of using flexibody as back material finally led me to this
excellent caddis larva imitation. The reason that I used a curved hook to present my
caddis is because I find out that disorientated larva often will drift in this way. This
is why I mainly fish the pattern in a dead drift.
FISHING, RESULTS AND TECHNIQUES
The caseless caddis proved also to be an excellent pattern for
beginners. It is easy to tie and extremely easy to fish with. I fish the Caseless Caddis
mostly in dead drift and therefore blind, but when the conditions are right I love it to
fish this pattern by sight in clear water. In deeper or more coloured water where I can
not see any fish I always use a fine bite-indicator which I put directly on the connection
loop where tippet and braided leader are knotted together. I fish it in an upstream dead
drift, watch the bite-indicator and set the hook at any movement, no matter how small and
trivial it sometimes might be. With this fishing technique even brooks or small streams
with a lot of weed are much easier to handle. The second reason for using a bite-indicator
is to present the nymph on the right depth.
SUBSTITUTE MATERIALS
The materials below are the best by far to imitate the
caseless caddis in the most realistic way. Furry Foam is easy to obtain but hare-tron or
fine dubbing materials will do also. For the back thin skin is a perfect substitute. I
prefer a dark grey transparent colour. This makes the back darker than the body. I use
many green colour variations.
THE DRESSINGS
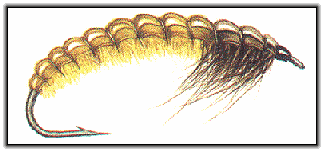
The Green Caseless Caddis Larvae
(Ryacophila)
Hook : Partridge GRS12ST or GRS15ST size 12
Underbody: Leadwire (shank one layer, thorax double)
Thread : Uni thread 8/0 Black
Ribbing : Monofilament 0,20mm at least 12 windings
Body : Olive green furry foam
Back : Grey transparent flexibody
Thorax : Fitch or mink (dark brown) dubbing well picked out
Head : Black
The Yellow Caseless Caddis Larvae(Ryacophila)
Hook : Partridge GRS12ST size 12 reshaped into wide cap
Underbody: Leadwire (shank one layer, thorax double)
Thread : Black
Ribbing : Monofilament 0,20mm at least 12 windings
Body : Dirty yellow furry foam
Back : Grey transparent flexibody
Thorax : Fitch or mink (dark brown) dubbing well picked out
Head : Black
Caseless Caddis Larvae
(Hydropsyche)
Same as above only with tail
Tail : A few fibres from a Emu or Ostrich herl
TYING TECHNIQUES
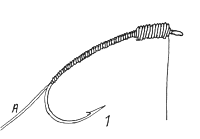
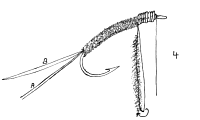
Step 1
Put fine lead wire on the hook shank (two layers around the
thorax). Tie in 0.20mm diameter clear monofilament for use as rib and to create the body
segmentation (A). Secure the underbody well with thread and lacquer to be sure the
materials will be not twist around the hook shank when the fly is finished. Some of my
friends use a drop of superglue before they put on the leadwire.
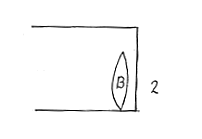
Step 2
Cut out a small piece of grey transparent plastic (B) in the
shape as shown in the drawing
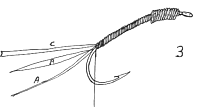
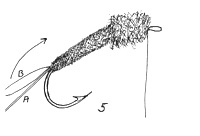
Step 3
Tie in the strip of plastic (B) and a small strip of Furryfoam
(C). If furry foam is not available use hare-tron or fine dubbing material.
Step 4
Wrap the furryfoam around the shank to form the abdomen. Use some
dark brown mink dubbing for the thorax.
Step 5
Make a nice thorax and pull over the plastic sheet. Secure it
with your tying thread and wind the monofil in at least 12 turns to the eye of the hook
and tie off. You have now a good and effective segmentation, which is of vital important
for this pattern. Pick well out the mink hairs.
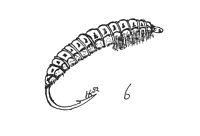
Step 6
The completed fly.
For more interesting flies and techniques, check out my
website! ~Hans van Klinken
— Hans van Klinken
Originally published c. 2003 on Fly Anglers Online by Hans van Klinken.