A lot of the times when I am partially through with a fly I am tieing, as I am pulling the thread tightly around the shank the whole get-up spins around the shank and I have to move it all back into place, or sometimes I must start all over again. The only thing I can think of is that perhaps I am not starting my thread properly. As I have never seen any detailed instructions on how one properly does this I assume maybe I am doing something wrong. Does one drop a bit of head cement or super glue onto the first few spins?
I think I am doing this…
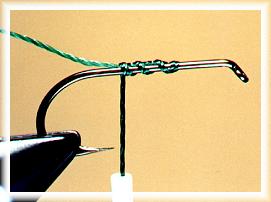
First, you need to know how to start the thread on the hook. This is done by holding the end of the thread in one hand and the bobbin in the other. Start winding the thread over itself as you wind it around the hook.
About three or four wraps should be sufficient. Be sure to keep the thread length short as it leaves the bobbin. You must use a bobbin to hold the thread if you want to have any realistic chance at tying quality flies.
From Al Campbell’s “Beginning Fly tying - Part 5”
Is this a common problem? Am I missing something key? Am I just not being tight enough for my first couple loops?
Jonathon look up to the top of this page and click FAOL Home. Once you are there go to the left side of that page and find fly tying. In that area you will find Al Campbell’s fly tying lessons. He gives instructions on starting the thread and answers a lot of other questions you haven’t even realized you need to ask yet. I’m not real sure what you are doing wrong but try it Al’s way and you should be all right.
If you look reall closely you will see a quote from Al Campbell’s instructions in my post. I have read his complete series and I clipped the only part where beginning the thread is mentioned. :shock:
I still can’t see what your doing wrong from your description. For a temporary fix until you find the problem try putting a half hitch over your tag end after you start the thread and pull it tight to near the breaking point of the thread. That should lock things down.
As I think a little more about it I don’t believe your problem is in starting the thread. I think you should look at how your tying in materials. Are you starting with a fairly loose loop of thread to position them followed be a couple of very tight wraps to lock them down? At that point it should not be possible to reposition them by hand without unwrapping the thread.
A possibility, however the method you mentioned is what Al Campbells series taught, and is how I was trying to tie. I will go back to the tieing bench and update later. First though I must go to work so I can support this hobby :roll:
You said the “whole thing” spins around the hook. I think your problem is that you aren’t tying tight enough beginning when you start the thread. You MUST tie just below the breaking point of the thread almost all the time. There are a few exceptions but if your starting point and the rest of the material tie in and offs are loose, the fly will fall apart. You must be breaking your thread at first so your hands “learn” where the breaking point of the thread is.
Start Al’s lessons and read them very carefully and follow them to the letter. Don’t improvise or skip around thinking you have mastered it until you can tie flies one after the other that are right and consistent. You must learn the basics first!!! I guess attaching the thread is about as basic as you can get.
When I start the thread on the hook it looks very different than that picture. I start behind the eye leaving a space where the head will be. I wrap the thread back in close turns. When I get to about mid-shank I break or cut off the tag end of thread. Then I continue wrapping to cover the entire shank with a base of thread (for most flies). The thread base helps to keep things from sliding around as I’m tying. Hope this helps.
If sounds to me like you are starting the thread and then tying all the fly material on a bare hook shank. If you are, the material cannot get a grip on a bare hook shank. You need to start the thread and then cover the hook shank with thread so the material has something to grip. Just my opinion on what I am reading.
I was initially taught to cover the whole hook but subsequently have seen some very good tyers leave gaps along the shank…does anyone think it makes any difference?
Leaving gaps is faster uses less thread[as though that matters] and may by creating more ridges create more grip…???
I agree with Jayatwork. Most flies benefit from having a side by side (keeping each wrap next to the last one) thread base from behind the hook eye to just above the hook barb. An exception would be when spinning deer hair, but that’s a different technique as you become more experienced. Placing those wraps tightly (just below the breaking strength of the thread) on the hook shank is critical as well. This just takes a little practice, and as suggested above, requires you to break the thread to teach yourself what the breaking point actually is with each different type of thread. Even still, the materials will move slightly around the hook shank unless each step is finalized with a little glue, but that’s not usually necesssary. Save your glue for cementing the head.
The one time when having a thread on thread wrap is critical, is when you are needing a smooth thread wrap, for a floss body. Any bumps or gaps in the wrap will show in the floss body.
To achieve a tight tread wrap on the hook shank…
Holding the tag in with one hand, wrap the tread around the hook. After a couple wraps rearward. tighten the tag line.
Hold the tag line tight, lay the wrapping thread on the tag line, and slide it down onto the hook shank.
The wrapping thread will lay tight, up against the previous wrap. If there are any gaps in the wrap, you just tug forward with the tage end of the thread.
That picture illustrates the technique up to a point. I would not go with any less than 5 wraps to start a fly and most often use more than that. Also something you can’t see in a picture is that as you tie, your thread tension should be approaching the breaking point of the thread. After all it is the thread tension that holds the materials to the hook. Glues and head cement can help but are not a substitute for proper technique.
The illustration you have shown is the way I teach and I have never wrapped the complete hook to start as some have suggested. If your thread is wrapped tight to the rear of the hook as shown and the tag then cut you shouldn’t have any trouble–then wrap thread forward as you add material. BILL
Wow, a lot of grate tips. I can see this topic was busy while I was at work.
By:Steven H. McGarthwaite
To achieve a tight tread wrap on the hook shank…
Holding the tag in with one hand, wrap the tread around the hook. After a couple wraps rearward. tighten the tag line.
Hold the tag line tight, lay the wrapping thread on the tag line, and slide it down onto the hook shank.
The wrapping thread will lay tight, up against the previous wrap. If there are any gaps in the wrap, you just tug forward with the tage end of the thread.
I think this was what I was looking for and can’t wait to go try some test. Thanks!
Mark, nice link! I just took a quick peek and will have at it once I get off this dial-up connection(I’ve been having problems viewing websites that are hosted on NS*.WORLDNIC.COM servers including FAOL from my work connection so have been swaping high-speed to dial-up depending on server location)
Hold tag end in your left hand pulling the thread over the hook shaft at about the halfway point.
Make four or five wide wraps forward to near the eye. One of the biggest mistakes when you are starting to tie flies is to not leave enough room for the head wraps so leave some bare shaft behind the eye depending on type of fly you are tying. This helps as a guide as to how far to apply dubbing, add wings, etc. and still have enough room to tie a head.
Wrap tight turns back towards the bend, leaving no gaps between wraps.
When you reach the tag continue to hold the tag line firmly out at about a 90 degree angle and use it to guide rapid neat, tight wraps back to the bend.
When you get near the point of the hook angle the tag down and slightly forward and wrap at an angle (back to the left on the top turn and more forward to the right on bottom turn). This will help you from hitting the hook point and cutting your thread.
Just before you reach the bend of as far back as you want to make turns, snap or cut the tag off and make a couple more wraps or just start adding the tail, weight or whatever the tying directions tell you to add.
With a little practice using the tag as a guide will really increase your speed in applying the thread base to the hook.