The RS2 is one of my favorite flies. If you have ever had the
pleasure of watching Rim Chung and his unconventional
nymphing technique work through a run, this fly might become
one of your favorites as well. This guy catches fish like nobody’s
business. Rim uses an old Sage LL rod in the 389 configuration
(8-foot, 9-inch, 3-weight), a thin-diameter level line, and a long
leader. He weights the leader with split shot or putty and uses no
indicator. I could say that Chung’s deadly technique is reminiscent
of the now-popular Czech nymphing style, but I believe I would
have to say it the other way around, since Chung has been at this
game long before I ever heard of Czech nymphing. Chung is a
gracious and gentlemanly angler and is a pleasure to share the
water with.
When I guided on the South Platte River it seemed that at least one
of my clients always had an RS2 on, and I would bet that half the fish
my clients caught were victims of this fly. Confidence in a pattern can
make all the difference, and I have a lot of confidence in the RS2.
The pattern that we will tie here is not Rim’s original, but a variation
that I developed over the years using alternative synthetic materials.
Synthetics are, in my opinion, more durable, cheaper and easier to get,
and more consistent than their natural counterparts.
I’ve incorporated a few special techniques into my RS2 variation after
years of tying these flies. The first is to split the tail with the tag end of
the thread. I first saw this method used by Scott Sanchez in Tying
Flies with Jack Dennis and Friends. It is so simple and obvious
(once you see it) that it will leave you slapping your forehead and wondering
why you didn’t think of it first.
The second trick, which is especially useful on flies smaller than #18, is
to cut the Super Fine dubbing clump in half across the center of the bunch.
Super Fine’s long fibers make it hard to control the taper and density of
the body. Cutting the dubbing lets you add it in smaller increments,
allowing more control over its application.
The third trick is burning or melting the Antron wing clump. If you tie your
RS2s with Antron wings, you quickly find out that you can only tie a few
flies from a length of Antron before it starts to fall apart and become
unusable. This trick prevents this and makes for more efficient use of
both your time and materials. Clip a length of Antron from the package,
so it is as wide as the card it came on, which is about 3 inches. Hold
one end of the Antron up to a flame and melt the ends a bit. Take the
flame away and quickly pinch the hot end (be careful) to fuse the end
together. Now you have a “wing blank” that will tie a dozen flies without
falling apart. You tie the loose ends of the Antron to the hook, so the
melted end will always be toward the rear of the hook and stay intact
for the next fly.
When you buy a pack of these fibers [Microfibbets], they are typically taped to
a paper card and slightly stuck together at their base. The fibers
separate and become hard to handle and the tips are never even.
To alleviate the trouble with unruly synthetic tailing fibers, take a
brand new pack of tailing fibers and remove the tape and the paper
card, then cut the gooey bases off. Put the entire clump in your hair
stacker and tap them a few times to even them. Remove the fibers
from the stacker and bind the ends with heavy thread (use brightly
colored thread so you can find the clump more easily), just like you
would on a fly. Tie a whip-finish around the bases and clip the thread.
Melt the butt ends of the clump with a flame and press the hot end
against your workbench to form a small nub. Now you have clean,
nicely stacked tailing fibers that won’t separate for years to come.
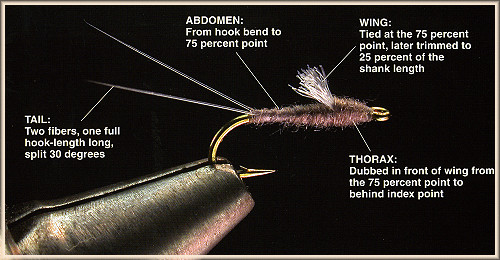
The RS2 is the first fly in this book that uses the front-to-back
dubbing technique. After tying in the wing, the wing butts will
create bulk on the hook that forms a slope toward the hook eye.
If you were to try to dub from the base of the wing forward to
the hook eye, the dubbing would slide down the hill and pile up
at the hook eye. To counteract this, dub from the rear edge of
the index point up to the base of the wing and then back to the
index. This allows you to climb the dubbing up that slope using
each wrap to support the next, instead of collapsing on top of
one another. This also assures the abdomen and thorax tapers
flow together.
The RS2 is a great mayfly emerger pattern that can be fished from
the stream bottom to the surface. I most often dead-drift it on the
bottom as a nymph, but it can be effective on the swing also. I
typically rig a #20 RS2 in a two-fly rig with a Pheasant Tail or Barr
Emerger on the front end with the RS2 on a 12- to 15-inch dropper
off the bend of the first fly. I have also fished the RS2 as an emerger
pattern in the surface film. I have taken to fishing it behind a Parachute
Adams or other visible dry so I can spend less time searching for the
fly and more time catching fish. While the standard RS2 color is gray,
this fly is also a killer in black, brown, and olive.
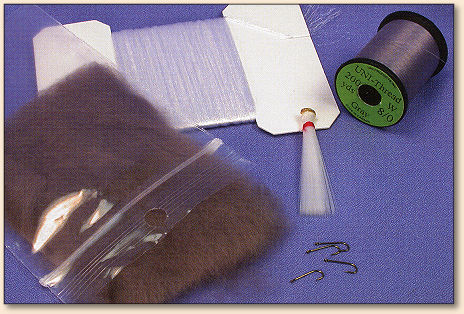
RS2 materials
Hook: #16-24 Tiemco 101.
Thread: Gray 8/0 Urn-Thread.
Tail: White Mayfly Tails, Microfibbets, or
other synthetic tailing fibers
**Abdomen:**Gray Super Fine.
Wing: Bright white Antron
Thorax: Gray Super Fine.
Method for the RS2
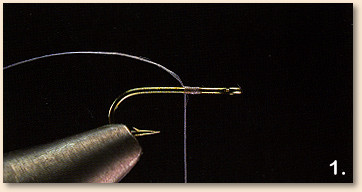
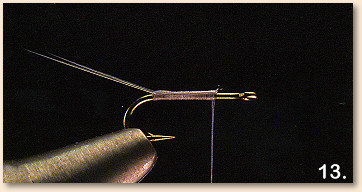
1 . Attach the thread at the 75 percent point on the hook, leaving a long tag end.
- Wrap back over the tag end toward the hook bend, taking care
to keep the tag end along the top of the hook by lifting it slightly
toward you.
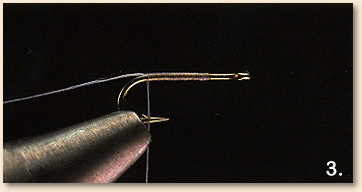
- Thread torque should pull the tag to the top of the shank.
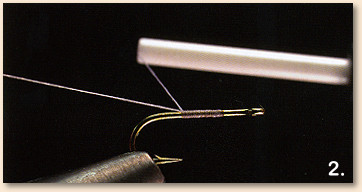
- Select two fibers from the bundle of tailing material and even
the tips. Measure these against the hook shank so that they are
a full hook-length long and grasp them at this point with your
material hand. The tapered ends should be in your fingertips
with the butt ends sticking out toward the hook eye.

- Place the tailing fibers along the top of the shank at the bend
at an angle that points the butt ends at your thread-hand-side shoulder.
- Wrap the thread up and over the tail fibers, allowing the thread
torque to twist the tail fibers to the top of the hook shank. Make
another two turns of thread over the butt ends of the tail up to the
hook point.

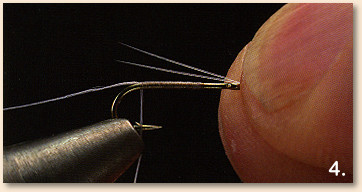
- Press your thumbnail up under the tails to lift and splay them out.
- The tails should be separated and on top of the hook. Make
sure the tails are not crossed up or tied down on one side of the
hook shank. If the tails are off to one side, splitting them will
become much more difficult.
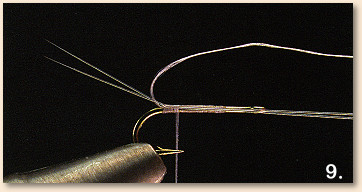
- Lift the tag end of the thread that was hanging off the hook
bend up between the tails.
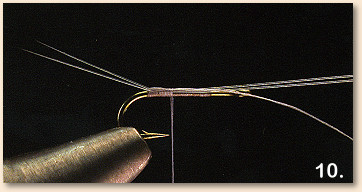
- Draw the tag end tight, allowing it to push the tails apart.
You may need to maneuver the tag to the left or right side of
the hook to manipulate the tail fibers so they are split evenly.
Tie the tag end down at the hook point with a turn or two of
thread. All the thread turns are traveling forward one in front
of the other to eliminate bulk at the rear of the fly.
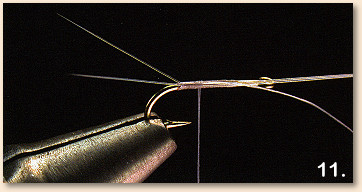
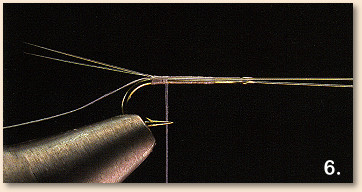
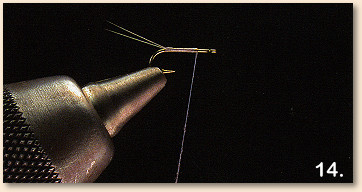
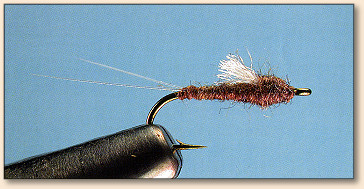
11 . The tails should be split at about a 30-degree angle to each
other and be slightly elevated.
- Continue wrapping the working thread forward to the 75
percent point, one turn in front of the other.
- Clip the tag end of the thread and the tail butt ends.
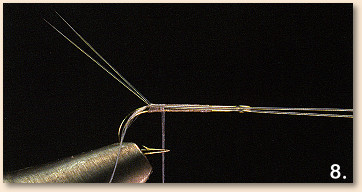
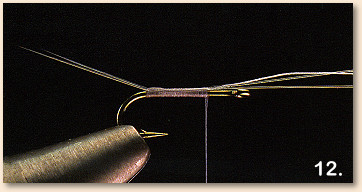
- Dub the thread with a thin, slightly tapered strand of gray
dubbing. There should be one half to 1 inch of bare thread
between the top of the dubbing strand and the hook shank.
- Use this bare thread to work back over the shank to the
hook bend. Notice the widely spaced spiraling wraps of thread
from the front to the back of the hook.
- Place the first, slender turn of dubbing under the tails by
wrapping around the shank just as you normally would…
- but wrap the dubbing under and behind the tails.
- Draw the dubbed thread forward as you come around the
backside of the hook shank, pulling the first turn of dubbing up
against the base of the tails. This turn should prop the tails up and
cover the tag end of the thread that you used to split the tails. Once
the dubbing is tight against the tails, drop the bobbin to bring the
thread under the hook shank in front of the base of the tails.
- Make the next turn straight up over the top of the shank at the
front edge of the tails. A thin strand of dubbing is required for the
slightly tapered body.
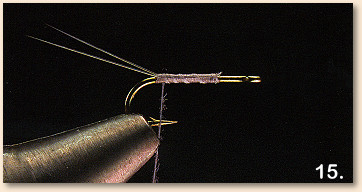
- Wrap the dubbing forward in a single layer to the 75 percent
point on the shank. The trick to making a slightly tapered body such
as this with a single, thin layer of dubbing lies in the angle of the first
few turns. I wrap the first three turns of dubbing at a dramatic angle
toward the front of the shank, almost spiraling the thread forward.
About halfway up the body, I start to make the wraps more
perpendicular to the shank, allowing the dubbing to bulk up.
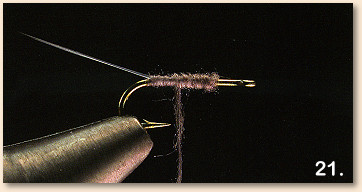
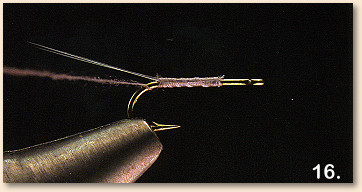
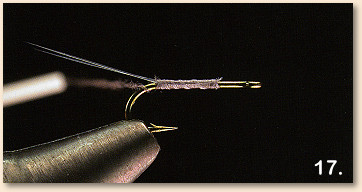
21 . Wrap the remaining dubbing back over the front half of the
abdomen, creating a second thin layer of dubbing.
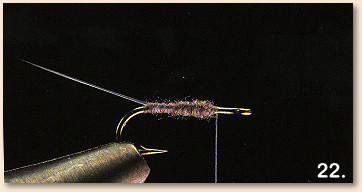
- Move the last of the dubbing forward from the midpoint of
the abdomen to the 75 percent point by making two spiraling
turns forward. Strive for an even taper with no lumps, bumps,
or gaps. End with the bare thread at the front edge of the
abdomen on bare shank.
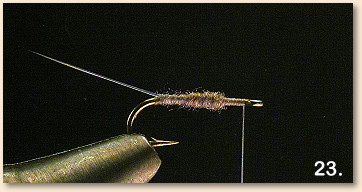
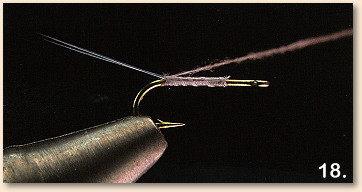
- Wrap a smooth, flat thread base up to the hook eye.
- Wrap back to the front edge of the abdomen to cover the
shank with a thread base for the wing to adhere to.
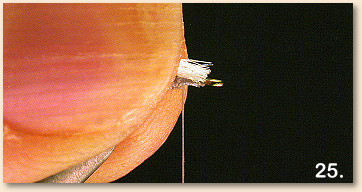
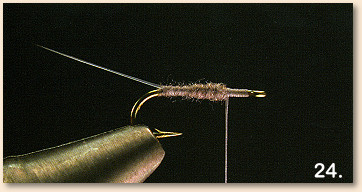
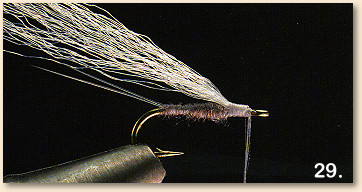
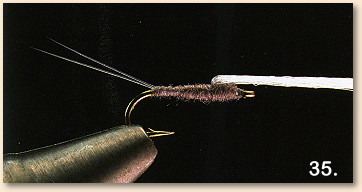
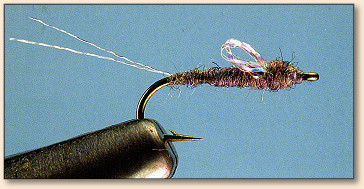
- Pick up the Antron wing blank you prepared at the beginning
and clip the loose ends square. Hold the loose ends of the Antron
between your thumb and forefinger of your material hand as close
to the tips as you can. Place the yarn flush against the top of the hook
shank with the stub ends facing forward. You do not want any space
between the Antron and the hook shank. They should be touching,
and the thread should be hanging directly at the front edge of the
dubbed abdomen. I always use an entire strand of Antron yarn for
the wing, rather than thinning it down for smaller flies. Fewer fibers
don’t form the same wing profile, and besides, the Antron compresses
well on the hook and creates little bulk.
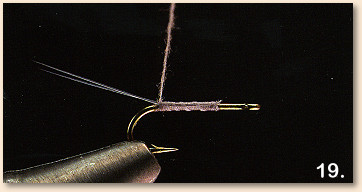
- Bring the working thread up above the hook and push the bobbin
tube toward the hook bend, sliding a length of thread in between your
fingertips on the near side of the Antron. Drop the bobbin over the far
side of the hook, but keep tension on the thread loop in your fingertips
so it doesn’t draw tight just yet. You should have a loop of thread up
and over the material inside your fingertips. This is the beginning of a
pinch wrap and allows you to tie the Antron down onto the top of the
shank without the thread twisting it to the far side.
- Draw the bobbin straight down, closing the loop within your
fingertips so it catches the Antron against the top of the hook shank.
Do this whole maneuver one more time before letting go of the yarn.
It takes two turns like this to make a complete thread revolution
around the hook to lock things down.
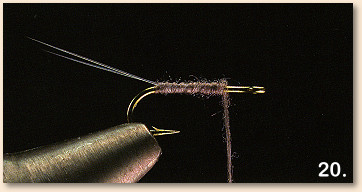
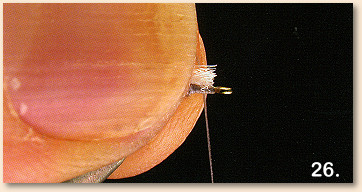
- The loose ends of the Antron should be well behind the hook eye.
If they are not, pull the butt ends to shorten the ends so they are.
- Wrap forward over the ends of the Antron up to the hook
eye. Let the thread hang in the index point.

- Twist a bit more dubbing onto the thread.
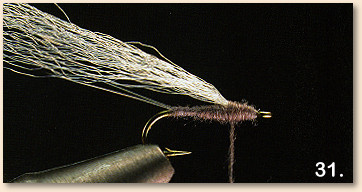
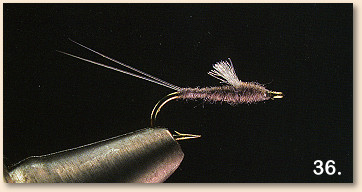
31 . Begin wrapping the dubbing from the back edge of the index
point up to the base of the wing. Wrapping the dubbing up the slope
from the front to the back of the hook prevents the dubbing from
sliding down the hill you created with the butt ends of the wing.
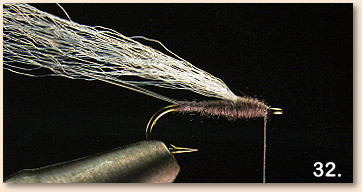
- Wrap the remaining dubbing forward to the back edge of
the index point, ending with bare thread behind the hook eye,
so that you have a descending taper with the thickest point at
the base of the wing. Overall, the whole fly should look like an
elongated teardrop when viewed from the bottom, with no seam
or gap at the wing.

- Whip-finish and clip the thread.
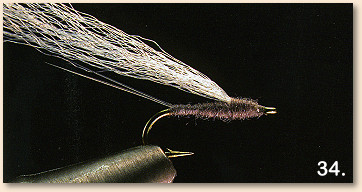
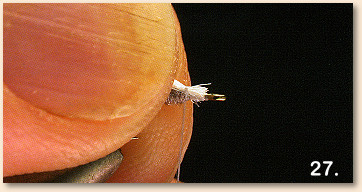
- The wing is now ready for trimming.
- Pull the wing straight forward over the hook eye.
- Clip it straight across at the back edge of the hook eye.
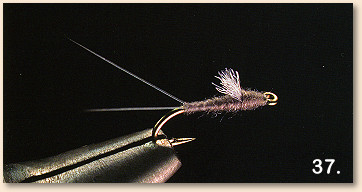
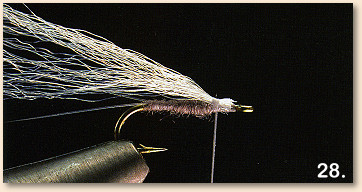
- Another view of the finished fly.
Pattern Variations
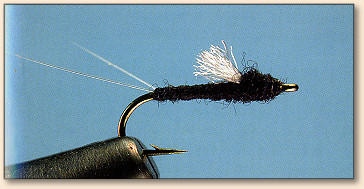
BLACK RS2
BROWN RS2
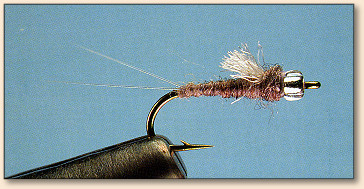
MERCURY RS2

OLIVE RS2
SPARKLE WING RS2
Credits: From Charlie Craven’s Basic Fly Tying
By Charlie Craven. Published by Headwater Books.
For more great flies, check out: and
Originally published October 6, 2008 on Fly Anglers Online by Charlie Craven.