Predator Mouse By Richard A. Lewis, California
History:
The “Predator Mouse” fly pattern was developed
in 2004 after a multi-year study of mice patterns.
Several years ago I attended a fly fishing show
and witnessed Dave Whitlock tying his “Mouse Rat”
pattern. Dave spun layer upon layer of deer hair
and carved his masterwork pattern while a crowd
of fly tyers looked on. I was amazed by Dave’s
artistic talent and by his tremendous patience.
While I eventually learned to tie Dave’s “Mouse Rat,”
I found that particular pattern quite time consuming
and rather messy to tie. I kept looking for another
mouse pattern to adopt for my fishing needs.
The next year I was able to meet Jack Gartside
at a fly show and watch him tie his famous Gurgler
patterns. Jack showed me a variation on the
“Gurgler” that he calls the “Furgler.” It is
made using crosscut fur strips over his standard
Gurgler body. I thought the “Furgler” pattern
was promising and began to experiment with that
concept as well.
The next year I stumbled upon Lee Haskin’s impressive
variations of Jack Gartside’s “Gurgler.” Lee has made
a business based upon the improvements he made to the
“Gurgler.” These changes include shaped, die-cut foam
strips, the use of a thicker gage and higher density
foam than Jack typically uses, and several species-specific
variations. Lee Haskin also developed a process to form
a pronounced “lip” with a tapered profile by heating
and shaping it. This improved “lip” affects the way
in which Lee Haskins’ Gurglers swim and move water.
I purchased several" Gurgler" kits along with one of
Lee’s Mouse patterns. Lee stated that his Mouse
pattern had produced fish catches on Alaskan rivers.
My mouse pattern experimentation continued in earnest.
This past Summer (2004), I settled upon a Mouse
configuration which I call the “Predator Mouse.” If
asked about this pattern’s roots, I’d have to say the
“Predator Mouse” is a cross between a Lee Haskin
Gurgler Mouse, a Jack Gartside “Furgler” with a
nod to Dave Whitlock’s Mouse Rat (I added a
generous set of whiskers to the mouse just like
Dave does with his mice). Of course the “Predator
Mouse” has several added features that make it unique.
The “Predator” is a high floating, easy casting,
flashy attractor mouse pattern that swims with a
lot of action.
The “Predator Mouse” has proven to be very effective
on large trout. One angler reported catching four
trout up to five pounds on this pattern in a single
morning’s session. I have a gut feeling that the
“Predator Mouse” will fool a good number of species.
Materials: Predator Mouse
Hook: Daiichi 2722, Size #2, Nickel Finish,
Wide Gap Stinger/Bass Bug Hook.
Thread #1: Danville Mono Cord, 3/0, Gray.
Tail: Ultra Suede, Gray.
Underbody: Tiewell Sparkleflash Chenille,
Multicolored Pearl, Natural, 6 MM.
Legs: “Perfect Rubber” brand Gray
Rubber Strands.
Thread: #2: Cascade GSP II-Gray.
Fur Back: Furry Foam, Gray, or Gray
Vellux Blanket.
Mid-Body Flotation Layer: 3MM Gray, Closed
cell, Fly Foam Sheet-any brand.
Whiskers: Hollow “Bio Fiber” Dyed Black,
or Substitute Six Moose Mane Hairs, or Course
Waxed Thread such as Black Kevlar.
Eyes: Black Acrylic Water Based Paint.
Liquids and Adhesives:
-
Zap CA, Super Thin
Special Tools/Safety Equipment:
-
Vise: Rotary Tying vise, such as the
Dyna-King “Barracuda Indexer”. -
Bobbin: Automatic Bobbin, such as
the Ekich Bobbin -
Single Edge Razor Blade-Unused
-
Disposable Lighter, Candle, or Alcohol Lamp
-
Curved Scissors
-
Wide, Flat Nose Pliers
-
Paint Applicator: Drill Bit, Toothpick, or Rod
Note: All of the materials needed for
tying the “Predator Mouse” are available from
fly shops. The black, dyed hollow “Bio Fiber”
for the whiskers is a specialty material. You
will likely need to use a substitute material
as noted.
Special Note on Hook: The Daiichi #2 hook
specified is a drastically smaller in size than
the similar hook pattern in the Mustad brand.
I suggest not substituting until you can compare
the hooks side-by-side to insure obtaining the
proper hook for a Trout-sized fly.
Safety Note: The materials used in the
construction of this fly will ignite and burn.
Solvents and adhesives are highly flammable too.
Please exercise great care when working with an
open flame on your fly tying bench!
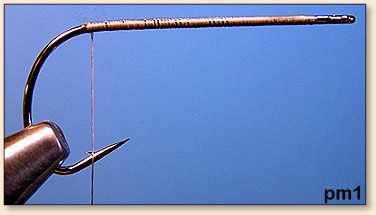
Tying Instructions: Predator Mouse
-
Start by attaching the gray Mono Cord thread and wrapping it from
the eye down to the start of the bend of the hook. -
Apply a drop of Zap-A-Gap Thin and spread it
along the thread wraps to bond the thread to the
hook. Let it set for a minute or two.
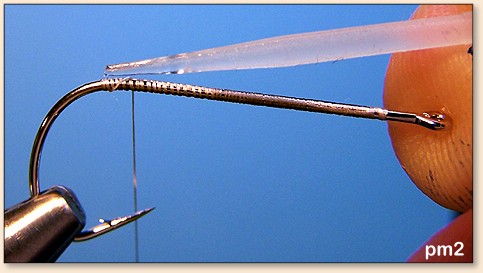
Prepare the Tail
- Cut a strip of Ultra Suede tail material at least
2½-inches long and approximately 3/16 inches wide.
I like to trim the very end of the tail into a
symmetrically shaped point. Apply another good-sized
drop of Zap-A-Gap all along the thread wrap and quickly
position the tail along the top of the hook shank.
Doing so makes binding down the tail very
straightforward and prevents it from spinning on
the hook. Smooth the tail down as it dries.
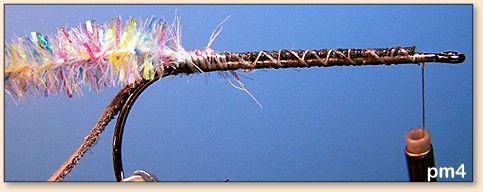
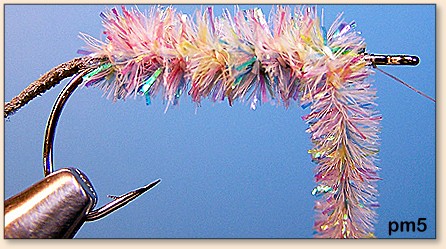
Attach The Chenille Underbody
-
Take a few wraps of Mono Cord around the tail
at the bend of the hook. Start the Chenille there.
Criss-cross the thread forward and back, and forward
again leaving a generous gap behind the hook eye. -
Apply a liberal amount of Zap-A-Gap along the
hook shaft. Soak the tail material and criss-crossed
Mono Cord wraps. Immediately wind a tight course
of the chenille forward. Stop well before the hook
eye. The chenille will bond to the hook and will not
tend to unwind. Tie-off the chenille with a few half
hitches.
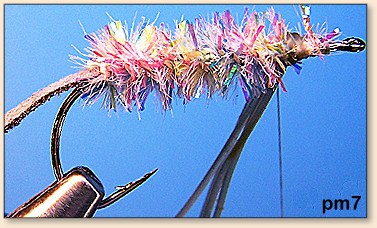
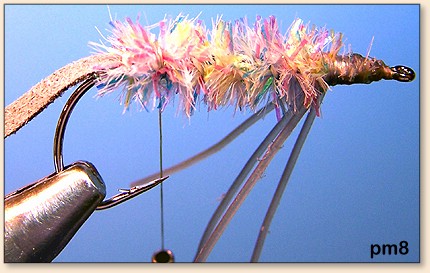
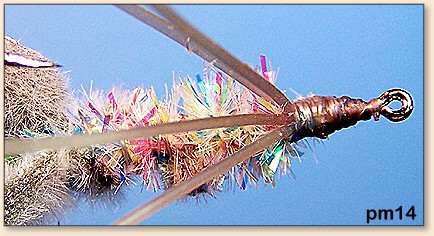
Attach the Legs
-
Rotate or invert the hook in your vise. Section
a strand of Perfect Rubber to provide 2-each individual
strands; each of these 2½-inches long. Even the two
strands side-by-side and loop them around the hook at
the front of the chenille wraps. Apply tension to the
strands and hold them back at a slight rearward angle.
Bind the strands to the hook with several firm wraps
of thread. Throw in a half hitch to secure the wraps. -
Roll the fly back upright and finish securing and
positioning the legs with additional thread wraps.
Ideally, there will be two legs grouped on each side.
Practice makes perfect. Build up a good-sized thread
mound. Trim the Mono Cord. Apply one last small drop
of Zap-A-Gap to secure the Mono Cord termination.
Allow the adhesive to dry a few minutes.

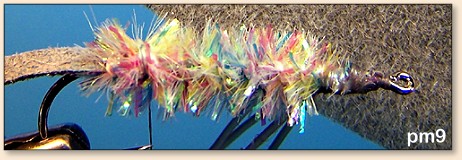
Attach the GSP Thread
- Start the Gray GSP II (spectra) thread at the
hook point. Secure it on top with a small drop of
Zap-A-Gap applied with a bodkin or tooth pick.
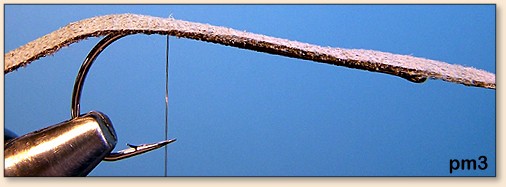
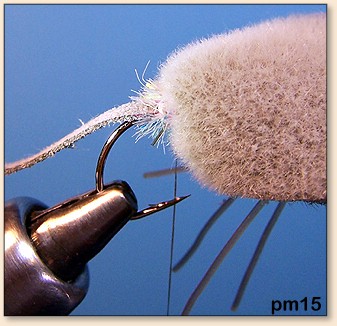
Constructing The Furry Foam Back
-
Cut a strip of Gray Furry Foam, or Gray Vellux
material — inches wide by 3 inches long. -
Fold Foam strip in half lengthwise and hold it
securely near one end.
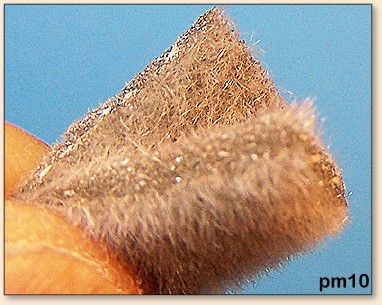
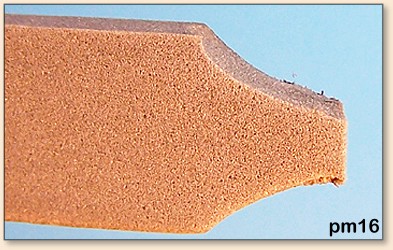
- Using curved scissors cut a crescent shaped
notch in the end of the folded strip of furry Foam.
Note that the cut is started from the folded edge
of the strip.
- The end of the trimmed strip of foam should
look like the image below.
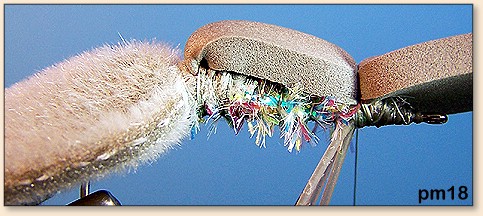
- Position the strip of Furry Foam aft of the hook
and secure it to the top of the hook at the GSP tie-in
point. The strip is bound in at the forward edge of
the crescent cut-out. The little flaps are brought
up along the sides of the underbody and secured onto
the top-side of the hook with several tight wraps of
the GSP thread.
- The Furry Foam, when properly positioned and
secured, exposes the chenille underbelly of the mouse
along the entire length of the hook.
- Pull the Furry Foam strip forward and check
the position. There should be a little bit of
chenille exposed behind the mouse body.
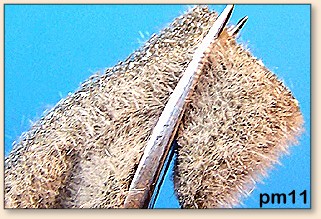
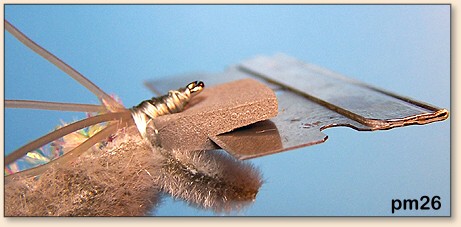
Constructing The Mid-Body Flotation Layer
-
Slice a sheet of 3 MM Fly Foam to provide a strip
3/8 inch wide X 2½-inch long. Using a straight edge
and razor blade to cut the foam sheet works well for
making neat, even foam strips. Use curved scissors and
notch the corners of one end of the FlyFoam strip as
shown below. -
Flip the Furry Foam material strip rearwards
and out of the way. Secure the notched end of the
Fly Foam strip to the top of the hook. Position it
on top of the tie-in point of the Furry Foam material.
Use firm pressure to bind the Fly Foam Strip down
to the hook. Wrap the GSP forward covering the
notched end of the foam strip completely. Advance
the GSP thread forward to the front of the chenille.
- Fold the Fly Foam strip forward and tightly
secure it down at the front of the chenille with
a few wraps of thread and a half hitch.
- Invert the fly. Add a drop of Zap-A-Gap
to the thread wraps for good measure.
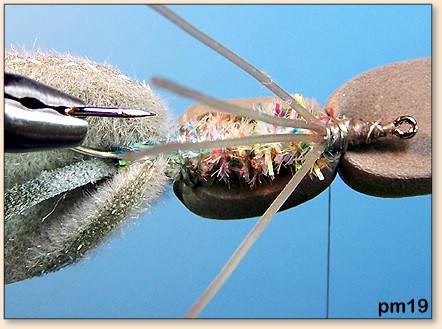
- Pull the Furry Foam strip forward over the
secured Fly Foam strip and bind it down with a
few additional wraps of GSP thread. Note: Do not
stretch the Furry Foam strip. You want the Furry
Foam to be full width in order to adequately cover
the underlying Fly Foam layer.
- Bring the GSP forward and get it underneath
the fly foam strip. Build up a sizable mound of
thread just aft of the hook eye to aide in holding
the swimming lip upwards. Trim the GSP off and add
another small drop of Zap-A-Gap to only the thread
wraps. In particular, be careful to keep the
adhesive from wicking into the Furry Foam. Prevent
the adhesive from also sticking the perfect Rubber
legs together. Easy does it.

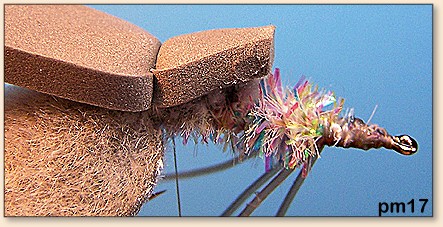
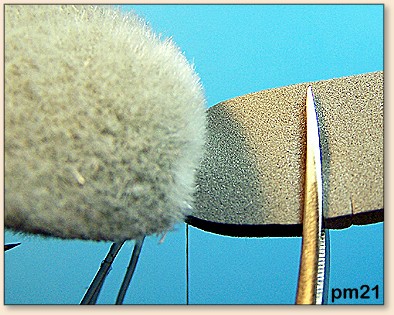
Trimming Both Foam Strips
-
Flip the Furry Foam back and out of the way.
Use curved scissors and trim the Fly Foam as shown
below. If in doubt, trim the foam longer than needed
and then get the proportions correct in successive
trimming steps. -
Fold the Furry Foam strip forward
and trim it even with the Fly Foam.
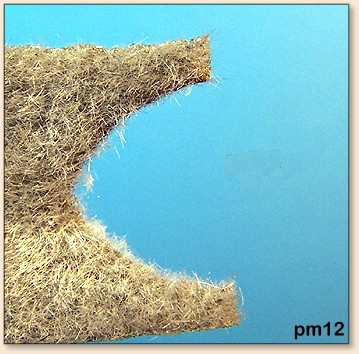
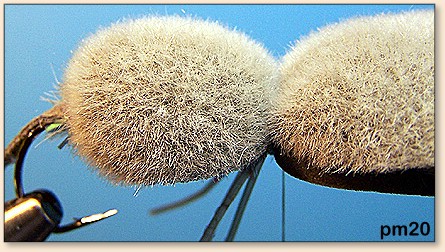
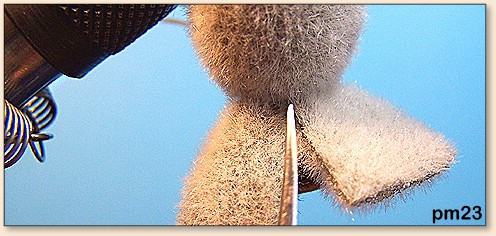
Trimming the Ears
-
Note: At this point the fly can be hand held.
Use your curved scissors to make an angled cut to
the center of the base of the tie-in point as shown
above. Do not cut the thread wraps. -
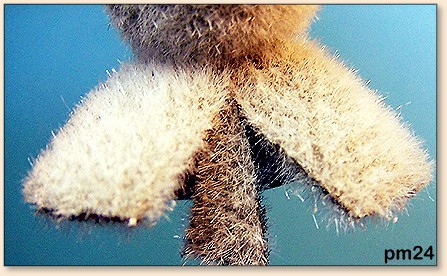
Make another identical cut from the opposite
sides. This creates a “V” shaped notch in the
center of the Furry Foam flap. Remove the excess
wedge-shaped piece and discard it.
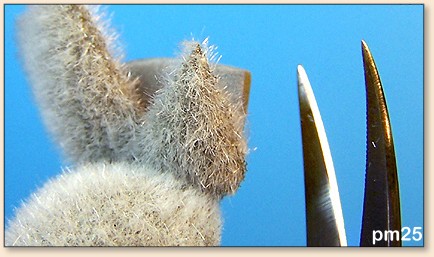
- Bring the scissors in from the underside and
cut upwards along the body to form each ear. From
here, you can trim the ears to shape as desired.
I usually start with another straight cut across
the top of both ears and then make a few snips to
slightly round the ears. You can see more details
of the finished ears in subsequent images below.
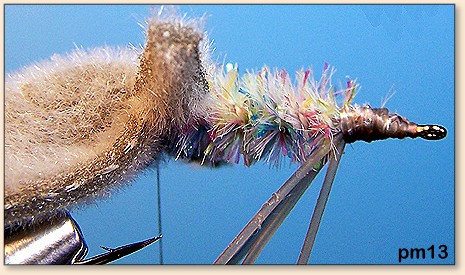
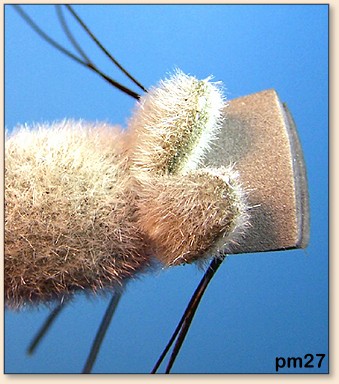
Adding the Whiskers
-
Slice the Fly Foam lip horizontally to make a
slot for the whiskers. I suggest making the slot
by first making a small cut on one side and then
starting another cut on the opposite side of the
lip. Next, join the two slices in the center.
Doing this insures that the slot is evenly placed
across the width of the foam strip. The depth of
the slot should be approximately — of the length
of the lip. -
Place 3-each, four-inch long strands of whisker
material into the slot in the foam strip as shown
below. Wedge these whiskers back into the slot and
even them up as needed.
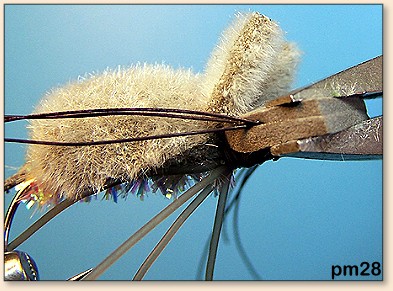
- Using a bodkin, evenly spread a few drops of
Zap-A-Gap to the inside faces of the slotted foam
lip. Fold the whiskers back along the side of the
body and lightly clamp the slot closed using a
broad nosed pair of pliers. Hold in position
until the adhesive has set: approximately 12
seconds or more.
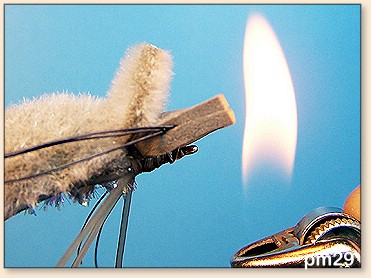
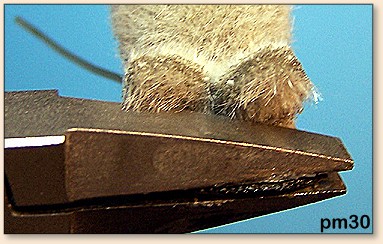
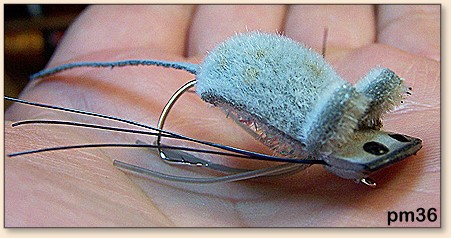
Heat Forming the Swimming Lip
-
Note: work in a well ventilated area.
Carefully soften the front of the foam lip
using an open flame. If the foam ignites,
quickly extinguish the flame. Otherwise, your
fly can suffer severe damage and literally go
up in smoke! Note: The closed cell foam will
heat-form nicely without being “melted” or
charred. The foam only needs to be warmed
to the point where it is softened. Pass the
flame near enough to the foam to soften it.
Direct contact with the flame is not necessary.
However, you can singe the edge with direct
flame contact if you are fast and careful.
The edge of the lip may discolor and darken
and that is OK. I highly suggest a little
practice on a scrap strip of Fly Foam before
making your first Predator Mouse. -
With the Fly Foam lip heated, quickly clamp
the lip in your pliers. Bias the pressure towards
the front of the lip & pinch it firmly to seal
the slot and to form a tapered shape. You can
trim any uneven crust off of the front edge of
the heat-formed lip with scissors. Seal the edge
with a Zap-A-Gap for insurance.
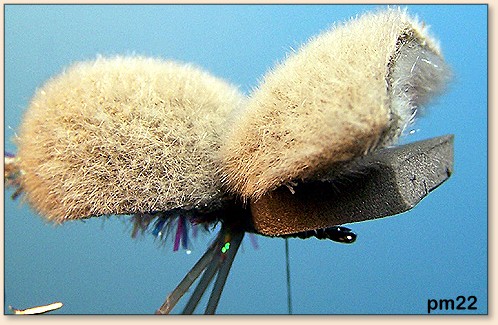
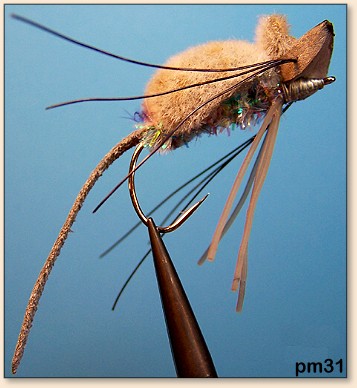
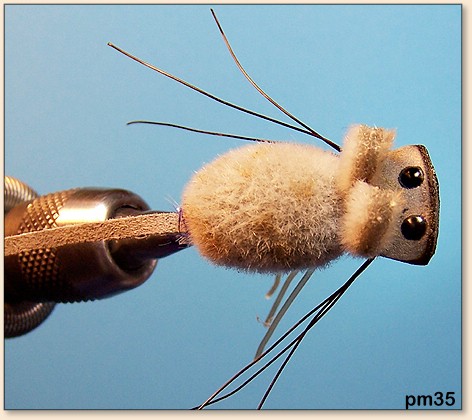
- The final shape of the lip, the profile of
the Mouse body and the appendages are shown below.
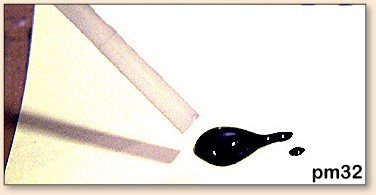
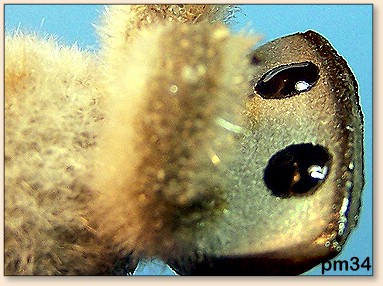
Adding the Eyes
-
Dispense a small puddle of black, fast
drying paint to a scrap piece of paper or
adhesive backed note pad. -
Using a blunted applicator, form the eyes
by applying paint to the top of the foam lip
in two equally spaced dots. Allow paint to dry.
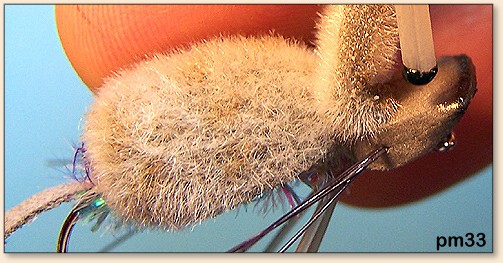
- Re-apply a second coat of paint as required
to make the eyes bold.
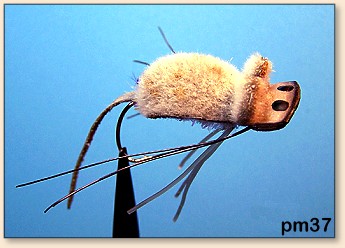
- Top View of the completed “Predator Mouse”
- The “Predator Mouse”.
Mouse Fishing Tips:
I was told about a sure fire method to catch
a big trout as follows: Attach a live mouse
to a hook using rubber bands. Then place the
mouse on a small board having a control line
attached to that. Next, pay out the control
line and float the mouse down stream into the
trout’s lair. When nearing the trout, pull
the board away and the mouse is left to swim
for shore. Then the trout attacks. End of story.
I have not yet tried this method.
Recently I was told that a big mouse pattern
could be very effective when fished in the dark.
Furthermore, cast the Mouse pattern onto shore
and thereafter drag the mouse fly into the edge-water.
I’m sure that the above technique is well proven
and it makes a lot of sense to try that too.
The way I have been fishing the “Predator Mouse”
is to fish it pre-dawn or at dusk. However, I
like to imagine that a careless Owl has dropped
the mouse as it flew over the water. In other
words, I just cast the mouse to pre-scouted and
likely looking structure. Then I hold on tight to
the fly rod. The strikes are explosive and serious.
The “Predator Mouse” fly may be taken as soon as
it hits the water often enough; so be prepared for
immediate action. Cast it out and let it sit. Go
ahead and give it a twitch. If nothing happens,
start a retrieve. When the fly line is steadily
stripped, the lip on the “Predator Mouse” will
impart a life-like swimming action that produces
a nice “v” wake in the water. Swim it right up
to the shoreline.
It makes sense to use a heavy tippet when fishing
a mouse pattern. I recommend pinching down the
barb of the hook to aide in releasing your catch.
You can tie this pattern in other color themes
such as tan and brown. Try scaling-up this fly
pattern to a larger size when angling for Largemouth
Bass, Pike, Musky and other Exotics. Have fun
fishing with the “Predator Mouse”. ~ Richard Lewis
Originally published January 10, 2005 on Fly Anglers Online by Richard A. Lewis.