Poppers. To a dry fly angler they’re an aberration, something that belongs on
the end of a heavy duty bait casting line or at the very least a spinning
rod. After all, that’s where they crossed the fence from, or did they? I
mean, what’s a Sculpin, Dahlberg Diver, Muddler or any number of hopper
patterns but poppers made from spun deer hair, wool and feathers. The only
major difference, in my humble opinion, is sometimes the material used in
making poppers also includes pine, basswood, balsa wood, cork or foam. For
that matter sometimes I’ve used combinations of several of the above
materials. The basic principal in all of them is to make some type of noise
on the surface of the water to get the attention of the fish and make it
attack the source. When the popper is designed properly, tugging on the
line sharply usually results in a popping sound caused by air being trapped
somewhere as the lure is pulled under the water.
Over the next couple of weeks I’d like to discuss the different techniques of
making and using different types of poppers, hoppers, frogs, mice, divers and
anything else you can think of that goes ‘pop’ in the day or night. While I
could do it all in one long, drawn out, article it wouldn’t be fair for any of us
because there is just too much material to cover! Something you’re going to
notice is I’m using the word “usually” a lot . . . There are always exceptions
to every rule, not to mention personal preferences.
First of all, I’d like to talk about some of the tools I use for carving and
shaping my poppers. While all of these are definitely not necessary, (please
don’t tell my wife!) they do make the job quicker, easier, and the resulting
popper looks more professional.
Safety glasses or goggles, breathing filter mask, carvers gloves (optional,
but nice), a first aid kit (because at sometime you will slip and cut
yourself)!
Basic tool needs:
-
Single edged razor blades and a basic set of ‘Exacto’ type carving blades.
Used for cutting, shaping, carving, and detailing. -
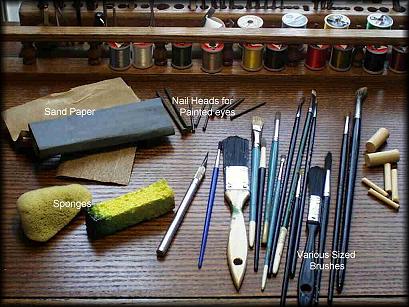
Sandpaper. Various grits in the ranges of 80, 100, 120, 180, 200, and
-
Wet sandpaper. Various grits in the ranges of 100, 220 and 400.
-
Paint brushes and painting devices. I use a variety, ranging from fine
hair artist brushes, to the coarser nylon bristle disposable brushes. In
addition I have a set of small dowels, nails, sponges and craft items I use
for detailing spots, swirls and eyes. -
Hooks. A selection of popper hooks in various sizes (I’ll get into these
again later), regular fly tying hooks in 2x, 3x and 4x in various sizes; and
yes, small treble hooks in various sizes. I’ve switched over to barbless
hooks for the most part, but I haven’t been able to find any popper hooks
that are barbless, so I usually pinch them down and file them smooth.
Using a little clear fingernail polish on the point helps to keep them from
rusting and doesn’t seem to interfere with hookups. I also use larger hooks,
up to 0/4, in either chrome or nickel plate for salt water use. If your
worried about the nickel or chrome hooks breaking off and not dissolving in a
salt water fish then by all means use what ever type or brand you want. I
haven’t found that to be a big issue, providing you bring the fish in and
release it properly. -
Epoxy, wood fillers, head cement, and adhesives. A variety of glues and
adhesives are usually necessary. The number and types will vary, depending on
what styles of poppers are being built. -
Paints and finishes. For most I use acrylic paints. They clean
up with water, come in every color known, can be mixed together
to create custom colors, and are very inexpensive. I also use spray paints for
special applications that I will describe later. -
Miscellaneous. A small drill and drill bits, a small saw (such as a
coping or jig saw), a wide variety of what I refer to as junk, tooth picks,
craft sticks, cotton swabs, cotton balls, small C-clamps, clothes
pins, needles, and masking tape . The more poppers you build the more this
list will grow. It’s been said many times, need is the mother of invention,
and you’ll come up with a lot of ideas of how to do things using common house
hold items. A bunch of plastic mesh bags, such as those that garlic, onions
and potatoes are purchased in, come in handy also, as I’ll explain in another
section. A variety of rubber strands to use for legs, feelers and attractor
skirts.
Advanced tools:
Things that make life easier and the job go quicker. These
items are not really necessary, some cost a lot of money, and are completely
optional.
-
Dremel-type rotary device with a large variety of
attachments. I have carving burrs, rasps, sanders, router bits, cutting
tools, extra collets and a wide variety of drill bits. In addition I also have
a drill press attachment and the extension wand. -
A good set of wood carving tools. I have a set of palm tools and a set of
chip carving tools. These are precision tools made of extremely hard metal
which hold a sharp edge. The job of detailing, carving and shaping is really
made easy with these. Quality and price vary widely, especially the quality.
If your going to spend the money, like most things in life, make sure you
don’t buy a cheap set, you’ll spend more time sharpening, honing and cussing
than you do carving. -
Air-brush system. These come in a variety of styles and price ranges, from
the inexpensive types that run off of a can of compressed air to the
professional double action models that operate from air compressors. The nice
part about airbrushes is they normally have interchangeable tips
or variable spray patterns. You can also vary the amount of paint that is
sprayed, from a very fine mist to a heavy coating. -
Miscellaneous. There is an art material called frisket which comes with
either a peel off backing or in liquid form that can be used to mask off areas
during the painting and finishing process you’ll find works a lot better than
masking tape. Power tools, such as scroll saws, jig saws, and sanders all are
useful, but as I said, not absolutely necessary.
That’s enough for this week. If you have any additions or comments, please let
me know and I’ll include it with the next section(s). Next week I’ll discuss
hooks and materials to use to make the bodies of the poppers. Until then,
keep casting those lines! ~ Randy Fratzke
Originally published c. January 14, 2002 on Fly Anglers Online by Randy Fratzke.