The Snookery was the name of a houseboat belonging to
Herman Lucerne. Herman was one of South Dade County’s
most famous snook fishermen. He was well known for his
backcountry fishing, his work with children, and his love for
the outdoors. Unfortunately, he was one of the many fatalities
of Hurricane Andrew.
A fellow angler, South Florida guide, and good friend of mine,
Captain Dave Baskin, from Homestead, Florida knew Herman
and was fortunate enough to fish with him in the Everglades. He
became very fond of this type of fishing. The favorite species of
a Glades fisherman is the snook. This elusive predator tests the
skill and wits of any angler who drifts into its mangrove-lined
channels. Dave, who has been tossing flies for only a year, has
found a new challenge in trying to “hook a snook” on a fly rod.
Fascinated with the art of fly tying, Dave has come up with some
very interesting and effective saltwater patterns. One of these is the
Pop-Eyed Snookery, named after his good friend’s houseboat.
Dave says, “I got the idea for the big pearl eyes from Captain
Dave Sutton. He ties a crab fly with those goofy looking things
and it works pretty darn well. I decided to try them on a snook
pattern, one that imitates their main food source, a Myan perch.
The mixture of red bucktail and grizzly hackle in the tail with the
black and orange body makes for a very close resemblance. But
those eyes, they are wild!” Dave adds, “I feel any predatory fish
needs to look into the eyes of is prey just before it eats it!”
And eat it they did! The first time he fished this pattern Dave landed
an eleven-pounder. “It was the way the snook would not give up on
the fly that told me that it was a winner. Most of the time a snook will
drop off a fly, or a lure as far as that goes, when it misses an attempt.
This big boy would not give up on it and kept crashing the water behind
it until the fourth time when he hit it hard. I just know it was those eyes.”
Recipe & Materials
Hook: Stainless Steel Salt Water, Daiichi 2546,
sizes 2/0-2
Thread: White flat waxed nylon.
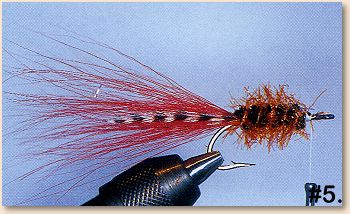
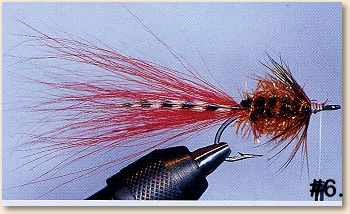
Tail: Red bucktail and grizzly hackle.
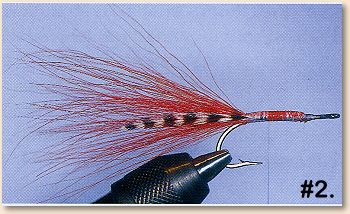
Body: Medium black chenille.
Overbody: Hot orange Cactus Chenille.
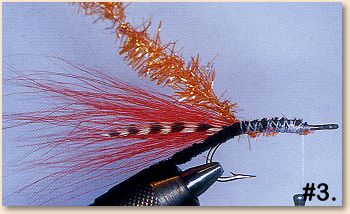
Hackle: Large grizzly soft hackle dyed orange (American Hen Hackle from
Whiting Farms.)
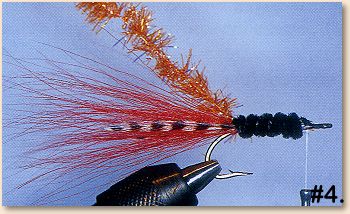
Eyes: Pearl eyes.
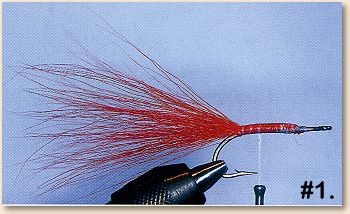
- Start thread at the ¾ point of the hook and wrap to the back
of the hook. Move thread forward laying down a thread base.
Hand-stack and measure a clump of red bucktail for the tail on
the fly. The tail should be about two hook shanks in length. Trim
and tie in the butt ends of the bucktail at the ¾ point securing the
bucktail on top of the shank. With very tight turns of thread wrap
to the back of the hook, making sure the hair stays on top of the shank.
Attach a grizzly hackle tip to each side of the hook so the tips are
mid way into the tail. Move thread forward to the ¾ point again.
- Tie in a length of medium black chenille on the fore side
of the hook and wrap to the back of the hook. Move thread
to the ¾ point again. Tie in a length of hot orange Cactus
Chenille on the far side of the hook and wrap to the back. Move
thread to the ¾ point. Tying in the chenille at the ¾
point and wrapping back helps maintain a nice level body.
- Wrap the black chenille forward to the ¾point leaving
slight gaps between the turns. Secure with a couple of wraps of
thread. Now wrap the Cactus Chenille forward, filling the gaps
between the black chenille. Secure at the ¾ point also.
- Prepare a large grizzly-dyed orange hen neck feather by pulling
the fibers back away from the tip and trimming the tip to about 1/8
inch. Tie in the feather by the tip with the convex side up in front of
the body. Wrap the feather as many times as the feather allows, forming
a soft-hackle collar. Secure.
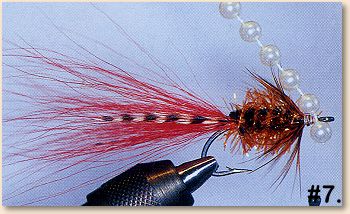
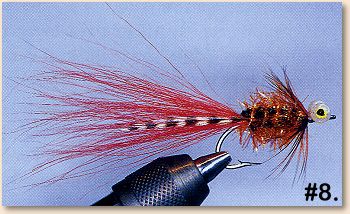
- These pearl eyes can be found at most hobby shops and some
fabric stores. They come in many sizes and you want to get the
biggest you can find. Cut a pair of pearl eyes from the rope and
secure in place right behind the eye with X-ing and figure eight-thread
wraps. You want the eyes to be slightly forward from the body,
standing out by themselves, so don’t let the body get too far forward.
Whip finish. Paint eyes on the pearl eyes and cement them in place
with clear fingernail polish. ~ Marty
Credit:
This fly is from Tying Flies Like a Pro by Marty
Bartholomew, published by Frank Amato Publications. This book
is full of short-cuts and techniques from the experts. Very well done.
For more great flies, check out: and
Originally published November 10, 2008 on Fly Anglers Online by Marty.