what is the best way without damaging a rod in any way ( finish ) to add aligment dots to a rod? just picked up a sage and LOVE the rod, knew it didn’t have aligment dots before i bought it but would lke to put some on it. i gear up in low light conditions and in a canoe often
I have done this by cutting off a round wooden toothpick about 1/4 of the way along the shaft to make a flat round end. Dip the flattened tip just barely in a bottle of Testor’s model paint (because that’s what I have) and place a dot where you want it. The toothpick should hold just the right amount of paint to make a small dot about 1/16 inch. I have found it easiest to align the dots properly by assembling the rod with the best visual alignment that I can manage and then placing the dots either side of the ferrules so that they line up.
Hope this helps,
Ted
adk,
Low light conditions? I guarantee you will be able to see the guides a whole lot easier than any dots. Use the guides to align the rod.
Larry —sagefisher—
i will tell you what the bottom guide is a long way down by eye sight in the dark, your a better man then me putting a 4 piece together by flash light looking down guides.
Will the paint stay on without a coating?
I have not had a problem with the paint wearing off. There really is not much wear on these spots. You could apply a coating of epoxy over them, but I have not found it necessary.
Ted
I have done many using Testors model paint as well. It works well and lasts many years, but sometime it may chip off over the years of use.
IMO, I do however suggest using a small nail that has a flat head on it. I made up various tools using 3/8 dia wooden dowel into which I attached flat head nails of various sizes, for I use these for adding eyes to my fly patterns as well. As mentioned, put your rod together and insure it is lined up correctly, then dip the flat head nail into the paint removing any excess paint (too much will cause it to run), then just dab it onto the blank ferrule locations. Having the rod sit in a horizontal position for this is best to insure you get the dots lined up nicely. If it works for you then that’s good, it’s your choice of course and just put them where you want them.
No real need to epoxy over them unless you have the will and the means to do so.
I do though, because it’s just what I do.
Sally Hansen’s Hard as Nails - lots of colours to choose from.
Sally Hansen’s Hard as Nails - lots of colours to choose from.
including glow in the dark.
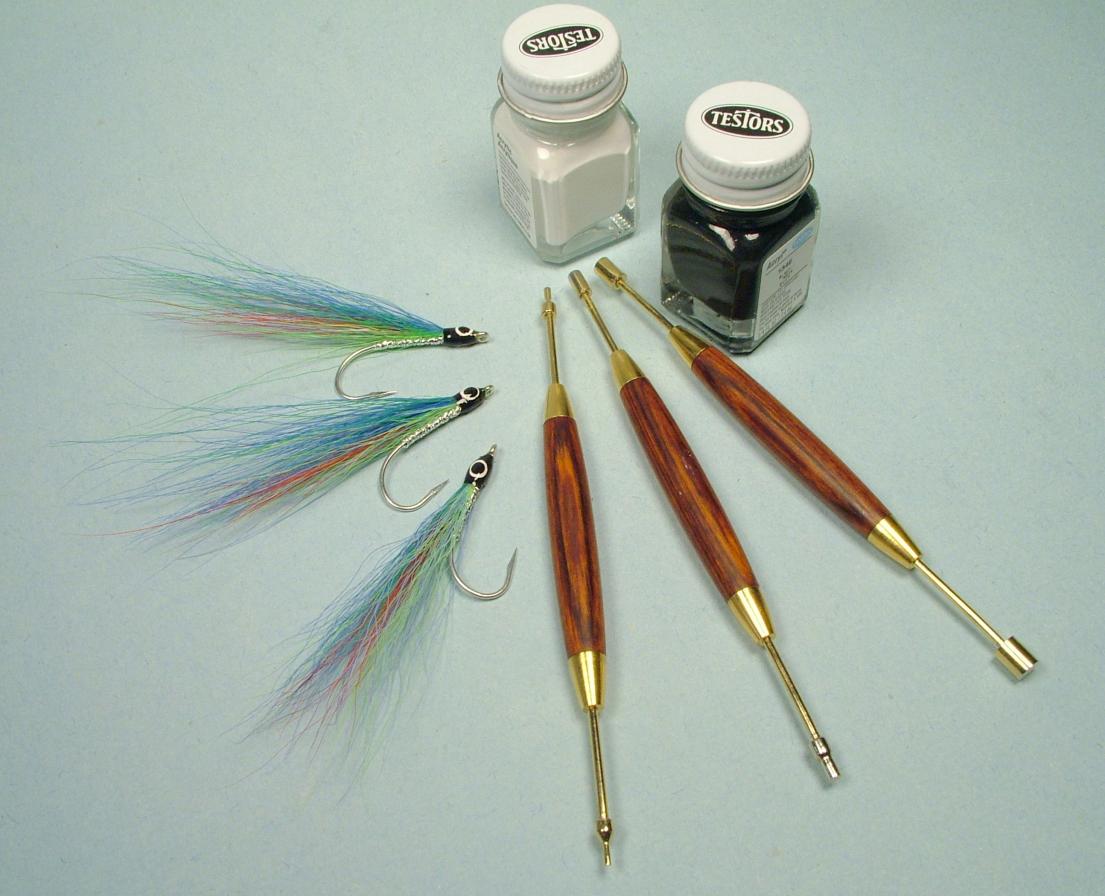
Or, if you want to go a bit fancier, this set of tools from Wasatch Fly Tying Tools was originally designed for painting eyes on streamers.
I’ll go one better than Sally Hansen’s. Sharpie gold or silver marker with a fine tip. Get the rod aligned as you like it and one quick tap with the marker and you have a subtle alignment dot. Rubbing it with your fingernail will take it right off when it’s time to sell the rod as the rod finish doesn’t let the Sharpie “stick” like it will to paper or clothes. You can increase the subtlety of it by matching the color to the accent color in the thread wraps.
Brian
Well now, where did they come from??? I just purchased some tools from them and did not see them available on their web page.