Kim’s Cased Caddis By Al and Gretchen Beaty
Inspiration for this pattern came from two directions.
After purchasing a package of Caddis Tube Bodies from
Umpqua, Kim was browsing through Gary LaFontaine’s
marvelous book Caddisflies looking for
ideas on how to effectively use the new material. Gary
us well known for his woven-body flies, so it was only
natural to put the two together.
When Kim first started tying this fly it was intended
to be an artistic rather than fishing fly. To his
surprise it proved effective on the water, especially
after replacing the pheasant-tail legs with those
constructed from rubber.
Kim fishes it without weight, casting upstream and
allowing it to dead-drift back downstream. The Cased
Caddis is most productive in clear, moderately
fast-moving water like sections of the Provo or
Weber rivers near his home in Utah.
Materials List: Kim’s Cased Caddis
Hook: Mustad 80150 BR (Swimming Nymph), size 14-16.
Thread: Black, chartreuse.
Case: Umpqua Caddis Tube Body covered with gravel.
Body: Wapsi Round Rib, yellow and olive, woven.
Legs: Black pheasant-tail fibers or fine rubber legs.
Coating: Five-minute epoxy.
Tying Kim’s Cased Caddis
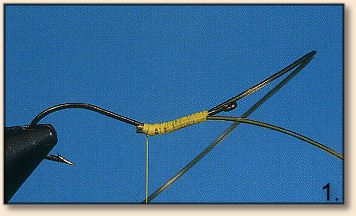
- Start a thread base about one eye-width back on the shank.
Wrap back to the first bend near the middle of the hook. Cut a
four-inch segment of yellow and olive tubing. Lay the olive aside
for a moment and bind the yellow to the off side of the hook shank
ending near the eye. Tie on the olive to the near side ending in
the middle of the hook. Be sure the tubing is on the sides of
the shank.
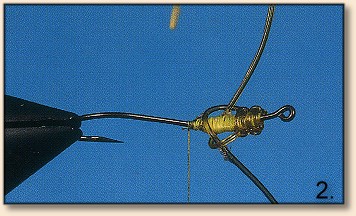
- Start the body by placing an overhand knot in the tubing, slipping
it on the hook, and then tightening it. Be certain to keep the olive
on the top and the yellow on the bottom. Place a series of these knots
on the shank, each one getting closer to the center of the hook. Some
tiers find this operation easier if they turn the vise so the hook
points either toward or away from them.
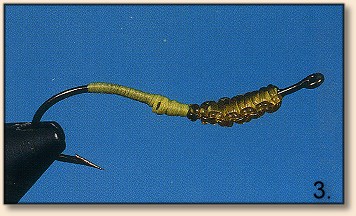
- Once you reach the center of the hook, tighten the last
knot then bind the two tag ends of the tubing to the shank.
Trim away the excess then apply a thread base to the rest
of the shank ending up back in the middle. Whip finish the
thread and trim it off.
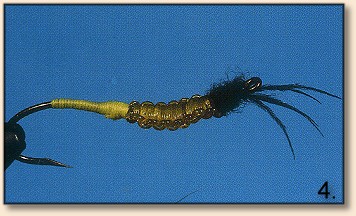
- Apply black thread to the hook directly behind the
hook eye. Select six black pleasant-tail fibers and bind
them to the underside of the hook as legs. Trim away any
excess fibers. Dub a black head, whip finish and cut off
the thread.
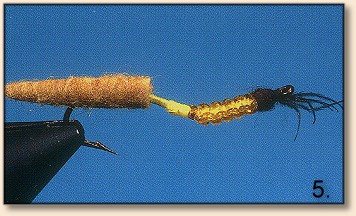
- Trim the body so it is as long as the hook shank.
Remove the hook from the vise and slide the point inside
the body. Half way into the tube pierce it with the point
and slide it part way onto the shank.
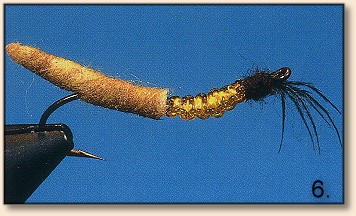
- Apply a coating of super glue to the theread wraps and
finish sliding the body tube on the hook shank until it
reaches the woven body completed in Step 3. Hold the
tube in place until the super glue works its magic.
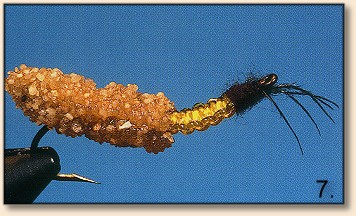
- Remove the hook from the vise and secure it in a pair of
hemostats. Mix five-minute epoxy and coat the body tube with
it. While it is still wet, dip it into a container of fine
gravel making certain it is evenly coated on all sides. Kim
uses parakeet gravel available at pet supply store, or fine
gravel from the body of water he plans on fishing.
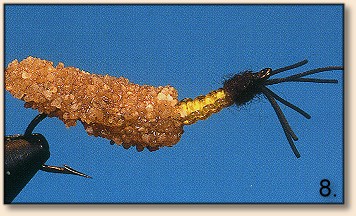
- Here is Kim’s rubber leg version. This has become
our go-to searching pattern for streams we fish in Idaho.
If caddis are in important insect in your part of the
world you owe it to yourself to try this pattern. It is
awesome! ~ Al and Gretchen Beatty
Originally published October 10, 2005 on Fly Anglers Online by Al and Gretchen Beatty.