Furled Line / Leader Jigs

This thread is in response to a comment made several weeks ago on a thread started by Kelly asking for ideas on how to go about furling lines and leaders.

Note that the title of this thread involves Jigs. Past threads have included quite an interesting variety of approaches and equipment used in furling. Hopefully others will post pics and comments about the methods and mechanisms they are using to furl their lines / leaders.

The following furled leader jig is based on the concepts and equipment used by the fellow who taught a class on furling for a TU affiliated club in Idaho Falls ID several years ago, Karl Amonson. Karl did a tremendous amount of experimentation to “perfect” his techniques and formulas and produce high quality furled leaders using a large number of different materials. One of his leader formulas was for Danville 210 Flymaster Plus fly tying thread. After experimenting with several different materials, this is the one I settled on for furling leaders for my own 3-5 wt rods, and which has now proven to be an excellent material for the thread furled Tenkara line / leader for my Tenkara rod.

This jig, finished a couple days ago, is very much like the first one I built five years ago. But it incorporates a number of improvements based on discussions here on the FAOL BB over the past couple years. Thanks to those who participated in those discussions and contributed ideas that makes this one better - if not better made.

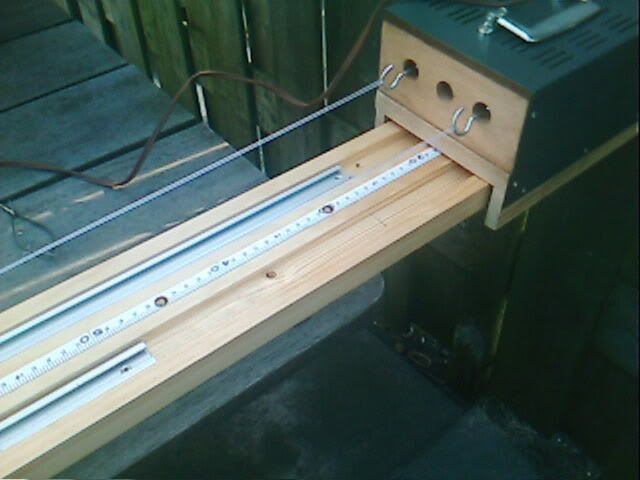
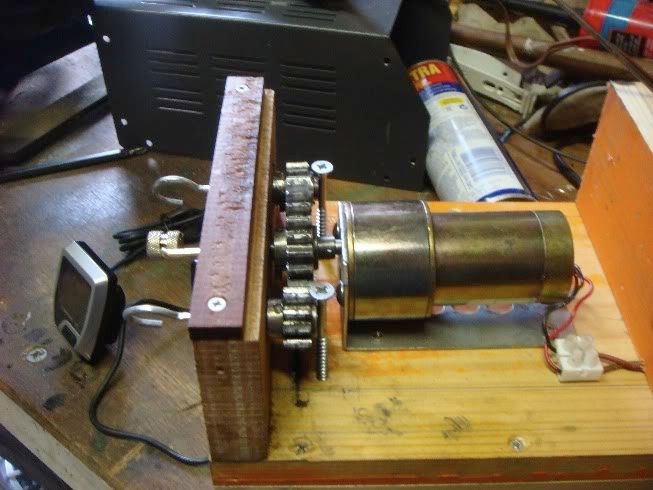
The following series of pix pretty much explains the equipment. The components include gears, a hollow aluminum rod, oak boards and dowels, fish hooks, shock cord, some handy weight, and some washers and screws. ( The power unit stand is optional - the unit can be handled. )


( this should read proportion not configuration )

The first line / leader furled with the completed jig.

The length of the basic jig provides for a starting length of about 87" of material resulting in a finished leader about 6’4" long. But the jig can easily be shortened to produce a much shorter leader, or extended to produce a very long one.

The posts are presently set to leader proportions of 40% butt section, 30% mid section, and 30% tip section. Changing proportions requires a little quick work with the power unit and a 1/4" drill bit.

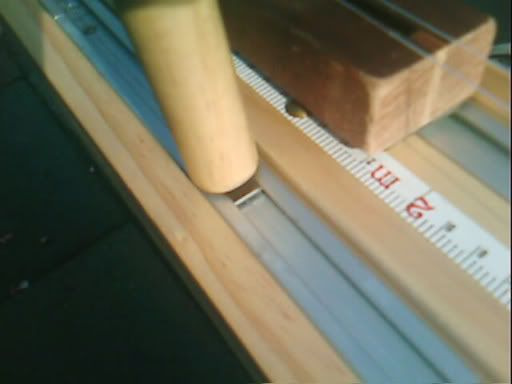
The hooks for twisting and then furling the material under power are chopped down size 6 Dai-Riki 700 4XL streamer hooks. Same for the tip hook. Reconfigured Dai-Riki 700s are also used to pin the hook shafts securely at the back of the gear mounting frame.

The Danville 210 furls best with 1350 twists and 750 countertwists. With the 5:1 gear ratio, that’s 270 revs by the Ryobi for the twisting and 150 in reverse for the furling.

Okay, folks, let’s see what your latest furling jig looks like.

And those of you with questions, feel free to fire away.

John

OK … the obvious …
How do you make furled leaders of multiple colors?

Actually, Betty, the line / leader shown was made in two parts.

First the yellow line was furled as a ten strand level line with a shorb loop in one end. Then the off white leader was furled with a 10-8-6 configuration with a ring in the tip end.

The two sections were connected loop to loop at the “tip” end of the line section and the “butt” end of the leader section. This was a bit tricky. Had to keep all the open loops at the connecting ends of the two parts collected to do the loop to loop thing. Before removing the furled sections from the hooks, I threaded some ultra wire through the ends of the loops to keep them all together.

Basically, put the collected butt end loops of the leader section through the loops of the tip end of the line. Then feed the butt end of the line section through the butt end loops of the leader section and pull the line all the way through to form the loop to loop connection.

It’s easier to put shorb loops in the tip end of the line and the butt end of the leader for a loop to loop connection, but using the straightforward ( although not-so-easy-to-execute ) loop to loop makes for a much neater look and reduces bulk at the center of the line / leader.

John

John, excellent info! Karl is a great guy and I miss him since he and his wife moved to take jobs with Cabelas. He used to shop with me a lot at the thrift store I managed, so I imagine a lot of what he used came from that store as Karl was more inclined to find items used that would work for his creations rather than buying new.

Thanks again, great info.

Kelly.

… was actually for making rope. Can’t recall all the details, but basically it had an outer ring gear and three inner gears, and each of the inner gears spun a hook. Don’t remember just how it was driven, except that it was cranked by hand. The outer ring gear was about 12" in diameter and the inner gears were in a 3:1 ratio, which is what I started with on my original jig. He only used two of the hooks for furling.

Karl didn’t use a board. The posts he used for configuring the material and setting proportions were simply dowels stuck in foam stands. He did use a shock cord attached to the end post for tensioning.

He probably had that rope making tool from the ranch up in the Lemhi, or maybe from where he worked hayfields in the Howe area. Or maybe he bought it at the thrift shop, Kelly ??

Getting back to the point of this thread. I’m hoping that others will take the time to add pix and descriptions of the furling mechanisms they are using presently so the new members can get some ideas about the process and various approaches to making furled leaders.

John

… for some more folks to add their mechanisms and methods to this thread, thought I would update the original post.

For those who have some apprehension about making a furled leader jig, they can be as simple as a long board with holes drilled at the proper places to hold pegs or as sophisticated as a fully mechanized one built by … ( don’t want to put him on the spot ).

And for those who think you need to be handy, have tools, and know how to use them, take a clue from me. I have very basic tools and very little skill at using them. But sometimes that is all right. The jig that I’m using started out to be a hand cranked model very similar to my first one. But I thought I would upgrade the original maxing out my limited skills.

The carriage for the end post and hook was originally constructed as an enclosed gear box for the working end of the jig. Only problem was, I used hardwood and brass screws. I didn’t drill the holes large enough for the screws, so when I tightened them down before assembling the gearbox, I stripped the phillips head slots and couldn’t disassemble the frame. Hmmmm …

Okay, how about an open look with those neat gears just spinning away. Cool. Take a piece of 1" by 4" pine, cut it to length, and drill holes for the gear shafts. Ever try to drill three perfectly spaced holes all at exactly a right angle to the thing you are drilling ??? I have. Four or five times. Finally, I got close enough to perfectly spaced holes at close enough to right angles that the shafts would turn the gears with a minimum of fuss.

Aluminum shafts. How cool would that be. Even got a neat little tool to cut the aluminum shafts to length. Didn’t even know that kind of thing existed until I spent a couple extra minutes looking at a display at the local Ace Hardware store and happened to notice it. Cut shafts to length for the main driving gear and the smaller working hook gears and for a handle to insert into the main shaft to crank the whole thing. Man, in my mind it was one slick machine.

Only problem was, maybe I should say problems were, I couldn’t tighten down the working gears to the shafts tight enough to keep them working, and when I epoxied the handle to the main shaft, it worked long enough to produce one two part line / leader and then the epoxy let go. Back to Ace for some oak dowel to use for shafts for the working hook gears. Took some doing, but they worked out okay, and are still working after making nine leaders and lines this week. The neat thing is - if they fail I still have most of a $.69 dowel to make new shafts.

That crank concept for the main working gear had to go bye-bye. Well, how about just chucking up my drill to the shaft and giving it a go. The word “serendipity” comes to mind but probably isn’t really appropriate. Something like “dumb luck” would be closer to reality.

So after stumbling around, and around, and around, I ended up with a mechanized jig that not only gets the job done, but does it quicker and better than the original design, and is actually fun to use.

A couple days ago, I picked up a couple poplar 1/2" x 4" x 3’ boards at the local Home Depot and built a stand for an extended furling jig. I can now start at a maximum length of 14’ and work down to maybe 4’. The longer jig permits building Tenkara line / leaders in one piece. Much more efficient.

Made this 12’ furled line / leader for a fellow Tenkara rod advocate in about 15 minutes. Not sure I could have done it at all if I had really good tools and knew how to use them to make the jig I started out to make.

I’m betting some of the other leader furlers waiting in the wings to tell us about what they use and how they built it have interesting stories to tell about their experiences, and misadventures.

John

I would really like to see some of the other jigs folks use as well.

What is that leader sitting on? I mean what is the object. I know it is a well worn piece of buckstitched leather that is quite likely to be older than I am.

John, are your driven(pinion) gears 16 tooth and your main gear 80?

… is achieved with 12 teeth on the driven gears and 60 teeth on the main gear. An 80:16 set up would involve somewhat larger ( and more expensive ) gears. If I were building an “industrial” grade jig, I might go to larger gears and use metal rather than acetal gears. But this jig is for limited limited production quantities and a restricted budget.

John

P.S. Kevin - nothing quite that romantic, or old, for the background for the white furled Tenkara line. Just my wallet which was handy and just the right size for the background of the macro pic.

I tried to count your pinion gear teeth in your picture and thought I got 16, and you wrote your gearing was 5:1 (80/16) so that’s why I asked.

Alan

Mojo;
You counted the teeth on the gear? God man you are now lost into the black side of Furled leaders!! And for my 2 cents you wasted your time as it is all smoke and mirror’s!!

Jack, you surprise me. Nothing, absolutely nothing, to do with the delicate delivery of a dainty dun is time wasted. Whether the intended target is a bashful brown or belligerent bluegill, and whether the leader is tapered, tied or twisted, it’s all worthwhile.

With John’s pictures, I’ve got to build one for Joni now. I think I got a good idea of what I want to do. You gots to be precise!

John , I love the idea of the gear drive and have been trying to find the right parts for sometime. Trying to spin one leg of the leader at a time is just not a precise as I would perfer. The web site you suggested is great but it’s like looking for a needle in a stack of needle’s. The gear’s you have used seem to be nylon with a set pin in the collar. I just have not been able to figure out the one’s you picked to produce a 5 to 1 ratio. Any hint or part number you could give would sure be great. As alway’s thank’s for the inspiration to further the knowledge of our craft.

[u]https://sdp-si.com/eStore/Top.asp[/u]

They are the top left gear in the center photo.

https://sdp-si.com/eStore/PartDetail.asp?Opener=Group&PartID=32310&GroupID=207

https://sdp-si.com/eStore/PartDetail.asp?Opener=Group&PartID=38815&GroupID=207

Found and double checked the invoice on my order and confirmed that these are the gears I used. The cost is a bit more on orders under $50 - like a $10 charge plus about $7.50 S&H. The total for the three gears was about $35. The turnaround time on the order was pretty good - under a week.

BUT these are the best gears I could find. We have no local sources here in the Missoula area, and other gears that I found on the internet were either more expensive, available only in large quantities, or not nearly as well made and adaptable as these gears. The set screw in the hub is an important feature. They look like they will last a long time.

John

I’m concerned that your tensioning device is of the lifetiime warranty type . . . just in case you break it while furling

smc

Here is a previous post by Denny… another source of bearings is roller skates from the thrift store…you can get 16 for a few bucks…

“Here is the place I purchased my motor, #9.95, gear sets
Also went with the ball bearing, radial Bearings.
http://www.herbach.com
Here is what I purchased:
TM93MTR2370 900 RPM High Torque 115 VAC Gearhead CW Rotation 1 $9.95 $9.95
TM97MEC3048 Precision Ball Bearings - High Quality, Single Row Radial Bearings 5 $3.45 $17.25
TM03MEC4686 Compound Gear Set 2 $3.25 $6.50
Shipping: U. P. S. GROUND: $9.25
Sales Tax: $0.00”

Thank’s John. I can’t wait to make and order and get to work. I’ll make sure and let you know how it comes out.

Just thought i’d show my setup:
My board with a 24V DC powered twisting unit.

The twisting unit open, when i added a bicycle computer to count the rotations.

My board is a two piece foldable with a pulley attached to one end. I use just a rope with a weight hanging on the end for tension. The weight is calculated for different threads, and different numbers of tip loops.

My pegs slide in T-track to be the most flexible in my setup.

Karel

… and probably much more flexible, at least on an ease of use basis, than the one I cobbled up. I looked at the possibilities for using a DC motor drive, but don’t know enough and didn’t want to take the time to learn enough, to get into that kind of application.

Wondering where you found the motor and gears, in case I need to go back to the drawing board one of these days.

John