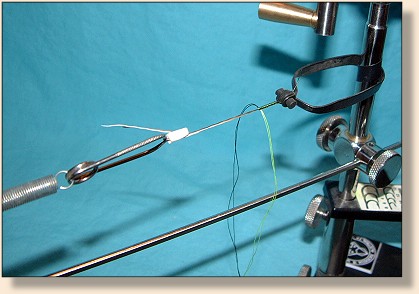
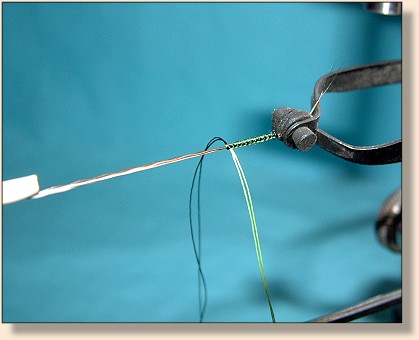
You will need a set up on your vise to handle the
braiding part. The Moose Mane is stretched between
two hackle pliers. One is spring loaded with a very
light spring to the bobbin rest. The other is attached
to the stem of your vise. Place the 3 strands of Moose
Mane into the pliers attached to your vise stem, placing
it into the tip of the pliers only as far as you want the
tip ends of the hairs to extend past the braided part of
your tail, no more than hook shank length. Place the other
ends into the second pliers and apply a light tension to
them using the spring and moving the bobbin holder out
to give this tension, and lock it in place.
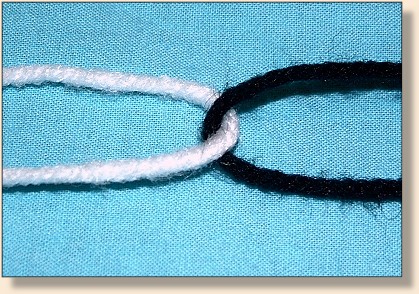
1. Now place the ends of one color G thread next to each
other. Place the other color through the loop end and
match the ends so now we have one strand, doubled and
hooked together in the middle. Wax the thread making
sure the ends so not slip. (It is important to wax well
so during the braiding the two threads appear to be one.
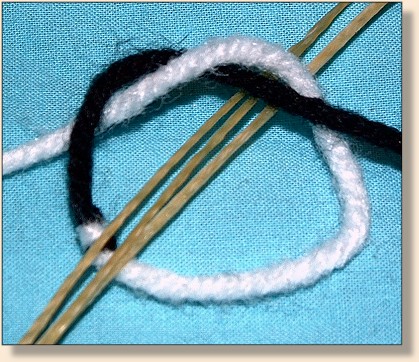
2. Ready to start the braiding. Turn the cradle you have
set up so it is pointing toward you with the spring end next
to your body. Lay the thread piece under the Moose mane
with the light color on your left. Tie an overhand knot
(1/2), (be careful that the knot is centered over the
Moose Mane as you tighten it) so the light color now
is on your right hand side. From now on it is important
to remember the right side which is light in color. It
is your control. If you should want to use the same color
for both parts you will want to tie a knot in the end of
the one that would have been the light color. This will
make it easier to find your control thread. (Light color
or knotted end goes over the top, always).
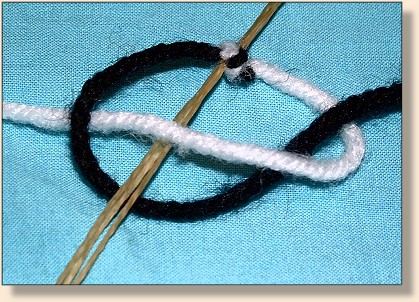
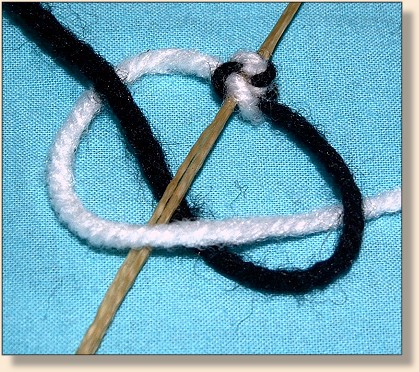
3. The light color always goes over the moose mane, holding
onto a flat loop. Bring the dark thread over the top of the
light one from the right to left and insert a nit picker
(any hook can be used) down through the loop and catch
the dark thread on the nit picker and bring it up through
the loop. Snugly tighten both, making your own first stitch.
We want 22 of these knots or stitches total. This will end
us up with the control color (light or knotted) on the right.
(11 each side).
4. Now the light color is on your left side but you must
still pass it over the moose mane), holding onto your end
loop, left to right Again go down through the loop with
your nitpicker and catch the dark thread which has been
passed over the light thread. Over and over until you
have the 22 desired knots or stitches. 11 on each side.
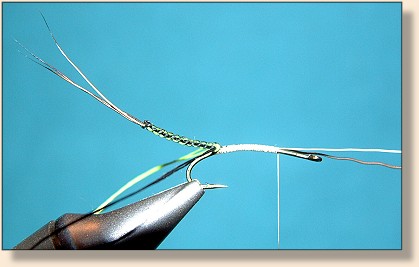
5. Now you can remove it from your jig and set up the
hook in your vise. My materials list calls for the
Daiichi 1270, but you may use whatever dry fly hook
you like. Wrap the thread starting about 1/3 of the
way back from the eye until you reach the bend. Now
place the Moose Mane on top of the hook, holding the
thread and braided tail, back out of the way. Pinch
the "G" thread and braided tail to the hook, laying
the 3 strands of moose mane on top of the hook, pointed
toward the eye. Lightly wrap two turns around the Moose
Mane and hook, gently tighten and then wrap back up to
your 1/3 starting point. Be careful to keep the braided
tail part on top of the hook. Here I like to do a
half hitch in my thread. Place your bobbin in the
bobbin cradle so as to keep it out of your way while braiding.
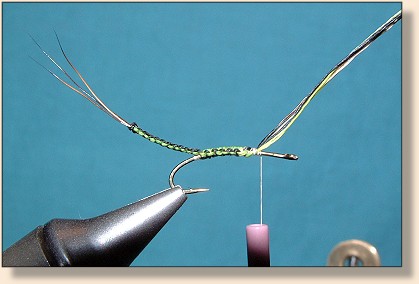
Turn the eye of your hook toward your body, and (if done
correctly the light color will be on your right) (Refer
to above drawing #2 & 3, the difference being we now
are including the hook), start with the light color
thread over the top, bring the dark over the light
and reach down through the loop and hook the dark up
through the loop. Tighten both threads equally. The
looks of your finished braided tail will look only
as good as you tension all of your knots. Take your
time and do not pull too tightly, just snuggly. Do
as many stitches as it takes to arrive at your 1/3 mark,
or where you will want to tie in the post or wings. As
you braid you may have to re-wax your thread so as to
keep the two strands together.
6. At this point we have many options for tying our fly.
We may choose to use any number of wing configurations
with conventional hackle wrap. Or we can use a calf tail
or Anton post and do a parachute hackle. For this fly
I will go with the Antron and Cree hackle tied conventional wrap.
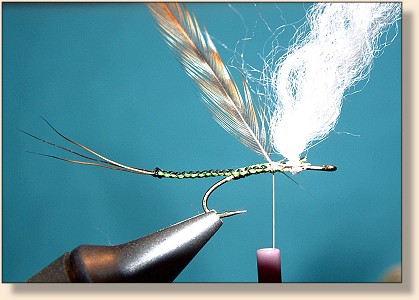
7. In using the Antron as a post, bring the 3 strands
of Moose mane and the two pieces of G thread up in
the middle of your Antron, which you have looped
around the hook. Do a normal tie in, now cut off,
carefully, the G thread and Moose Mane. Do not
trim the Antron until your fly is completed. It is
easier to have it out of the vise (later) and cut
off at an angle. Sure makes the fly easier to hang
on to with a handle.
I like to tie in my hackle at this point so when I
dub I can hide the stem of the hackle.
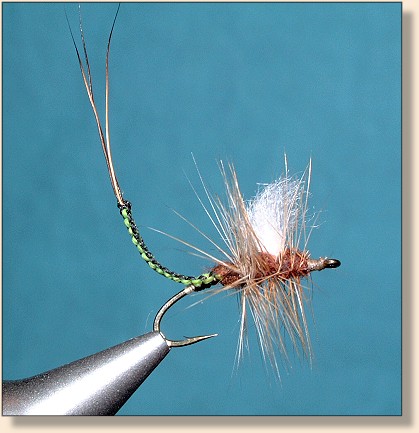
Apply dubbing to thread lightly and dub both in back
of and in front of the post, forming a light thorax.
Stop at this point, wrap hackle, bind off the hackle
and wrap your head and finish off.
Now you can trim the Antron at an angle at a height
that keeps the proportion correct.
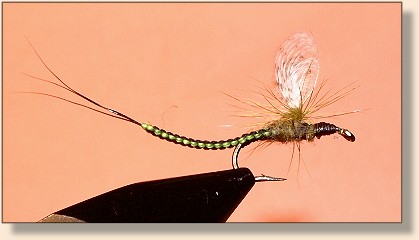
8. The other fly I like to fish is one where I use
2 matched JV hen saddle hackles for the wings. After
the extended body is braided onto the hook, tie off
with your thread and snip off the Moose Mane and
thread ends. Tie in the JV hen saddle hackle wings.
Tie in your hackle and then dub in a thorax to cover
your hackle tie in. Carefully wrap your hackle both
in back of the wings and a couple in front. Tie off
and make a small head of thread. Cement and Fish.
Last but not least, one of my favorites is this tail
combined with the Wally Wing. With Tony teaching me to
braid his Nit Pickin Mayfly and Martin Westbeek teaching
me the Wally Wing, a light came on in this old head;
I have tied many of them since and have caught lots of fish
on them.
As you can see, this braided tail mayfly may be modified
to use any number of different wings and posts. Allow
your mind to wander and create your own Braided Tail
Nitpicking Mayfly. Use 'em, they are real fish catchers.
~ Denny