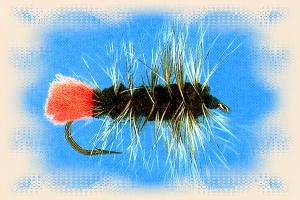
Black Woolly Worm
Tied and Photographed by Peter Frailey, text by Gary Soucie
Like the basic black dress, the Black Woolly Worm is at
home almost anywhere and is rarely a bad choice. (Just
as chic women accessorize their "little black dresses"
with colorful scarves, fancy belts, single-rope pearl
necklaces, or gem-studded pins, so do fashion conscious
fly tiers dress up their basic Black Woolly Worms with
red tails, silver ribs, shiny bead heads, or other
fish-attracting fillips.)
Materials List: Black Woolly Worm
Hook: 2X- or 3X-long, standard to 2X-heavy wet-fly,
sizes 2 to 16, say (6 to 1 2 being the sizes most often cited).
Thread: Black, in a size appropriate to the hook: 8/0
for sizes smaller than 16, say, 3/0 for a size 4 or larger, 6/0
for most sizes.
Tail: Red or grizzly hackle fibers or point(s), a quill
slip, or a short tuft of red yarn; some tiers consider the tail
optional in a standard Woolly Worm2
Body: Black chenille fine, medium, or large, to suit the
hook.
Hackle: Long grizzly hen hackle neck or saddle, your
choice palmered the length of the body, with the dull
underside of the feather facing forward and the barbs
angled forward.
Head: Tying thread, tied fairly large; cement, varnish,
lacquer, fingernail polish, or other protective coating is optional.
Tying Instructions: Black Woolly Worm
In the photo sequence that follows, the body color
has been changed to make the tying steps more easily
visible.
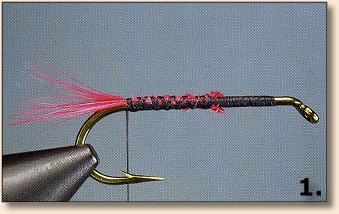
1. Tie on behind the eye of the hook and lay the tail
material if used along the top of the shank and wrap the
thread down to the bend, binding the tail material to the
shank to form a smooth underbody.
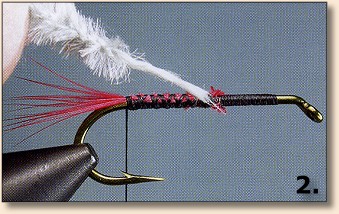
2. Strip one end of the chenille by pinching and
pulling the fuzzy stuff away with the nails of your
thumb and forefinger, exposing about 1/4 inch of
the string core.
3. Tie in the stripped end of the chenille at the
bend, with the rest of the chenille hanging back
behind the rear of the hook.
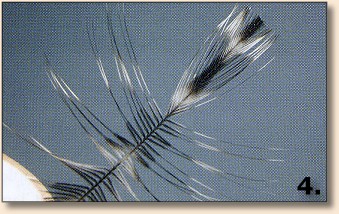
4. Prepare the hackle feather by stroking most of
the barbs perpendicular to the hackle's center stem,
then trim the feather square at its tip, leaving a
small triangle.
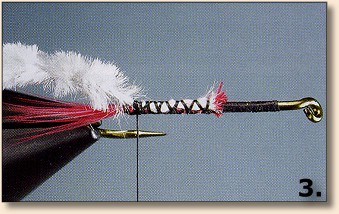
5. Trap the aft-facing hackle feather (its dull,
concave side facing up) by its triangular tip to
the top of the hook at the rear of the shank, just
ahead of the tied-in body material. Wrap the thread
back up the shank in neat, close spirals, forming a
thread base that will keep materials from slipping
around on the slippery steel shank.
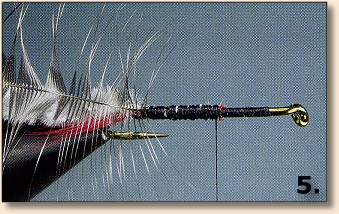
6. Holding the hackle up and out of the way, take
one wrap of chenille behind the hackle.
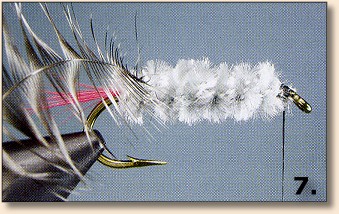
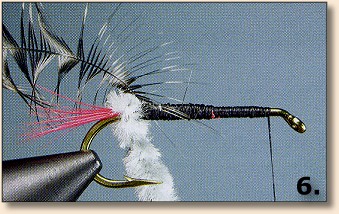
7. Wrap the chenille forward in close spirals, each
abutting the preceding wrap without overlapping it.
Just behind the eye, tie off the chenille and clip the
excess. Be sure to leave enough room between the chenille
and the hook eye to tie off the hackle and build a head
in step 8.
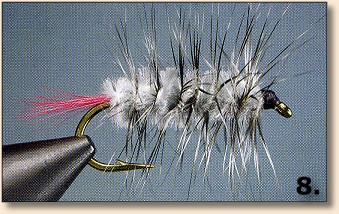
8. Wind the hackle forward in evenly spaced, close,
open spirals. Wrap with the shiny, convex side of the
feather toward the rear, if you want most of the hackle
barbs to angle forward. (Seven turns are traditional,
but Charlie Brooks liked to use just five turns for a
sparser look. When in doubt, opt for the fewer number
of turns.) When you reach the front of the body, secure
the hackle with three or four tight wraps, and clip the
excess feather. It's a good idea to anchor the hackle
with a half hitch or two before clipping the excess. Build
a neat, smooth, rather large head (larger than for most
trout flies) with the tying thread. Whip-finish or use
three half hitches. Clip the excess thread and - if
you wish, it's not altogether necessary - apply a drop
of head cement ("lacquer") to the thread. Once the
head cement has dried, go out and catch a fish!
~ Peter Frailey
Credits: Excerpt from Woolly Wisdom,
By Gary Soucie, published by Frank Amato Publications, Inc., P.O. Box 82112,
Portland Oregon 97282; Phone: 503-653-8108
|

