1. Secure the thread to the hook shank and cover
the front one fourth behind the eye. Lash the dumbbell
eyes to the top of the shank, leaving one and a half
hook-eye widths between the dumbbell and hook eye. To
do this, take three wraps diagonally one way, then the
other way to straighten. Wind the thread three times
around the wraps clockwise (between the dumbbell and
shank) to tighten the wraps. Check the position of the
dumbbell to make sure it's sitting right, then repeat
the thread wraps a couple more times. Wind the thread
back along the shank to directly above the hook point,
then forward again to the dumbbell. This gives us a
foundation for lashing on the leather lace underbody.
From a spool of 1/8" leather lace, cut two sections about
3/4 inch long for size 4 (or a length equal to, from just
in front of the hook point to slightly behind the dumbbell
eyes). Hold it up so the wide side faces you and it appears
as a rectangle. From one end, trim the top corner off at
about a 40 degree angle to the bottom. From the other end,
trim the top corner off at about a 25-30 degree angle to
the bottom. Do the same for the other section. A section
will go on each side of the shank to form a wide, flat
underbody. Place one section on the far side, the
longer-tapered end near the dumbbell eyes, the sharper
angled end terminating just in front of the hook point.
Pinch the leather between thumb and finger, and spiral
wrap the thread over it toward the bend, taking loose
turns, pulling on each turn toward you, parallel to the
wide side of the leather to prevent it from twisting or
moving around the shank. Reverse direction and spiral
back to the dumbbell eyes. Attach the other side in the
same manner. Once the other side is attached, carefully
wind the thread back and forth along the leather to further
secure it. End with the thread just behind the dumbbell
eyes, tie a small whip finish knot, and clip the thread.
Coat the thread wraps on the dumbbell eyes and leather
lace with several drops of Zap-A-Gap. Let this dry, then
paint the dumbbell eyes if desired. For the fly pictured,
I used Testors enamel, mixing colors until I got a shade
that roughly matched the raffia I'll be using for the
shellback. Go ahead and prepare four or six underbodies
up to this point now if you like.
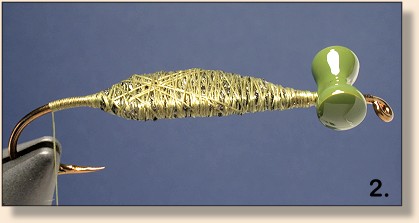
2. Replace the hook in the vise, leaving plenty of room to
work around the hook gap, where the head is tied. Start
the thread just behind the dumbbell eyes and wrap back and
forth over the underbody a couple times, criss-crossing
where necessary, to cover the "slippery" cemented portions.
Bring the thread to across from the hook point, then continue
into the bend with smooth touching wraps to directly above
the hook barb. As we're tying the head, think small and
minimal. Try to ignore the big body foundation and tie
as though the head is the entire fly. The head itself
is only as long as from the hook point to the hook barb,
the antennae and mouthparts extending out beyond that. Not
to worry, though...if you can tie a size 14 or 16 nymph, you
can do this!
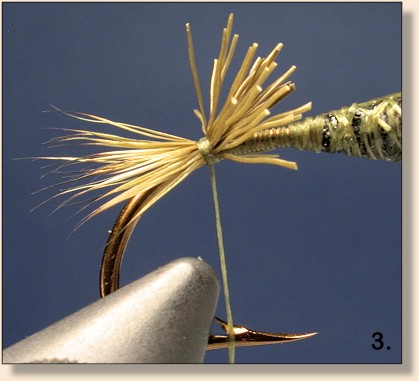
3. Clip a bundle of deer hair slightly less than a
matchstick in diameter (for sizes smaller than 4, use
a bit less). Remove the underfur and align the tips
in a stacker. This will be the mouthparts of the crayfish,
and will extend from the hook barb where the thread is
hanging now, to slightly beyond the back edge of the
bend. So hold the bundle rather close to the tips and
trim off the butt ends so you're left with an even-tipped
bundle about half an inch long...this just gives us less
excess to work around. Straddle the hook shank with the
bundle, take two loose turns of thread, then pull down
to tighten while pinching the bundle to keep it from
spinning. Check the length and the distribution of
the fibers. Length has been discussed, and there
should be about as many fibers on the far side as the
near side. If it's not quite right, simply pinch the
bundle, loosen the thread, and reposition. If it's
right, take one more tight turn of thread, then spiral
forward to lash down the butt ends. Trim any strays.
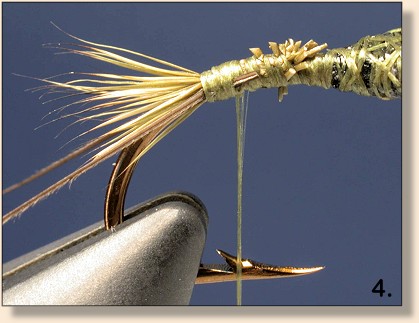
4. Clip two fibers from a dark gray goose wing quill.
These should be about as long as the hook. If you don't
have the goose, ringneck pheasant tail fibers will suffice.
Spiral the thread all the way back to the mouthparts (the
first turn of thread tying in the deer hair) and lash one
fiber to the near side of the shank. Take another turn in
front of the first. Position the fiber to point downward.
Now lash the other fiber to the far side, taking one turn
of thread, then another just behind that one, directly on
top of the rearmost thread wraps. Spiral the thread forward
one turn, then take another tight turn to anchor all in
place. Turn the fly over so the hook point is on top.

5. We'll be using raffia, or Swiss Straw, for the shellback,
but if you've ever used this material, you know that once it's
wet, it is very delicate...one nice trout will shred it.
So we're going to cover it with a protective layer of a
clear, more durable material. Plastic like that which a
freezer storage bag is made from will work well, or use
other clear, flexible durable materials. Trim a small
piece of this about an inch long and roughly as wide as
the hook eye. We'll tie this in like a nymph's wingcase,
so lay it at an angle against what is now the top of the
shank, and take one loose turn of thread around it. Use
your thumb and index finger to center it on top, then
gently pull back on it as you tighten the thread. Take
another tight turn of thread behind the first, which
should be against the deer hair mouthparts. The excess
to be pulled over later should now be extending beyond
the bend of the hook. Take another couple tight turns
to secure.
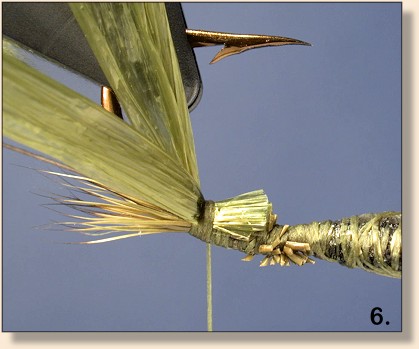
6. Now for the raffia. Cut a section about an inch long,
unfold it, and cut it lengthwise into three equal sections.
Take one and tie it in directly on top of the plastic in
the same manner. It helps to crimp the end being tied in,
then the thread is "laid" in the crease to keep it from
slipping off. Make sure the first turn of thread is over
the rearmost thread wraps, then take another turn directly
in front of the first. Now tie in another raffia section on
the near side of the hook the same way, two wraps of thread
only. Repeat for the far side. The first tied-in section
of raffia should be centered on top, with the two tied in
directly on top of that, but angled out to either side.
Spiral the thread forward to lash down the excess and bring
the thread to just behind the hook point.
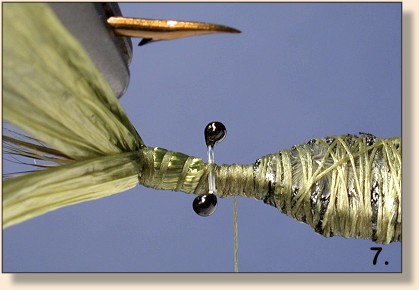
7. Prepare the eyes. Clip a 3/4 inch section of 8 lb.
monofilament (use smaller test for smaller sizes), clip
in the middle in metal hackle pliers. Hold near a flame
to melt both ends. Be careful not to catch the mono on
fire...be prepared to blow out any flames quickly. If it
burns, it's still usable, but if melted slowly it forms a
nicer, more rounded shape. Prepare eyes to go with all
the underbodies you made previously. I like to coat my
eyes with paint or dark nail polish, and this can be done
en masse by cutting slits into 1 mm foam, inserting the
mono eyes, then applying the paint to both ends. Allow
adequate time for the eyes to dry. When they're ready,
lay them against the top of the shank at an angle and
take a turn of thread diagonally though the center. Take
just two crossing diagonal turns of thread, reposition and
center as needed, pull down to tighten, then immediately
take two turns just in front to secure.
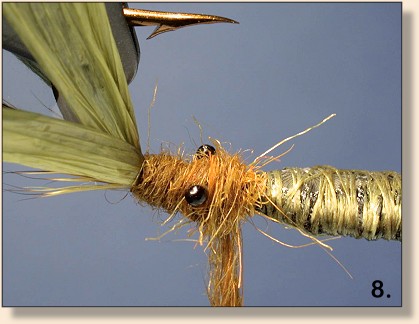
8. Dub the head. Use a blend of dubbing to match the
locals, and one which has bulk, but can be dubbed fine
with the aid of wax. Here I've used a blend of 60%
olive rabbit, 30% olive poly yarn, and 10% orange Angora
goat dubbing. Start the dubbing behind the eyes and wind
back to the mouthparts. At the very front of the head,
lay down one fine layer of dubbing, then dub forward to
the back of the head. In other words, the head should
be dubbed to taper sharply from front to back. Take a
couple extra turns of dubbing at the back of the head,
directly below the hook point.
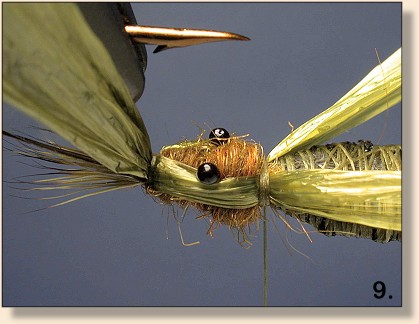
9. Grasp the raffia strip on the near side of the hook
and pull it back along the side of the head. Use the
edge of the raffia to push up on the mono eyes, and
secure with two tight wraps of thread. Do the same
for the other side.
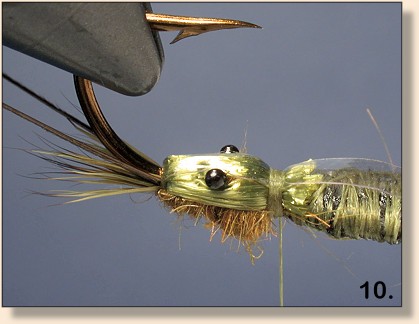
10. Now pull the center strip of raffia over the top of the head,
working it between the mono eyes. Tie down with two tight turns
of thread. Clip the excess raffia, leaving a little to help
build bulk in the "neck" area. Finally, pull the plastic
down over the center of the head, again between the mono
eyes, and tie down with three tight turns of thread.
Clip the excess, take a couple extra tight turns to
secure, then coat the thread wraps with cement. Take
a small break and let the cement soak into the thread.
I think the head is probably the hardest part of this
fly to tie, so the rest should be a piece of cake, right?
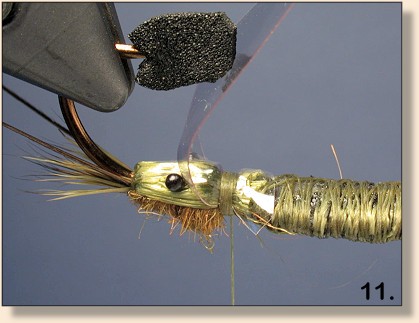
 11. Put a small piece of scrap foam on the hook point,
both to protect your fingers, and to prevent the plastic
from being impaled. We'll tie this in next, but first,
you have to trim it to shape. Use a marker (not
permanent) to draw on the plastic, a simple bowling pin
shape...keep in mind it will cover a wider, rounded thorax,
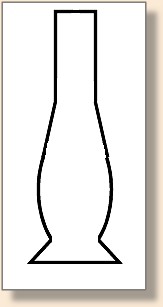
then taper slightly toward the crayfish's tail. Make it
extra long beyond the tail for ease of handling and draw
in a "notched" section to tie in near the head. (See
pattern outline at right.) Hold this over the fly to
check the size...your outline should be slightly larger
than the edges of the underbody. If it's the right size,
cut it out with regular scissors, and wipe away any traces of
the marker outline. It's a good idea to use this first
one and trace it on an index card, to be used as a template
for more flies. Lay this shape on top of the shank and
bring the thread over it in the notches. The notches will
catch the thread and you can position the very first thread
wrap right against the back of the head, and centered on
top. Excess should extend to the rear to be pulled over later.
11. Put a small piece of scrap foam on the hook point,
both to protect your fingers, and to prevent the plastic
from being impaled. We'll tie this in next, but first,
you have to trim it to shape. Use a marker (not
permanent) to draw on the plastic, a simple bowling pin
shape...keep in mind it will cover a wider, rounded thorax,
then taper slightly toward the crayfish's tail. Make it
extra long beyond the tail for ease of handling and draw
in a "notched" section to tie in near the head. (See
pattern outline at right.) Hold this over the fly to
check the size...your outline should be slightly larger
than the edges of the underbody. If it's the right size,
cut it out with regular scissors, and wipe away any traces of
the marker outline. It's a good idea to use this first
one and trace it on an index card, to be used as a template
for more flies. Lay this shape on top of the shank and
bring the thread over it in the notches. The notches will
catch the thread and you can position the very first thread
wrap right against the back of the head, and centered on
top. Excess should extend to the rear to be pulled over later.
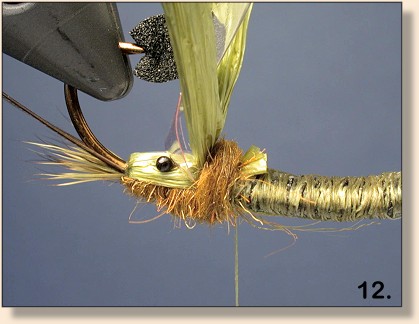
12. Cut two, two-inch sections of the raffia, and tie these
in together directly on top of the plastic, a section angled
slightly out to either side. Apply dubbing over this to fill
in the "neck" area, until it is about as wide as the underbody.
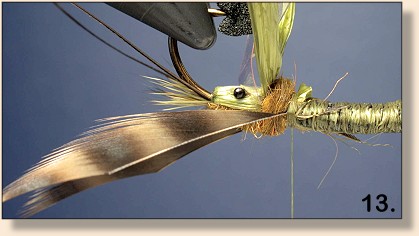
13. Prepare the pincers by selecting two wide, webby saddle
hackles. These can be hen or rooster, or you can use other
birds such as pheasant, providing the feathers and fibers
are long enough. The fibers should be about as long as
half the hook shank. Clip the butt end holding all the
marabou-like fluff, and hold the feathers so the "tops"
are facing you, tips pointing up. Take one feather and
carefully strip the fibers from the left side. On the
other feather, strip the fibers from the right side. On
each feather, from the fibers remaining on the one side,
trim off about half an inch from the bottom with scissors.
This clipped portion will be tied in. Measure against the
hook, and trim each feather so the stems are half as long
as the hook shank. Use you fingernail to crimp the stem
of one feather just below the lowest fiber, and use this
to tie it in on the corresponding side of the fly...to
illustrate this, hold your hands out in front of you,
relaxed. Notice the hands are slightly angled. Position/tie-in
the pincers in a manner that the fibers point inward toward
each other and up, as your thumbs are, and the stem sides
are on the outside and down a little, like the "pinky" side
of your hands. Tie one in at a time and make loose turns
of thread directly in front of the "neck" dubbing, positioning
each feather before tightening down. Once they're both
positioned and tied in, lash over the excess butt ends
along the sides to secure, then bring the thread back to
the tie-in point.
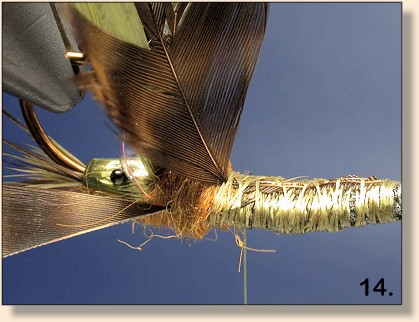
14. Apply dubbing over the tie-in area of the pincers to
blend with the dubbing in the "neck" area, and about as
wide. Select two webby saddles with fibers which, when
stroked to stand out straight from the stem are a little
more the half the hook shank long on each side. Trim away
the fibers from the butt end for about half an inch on both
sides, and tie this in on top of the shank, "shiny" (or
bottom) side up, extended back toward the bend. This will
be pulled over later. Repeat for a second feather directly
on top. TIP: since we'll be folding this over and
tying it down, I find it helpful to measure out the section
that will be over the thorax, then clip out a couple fibers
on both sides where I anticipate the tie-in area will be.
This helps you maneuver the thread though the feathers to
tie them down (see photo).
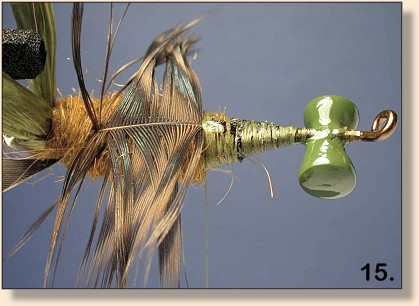
15. Apply dubbing to the thorax area, terminating about
half the distance from the back of the head to the dumbbell
eyes. Pull one saddle over the top and tie down with three
or four thread wraps, then do the same with the other. Clip
the excess from the saddles and take a few more extra turns
to secure. Apply a drop of cement and allow some time for
it to soak into the thread wraps.

16. Now tie in the tag end of the wire. Here I've used
gold, but copper also looks quite nice, just be sure to
use medium or about 32 gauge, as we'll be applying quite
a bit of force to it later, and this will also help make
the fly more durable. Lash the tag end to the bottom of
the fly, then fold the excess back, effectively trapping
it in the thread wraps so it doesn't pull out later. Cover
the wire with thread wraps, then apply a little more dubbing
in front of and behind the tie-in point. Advance the thread
to halfway between this tie-in point and the dumbbell eyes.

17. Unfold the tied-in raffia enough that when it's pulled
over, it will cover the back of the thorax and force the
thoracic legs (saddle fibers) downward. Pull the raffia
sections forward together, and take a turn of the wire
around them. Pull the raffia taught, tighten down with
the wire, then pull the plastic down and secure with a
second wrap of the wire. Keep the wire tight as you move
on to step 18.

18. Pull the raffia and plastic up out of the way and
spiral the wire to the tying thread. Tie down with three
or four tight turns, but do not clip. Dub the area between
this tie-down area and the first ribbing, forming another
dubbed section. Finish by dubbing a little behind and
in front of the wire. Bring the thread right up to the
dumbbell eyes. Pull the raffia over and secure with one
turn of the wire, the plastic with the second turn. Lift
the excess up out of the way and spiral the wire to the
thread, then tie it down. Dub this last section, then
bring the thread to in front of the dumbbell eyes. Pull
the raffia and plastic forward and tie down as previously,
take two extra turns of the wire underneath, then bring the
wire diagonally over the top of the dumbbell eyes so the
excess is in front on the far side. Take the tying thread
diagonally across the top to behind the dumbbell on the far
side, take two turns right behind, then two more diagonally
across the top from in front on the near side, to behind on
the far side. Clip the wire, and bind down any exposed end
to the shank in front of the dumbbell eyes.
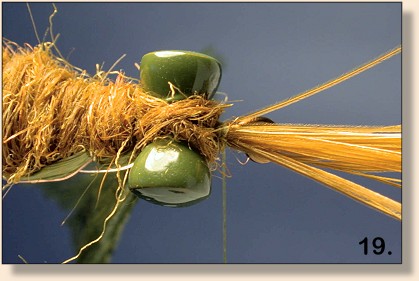
19. Select a feather with long, webby fibers for the tail.
Trim a section of fibers about an inch wide, even up the tips,
and tie this in on what is now the bottom of the hook. If
you have a rotary feature, you can simply turn the fly over
to do this. Tie this bundle in so the fibers are about half
as long as the body. TIP: Hold the bundle in your right
hand, pinched at the tie-in point, and drape the tying
thread over the bundle. Take another turn in this manner,
then pull down to tighten while pushing the bundle "into"
the fly with the right hand. To help tighten down with
minimal thread wraps, take a turn of thread behind the
dumbbell, come up over the bundle in front of the dumbbell,
pull to tighten, then take another turn behind to secure.
Apply dubbing in two turns diagonally though the dumbbell
eyes, first one way, then the other. Do not dub in front
of the dumbbell.

20. Pull the tail fibers back and take several wraps of
thread in front to hold them. Make sure the wraps are tight,
but try to wind back far enough that the fibers tend to lay
back on their own.
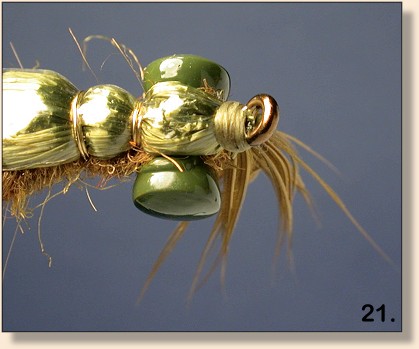
21. Pull the raffia over the dumbbell and tie down with
the thread. Be careful not to trap any of the tail fibers.
Take four tight turns, then clip the excess close. Do the
same with the plastic. Cover any exposed ends and build
up an oversized head with the tying thread. This is one
case where a great big head is actually desired. Whip
finish the thread, clip, then coat well with a good,
penetrating cement.