2: Cut a Ľ" strip from a 1mm foam sheet for your abdomen.
3: Prepare two Pheasant feathers as shown for the rear legs.
When you are satisfied with their shape dip the stems only
in Soft Body to reinforce the quills.
4a: Strip and prepare 4 Pheasant feathers or Japanese Nymph
Legs for the remaining center and front legs.
4b: Strip two Pheasant feathers or Japanese Nymph Legs for
the center legs. You may also strip and shape two Pheasant
feathers for the front "scoop" legs common to this species.
Again when you are satisfied with these dip them in Soft
Body to reinforce the quills.
5: Finally unravel a 3" length of Raffia and cut 3 - 4
thin strips for your thorax material.
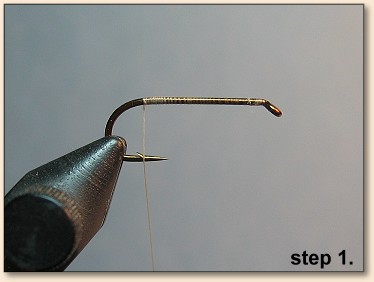
1. Attach your thread and apply a layer to the hook shank.
This will prevent any material slippage in future steps.
Return your thread to the rear of the hook and let hang.
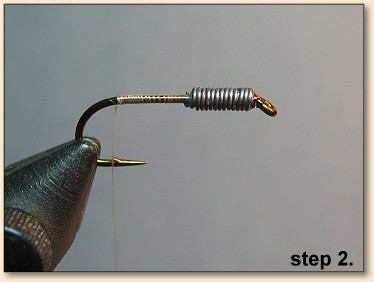
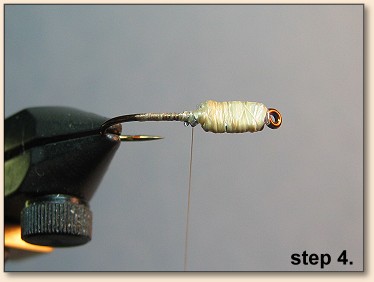
2. Apply a thin layer of "Crazy Glue" to the front section
of your hook. Take care the glue does not run into the eye.
Wrap your lead wire on the front thorax section as shown
in the photo and allow drying for several seconds.
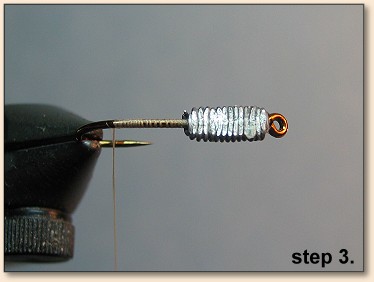
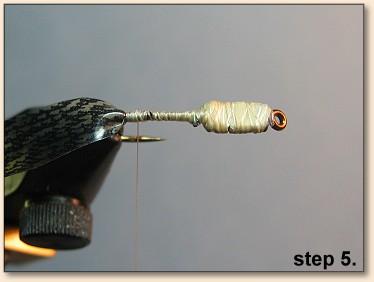
3. Now using needle nosed pliers flatten the lead wraps
as much as possible. You are trying to achieve the final
shape of the pattern. These lead wraps may be trimmed
using nail clippers to a more pleasing shape if needed.
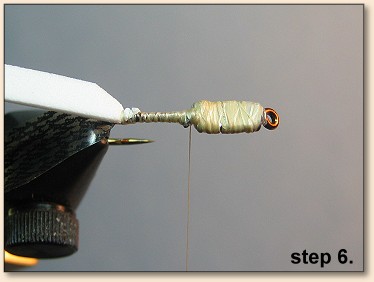
4. Tie in a length of Raffia and wrap over the lead wraps,
covering them all. Tie off any excess. The goal here is not
to build up the thorax. We are only trying to cover the lead
wraps.
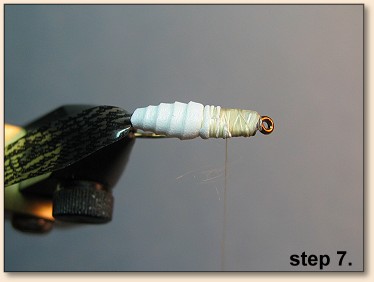
5. Return your thread to the rear of the hook and tie in
the Shell back material. (Mottled Thin Skin or Raffia
depending on species imitated and choice).
6. Attach your foam strip just ahead of the Shell Back and
decide which side will be wound down next to the hook shank.
Advance your thread to the front of the hook.
7. Using a toothpick or Bodkin apply a thin layer of "Crazy
Glue" to the inside of the foam strip. Wrap quickly as the
glue will dry fast on the foam strip. Overlap the wraps by
50% and wrap to achieve 4 - 5 segments. Wrap loosely building
the final shape of the finished pattern's abdomen up to the
lead wire wraps. Tie off and trim the remainder of the foam
strip.
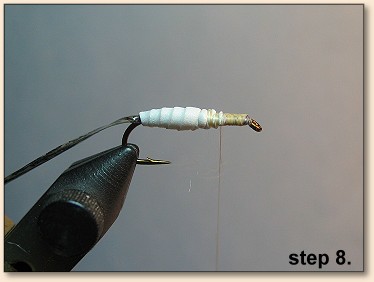
8. Now quickly flatten the foam strips slightly using
needle nosed pliers. The "Crazy Glue" will dry quickly
and hold the flattened shape. Remember we are after a
flattened, short, fat cigar shape. Tie off your thread.
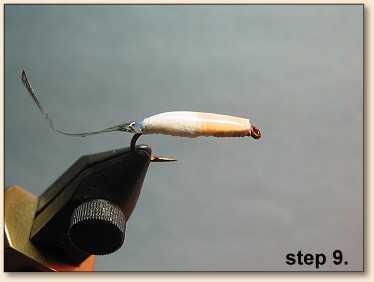
9. Apply a coat of Varnish to the entire foundation,
top and bottom. Allow everything to dry completely and
we are ready to proceed to the first stage of color.

10. Most species I have encountered are a tan/cream on
the bottom with a golden brown top. For this pattern I
have used Prismacolor PM -172 Light Umber for the top
and PM-158 French Grey for the bottom.
11. After you are satisfied with the color re-attach
your thread. Tie in a length of Raffia and let it hang
to the rear. At midpoint tie in one of the rear shaped
legs for each side. While the natural holds them backwards,
angling them with the curvature forward will help the
action of the fly when complete.
12. Wrap the Raffia strip forward covering any thread bindings.
Moistening the Raffia strip before wrapping will result in a
very pliable material easily manipulated into shape. Wrap just
forward of the rear legs and tie off on top. Trim your strip.
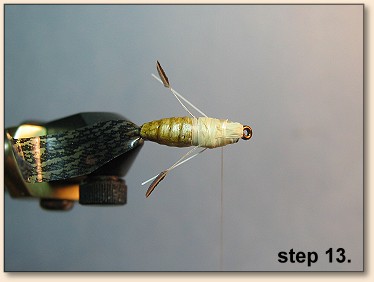
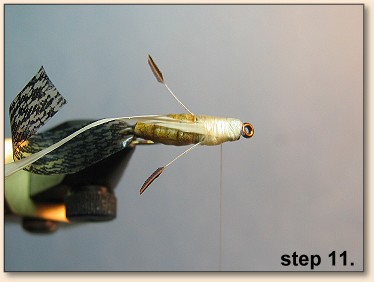
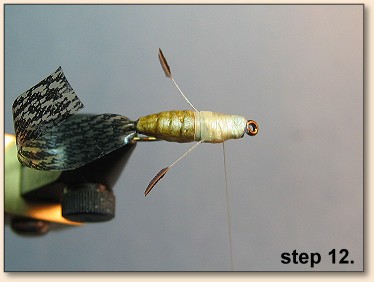
13. Attach another Raffia strip on top and then tie in
your center legs along the bottom of the thorax. When the
center legs have been firmly secured wrap the moistened
Raffia again to cover any remaining lead wraps and the
thread bindings. Tie off your Raffia strip on top and
trim any excess.
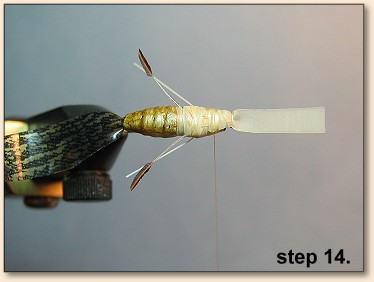
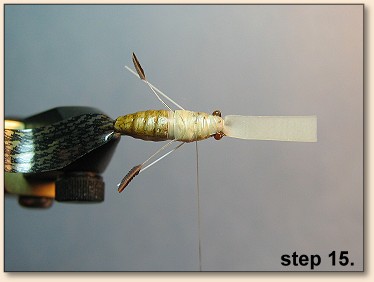
14. Now advance your thread to the hook eye and using
a pinch and wrap technique attach the latex strip you
will use as your head capsule covering. Allow this to
hang forward over the eye and trim and tie down any
excess left hanging over the thorax.
15. Using either a tea candle or lighter light the end
of a length of Mono and when it begins to "ball up," blow
out the flame and touch the melted end to your first eye
location. Remove quickly. Repeat for the opposite side.
If you make a mistake don't worry. Allow the Mono to cool
and carefully remove the eye with your fingernail. With
practice this technique will provide you with some very
convincing realistic eyes! When satisfied with your eyes,
coat them in a thin layer of varnish to seal.

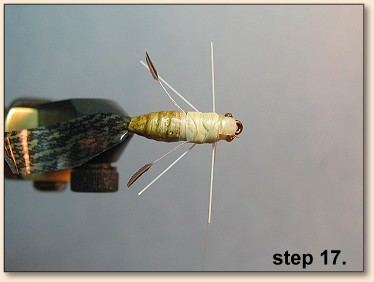
16. Tie in a final Raffia strip on top of the thorax
and tie in the front legs. When the front legs are tied
in secure wrap the moistened Raffia strip forward to the
rear of the head, tie off and trim any excess.
17. Pull the Latex Head Capsule towards the rear over
the eyes and tie down forming the head. Trim any excess.
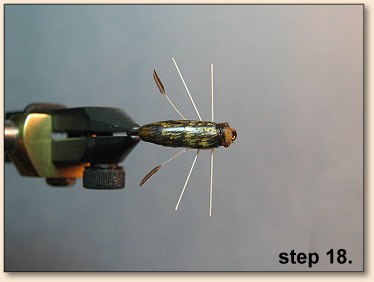
18. Pull the Shell Back forward stretching it slightly
to fit over the abdomen and thorax shape and tie down
behind the head. Tie off and trim closely any excess
material. Whip finish at this point using any thread
layers to hide any trimmed Shell Back material. Cut
your thread apply some final color and you are finished
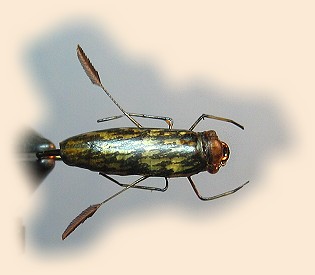
tying your Waterboatman.
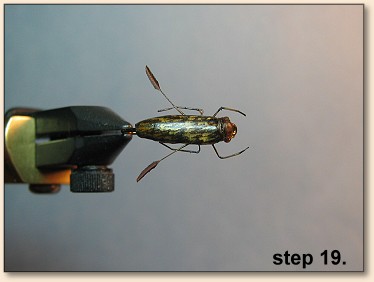
19. Using a tea candle as a heat source heat either your
Bodkin or as I do fine tweezers for only 3 - 5 seconds
and heat kink your center and front legs to a more
realistic shape. It is best to experiment on old quills
or Nymph Legs to ensure you do not end up burning off a
leg. While the pattern will still fish as well with one
burnt leg...it nevertheless can be a frustrating experience
after going through all the steps needed to tie these
patterns.
20. Apply a coat of varnish to the head and back and you
have just completed the Waterboatman.