
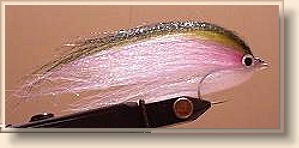
 Buffy the Striper Slayer Jeff Smith
|
|
|
|
|
Tying Steps:
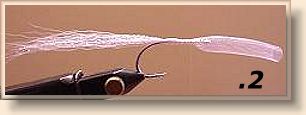
1. Secure hook in vise and secure thread midway along the shank.
Tie in a pinch of light pink bucktail and top with 3 strands of light
pink crystal flash. Fold the flash at the 45% mark around your thread
and cinch down on top of bucktail. Nearly all the materials are tied
around the thread and cinched down for this will keep the materials
from being pulled out when finished. Synthetic materials do not
compress the way natural materials do and have a slick finish so
get in the habit of tying your flash in by folding around the thread.
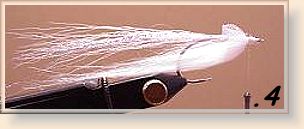
 2. Cut a 1-1.5 inch piece of corsair tubing. For this demonstration I used � inch Corsair. Take the nylon polyester stitching out of it. This will enable you to work the tubing to the required shape. Slip tubing over shank and tie in. Work your way up towards the head so there is about �" of shank showing just behind the eye. Half hitch several times and tie off. Coat with a dab of Zap a Gap.
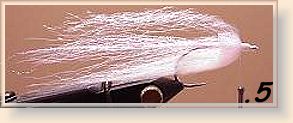
 3. Push the corsair tubing back over itself in the way you would turn a sock inside out. Push it back far enough so that the tubing is doubled over enough to make a head that will be big enough to secure your eyes too. Once you have it back where it is supposed to be, take your thumb and index finger and squeeze the tubing together while at the same time pulling up on the tubing. You want the spreader to be more on top of the hook than below it to keep the gap wide for hook sets. Keep holding it with your thumb and index finger and take your thread and hold it in your mouth and pull your bobbin out and around the tubing. Keep holding the tubing while you tie in down. Once the thread is set let go of the tag end in your mouth and continue wrapping up towards the nose of the spreader. Pull the tubing to the side, which will allow the eye to pop through and cut off excess tubing. You can use a soldering iron and melt it off if you choose. Be careful where you place your iron for there any many flammable materials and solvents around most fly tiers benches.
 4. Cut a pinch of white Craft Fur or Polarfibre and secure to the underside of the hook. Make sure it's long enough to extend a ways past the bend to reduce fouling.
 5. Take 5-10 strands of Kinky Fiber and stagger the ends. Wrap it around the thread at the 45% mark. You will want the fibers to extend 2-4 inches beyond the bend depending on what size you are tying. Once its wrapped around the thread cinch it down just behind the eye so that the fibers flare upward over the spread.
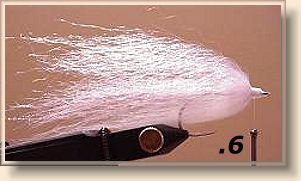 6. Repeat the above procedure until you have secured the Kinky Fiber around the spreader in a 180-degree pattern. This usually takes 4-6 pinches. Remember, you do not need more than 5-10 fibers for each step. Keeping the fly sparse is what makes it work so well!
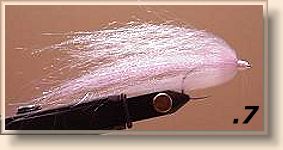 7. Cut 2 strands of neutral Polar Flash secure in same fashion as you did the yak until you have covered all 180 degrees. Flash put in this manner works itself into the body material and interacts with the Yak to give the impression of realism. Once you are finished with the Polar Flash secure neutral crystal flash same as above. Take a pocket comb and comb the body to blend the materials. At this point your eyes should start to light up as you see how the flash interacts in conjunction with the Kinky Fiber.
 8. Cut a pinch of lavender Craft Fur or Polarfibre and cinch down on top. Top with 3 strands of light purple crystal flash. Make a half hitch to keep head from unraveling.
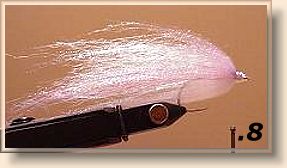
 9. Cut a pinch of olive Craft Fur and cinch down. Top with a longer pinch of olive Streamer Hair. The shorter Craft Fur helps push up the Streamer Hair to give you a larger profile. Add 10 strands of peacock Crystal Flash or peacock herls. Top with a pinch of black Angel hair tyed around the thread like we did in the previous steps. The Angel Hair helps to keep the flash and or peacock in shape along the top of the fly and also adds an added flash appeal.
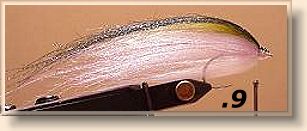
10. Pull just a few wisps of pink Diamond Hair or Angel Hair out of the package. Wrap around the thread and secure to the side of the head. This will give the fly a bleeding gill look. A few strands of red fishair can be substituted. Repeat procedure on the other side of fly. Whip finish and tie off. Take your pocket comb and comb out the whole fly. Run the materials between your fingers to blend. Take a dab of goop and secure correct size mylar eyes. You want the eyes to be set on the sides of the spreader. Lightly get both eyes set and then squeeze together with thumb and forefinger. Stroke materials back and alternate between stroking and pinching until eyes set up. Coat head and front of eyes with 5-minute epoxy.
Fishing Buffy:
About Jeff Smith:For more great flies, check out: Beginning Fly Tying and Intermediate Fly Tying.
|