I will try and explain how I was taught to tie
the Catskill Style of flies. I have changed a
couple of things over the years but I will do
this as I was taught except for one small thing
and that is putting on the tail before the wing.
I find it easier for me to tie on the tail first.
But I was taught to tie the wing on first. This
will be the only thing that is different from the
way I was taught. I should also say that I do a
few things differently now days as I have found
somethings that either speed the tying time up
or will improve on the outcome of the fly. But,
like I said I am sticking to the old way here.
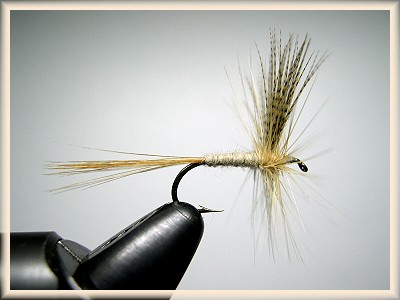
Materials: Catskill Style Light Cahill
Hook: Mustad #94833 size #12.
Thread: White 5/0 Silk.
Tails: Herbert Ginger Spade Hackle.
Wing: Wood duck flank feather.
Body Material: Buff Colored Beaver fur.
Hackle: Whiting Ginger Silver grade Hackle.
Tying Instructions: Catskill Style Light Cahill
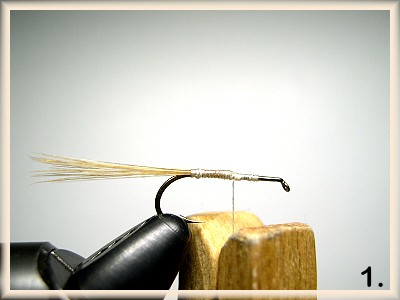
1. Place your hook in the vise. Cut about a
foot of thread off the spool of white silk
thread. Pull it through the wax. I do this
by placing the thread between my thumb and
the wax and just pulling it with my thumb
putting a little pressure on it. That will
get enough wax on it for the fly.
Now start your thread on the hook making sure
that it is started back from the eye about
where the wing will be tied in. This will
leave room behind the eye of the hook for
the leader to be tied on to the hook. (Most
people do not do this anymore but if tying
the "Real Style" of Catskill flies I believe
that you have to tie these flies as I am
describing. Most people put a head on these
flies now and it is not correct to do so. I
have flies tied by most of the best tiers of
the Catskill style and none of them have a head
on them and all have a space left behind the eye
of the fly. This is as I was taught.)
Wrap the thread back to a point just above the
barb of the hook. Put a half hitch in the thread
and put a cloths pin on the thread to hold it
in place. (Remember we are tying these as I was
taught and I was not taught to tie with a bobbin.)
Take your spade hackle and trim off the webby part
toward the bottom of the feather. Now grasp about
a 1/3 of an inch of the fibers in your left fingers
and pull down just a little so they are straight
to the side. Now grasp them tightly and pull the
feather with your right hand, not the fibers with
your left hand. (This is if you are right handed,
just switch it if left handed.) By doing this the
tips of the fibers will be even in your left fingers.
If you pull the fibers with your left hand the tips
will never be even.
Now that you have your tail fibers ready to put
on the hook I switch them to my right hand and
move them to the hook. By using the over all
length of the hook you will have your tail length.
Just lay the tail fibers on the hook and you can
see how long the hook is on the Tail Fibers and
that is were you will tie them in. Move to the
rear of the hook, hold the tail fibers on top
of the shank with your left hand and take your
cloths pin off the thread. Grasp the thread and
take 3 wraps around the tail fibers and between
your fingers. The Tail fibers should now stay in
place on top of the hook. Now take one wrap of
thread under the tail fibers. This will splay
them just a small amount and help the fly to
set correctly. With about 4 or so wraps move
the thread up to an area 1/3 of the hook shanks
length behind the eye. Take a half hitch around
the hook and place the cloths pin on the thread
again. (When you take the wrap under the tail do
not pull too hard here. If you do the tail will
spread to much and become a mess.)
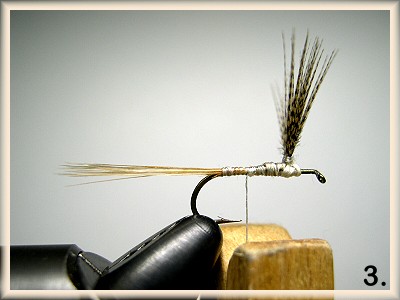
 2. Your thread should be at the wing tie-in point.
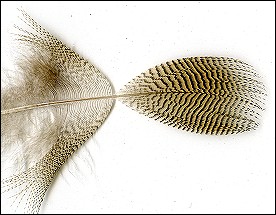
Take a Wood duck flank feather and remove the sides
of the feather that are not even with the tip or
middle of the feather. (Some people will tie two
flies with one feather. I was taught to tie one
fly with one feather. It saves time. I will tie
two with one feather if I am short on feathers
or have a lot of time) The feather will look as
the one in the picture. To get your wing length
hold the fibers up to the side of the hook. The
wing length should be just about twice the hook
gape. So by holding the clumped up fibers to the
side of the hook you should be able to see the
tie in point and then move the clump to the top
of the hook to be tied in at a point 1/3 of the
hook shank behind the eye of the hook.(This is
the point were your thread should be when you
tie it off from doing the tail.) Now still
bunching the fibers in a clump in my left finger
tips. Place this clump on top of the shank and
remove the cloths pin from the thread. Pinching
the fibers on top of the hook shank take 4 tight
wraps of thread around the wing fibers. Now move
your fingers toward the rear of the hook still
holding the fibers on top of the shank. Take a
few more wraps around the fibers in that same
area. This should be plenty of wraps to hold
the wing in place. Now lift up the butts of
the feather and cut it off. Making sure to cut
it at an angle, down and back toward the tail.
This will help with the taper of the body of
your fly.
2. Your thread should be at the wing tie-in point.
Take a Wood duck flank feather and remove the sides
of the feather that are not even with the tip or
middle of the feather. (Some people will tie two
flies with one feather. I was taught to tie one
fly with one feather. It saves time. I will tie
two with one feather if I am short on feathers
or have a lot of time) The feather will look as
the one in the picture. To get your wing length
hold the fibers up to the side of the hook. The
wing length should be just about twice the hook
gape. So by holding the clumped up fibers to the
side of the hook you should be able to see the
tie in point and then move the clump to the top
of the hook to be tied in at a point 1/3 of the
hook shank behind the eye of the hook.(This is
the point were your thread should be when you
tie it off from doing the tail.) Now still
bunching the fibers in a clump in my left finger
tips. Place this clump on top of the shank and
remove the cloths pin from the thread. Pinching
the fibers on top of the hook shank take 4 tight
wraps of thread around the wing fibers. Now move
your fingers toward the rear of the hook still
holding the fibers on top of the shank. Take a
few more wraps around the fibers in that same
area. This should be plenty of wraps to hold
the wing in place. Now lift up the butts of
the feather and cut it off. Making sure to cut
it at an angle, down and back toward the tail.
This will help with the taper of the body of
your fly.
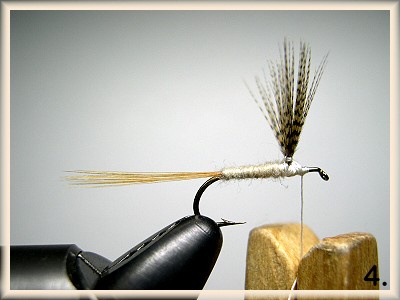
Move the thread just behind your wing.
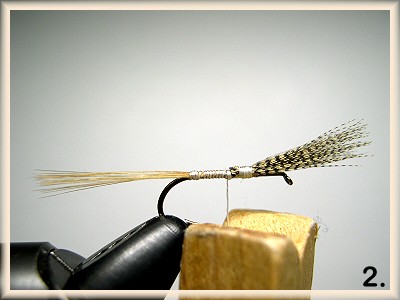
3. Now lift the wing up and take several wraps
of thread in front of and right at the base of
the wing. This will stand the wing up straight
as it should be.
Now split the feather into two equal bunches.
Do a figure 8 wrap between them and then take
two to three wraps around the base of each wing.
This will "Post" each wing and help it to keep
it's shape and position on the fly.
Move the thread to the rear of the hook to a
point just above the barb. Half hitch and place
the cloths pin on the thread.
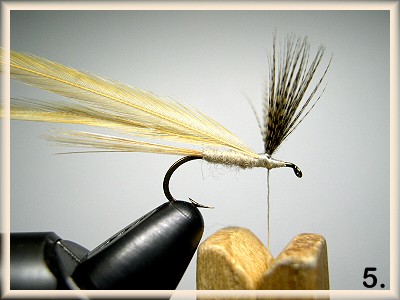
4. Select a small amount of Buff colored beaver
and lay it on your thigh. Now pull it into a
longish noodle and roll it with the palm of
your hand on your thigh. You will get a fine
point to one end. Take that point and take a
wrap of thread around it. Now just twist that
noodle of beaver around your tying thread to
form a body. This should be real fine. It will
take a bit to get the hang of this but it will
work if you give it a chance. After taking
several wraps around the thread with the beaver
now wrap beaver wrapped thread around the shank
forming the body moving up the hook shank as
you wrap it. Just remove the extra beaver and
take a wrap or two around the hook shank and
half hitch the thread and place the clothes
pin on it.
5. Now we will tie in the hackle. Select two
Ginger hackles for the hook size that you will
need. The fibers should be about one and one half
times that gape of the hook. Place the two hackles
together one on top of the other.
Curve side to curve side. Such as this "))" While
holding both in your left hand by the middle of
the hackle strip the butts of the webbing and fluff.
Make sure to pull just a few more fibers off the part
of the hackle stem that will go against the hook.
This will keep you from having hackle fibers
sticking out all over the place.
With the shinny side facing you the part of
the feather with the few less fibers will be
on the up side after being tied in. Now lay
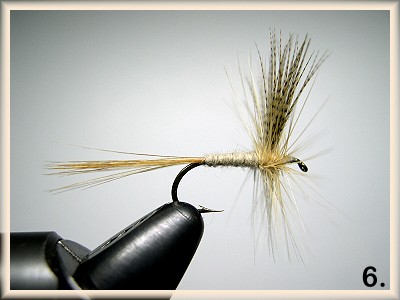
the hackle on the hook as in the picture and
tie them to the shank of the hook. Remember
not to get to close to the hooks eye. Leave
some room up there. I take two wraps of thread
in front of the wing and two behind the wing.
Then back in front of the wing with one wrap.
Cut the butts of the hackle off in front of
the wing, again making sure to leave some room
up front. The hackle should have the shinny side
out toward you. Grasp the top hackle with your
hackle pliers and take two wraps behind the wing
and two in front of the wing. Catch it with the
thread with two wraps on top of the hook. Take
the second hackle with you hackle pliers and
take one wrap between the two previous wraps,
weaving the hackle as you wrap it around the
hook shank. Now, one wrap between the two wraps
in front of the wing and a half wrap to the top
and catch it with the thread with two wraps of
thread. Trim the hackle tips off. Take two to
three wraps of thread right here and and whip-finish
with 4 wraps of thread. Cut the thread and you have
your fly finished.
There are a few things to explain here. One is
that every time I place the cloths pin on the
thread I will spin it to get the twist out of
the thread. This helps in not building up bulk
with your thread as it will lay flat. Do the same
before finishing off the head. It takes but a
second but will make for a much better looking
fly.
Do not take too many wraps of thread. Less is
always better. Most new tiers use way to much
thread. They think if two wraps is good ten
must be great. Dosen't work that way.
I always put a drop of head cement on the head
of the fly as I was taught to do. The wax on
the thread will act as a glue making the body
and the fly hold together much better. I always
use waxed thread on my Dries, Nymphs and Wet
flies.
I should add here. When you get good at these
flies you should be able to do one every 2 1/2
to 3 minutes. That is about normal for good tier.
That is with everything laid out and ready to go.
I hope this has helped some of you see how these
patterns use to be tied. I understand that some
may do it differently but like I have said this
is how I was taught to do these flies. I will
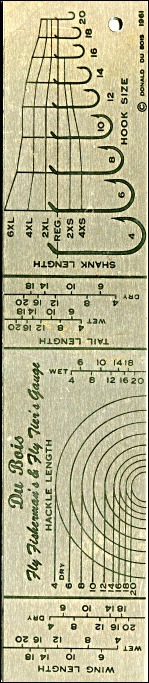
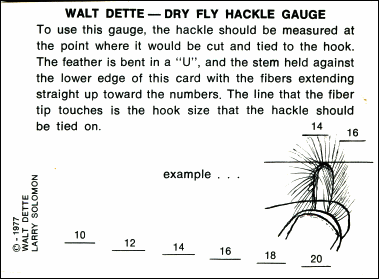
send two of my hackle gauges to JC and LadyFisher
so that they might be able to put them on the
site in real life size so that people might be
able to see what they look like. The ones that
Harry gave me are to well used to be of much good
for copying. Plus I would never trust them in the
mail. I have two gauges that I will send to them.
One is the Dette's and the other is the Du Bois
hackle gauge. I do not believe that either has
been made in many years. (See below!)
I wish you all the best in tying of these great
flies. They are a joy to use and a bigger joy
to tie. They have such a great history behind
them and will always be remembered by people
that love Fly Tying and Fly Fishing.
~ Ron Brown, Montana
Publisher's Note: To preserve the gauges shown here, print
them out and have them laminated!