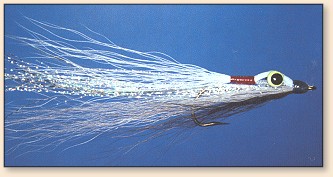
Deep Minnow
By Art Scheck
One of the most popular flies of our time might
also be one of the misunderstood. Maybe it's more
accurate to say that many anglers see only part of
the beauty of Bob Clouser's Deep Minnow design. When
Lefty Kreh introduced Deep Minnows to the fly-fishing
world in an article for Fly Fisherman magazine
in the late 1980's, a fair number of anglers either
praised or blasted the flies for their allegedly
jig-like characteristics.
"This is a great fly," said some. "Thanks to its
dumbbell eyes, it has a deadly jigging action that fish
can't resist."
"These things aren't flies," said others. "They're
merely jigs that heathens can throw with fly rods."
Neither extreme is right. Whether they love or hate Deep
Minnows, folks who use the "fly-rod jig" label don't know
much about jigs. It's practically impossible to impart
a true jigging action to any lure with a fly-fishing outfit.
Real jigs dart upward and then plummet very rapidly. The
action comes from the movement of the rod, and one cannot
replicate it with a 9-foot fly rod and 50 feet of fat fly
line retrieved by stripping. A Deep Minnow doesn't have a
genuine jigging action; rather, it takes a sinuous path as
it swims, rising and falling in a series of curves. It is
a nose-heavy, upside-down bucktail, and its movements are
much less abrupt than those of, say, a rubber-skirted, 1/2-ounce
spider jig manipulated by a bass fisherman.
...A Deep Minnow is not a difficult construction, but
it does present a couple of durability challenges. Many
tiers have trouble attaching dumbbell eyes so that they
stay put. Others paint the eyes with finishes that chip
off within half a dozen casts. Some tiers fail to
protect the band of thread that secures the belly hair
behind of eyes, and their flies fall apart after a few
fish...
Three-Stage Minnows
Besides eyes that twist out of alignment, some Deep Minnows
have another durability problem. If it's not cemented, the
band of thread that secures the belly hair behind the eyes
will abrade in a hurry. Once that band of thread falls
apart, the fly loses its shape.
The solution is to protect that band of thread behind the
dumbbell. As you'll see in a minute, we'll use an unusual,
two-bobbin method to attach the belly hair, and we'll protect all
the thread with cement before proceeding with the rest of the
fly. And since we'll use two bobbins, we'll load the rear one
with red thread. That way, the band of thread behind the eyes
not only secure the belly hair, but also suggests a minnow's
gills.
This approach isn't as time-consuming as it might seem.
Tying production-line style is very efficient, and in this
case produces a more durably fly. If a fly lasts longer in
the field, I don't mind investing an extra two minutes at the
vise.
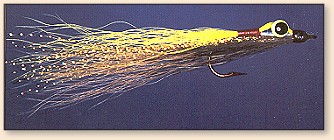
Believe it or not, Deep Minnows come in colors other than
chartreuse and white. Let's tie one that represents a variety
of fresh- and saltwater baitfish - chubs, shiners, herring,
baby bunker, silversides, and others. Here's what you'll need.
Materials List:
Hook: Mustad 3366, size 2 or 2. If you want a
saltwater fly, substitute a tinned or stainless hook.
Thread: Three altogether - white Flymaster Plus to
attach the eyes, any red thread for the band that secures
the belly hair behind the eyes, and gray 6/0 or 8/0 for the nose.
Eyes: A 1/50 or 1/36-ounce dumbbell painted with vinyl
jig paint.
Belly: White bucktail.
Flash: Holographic silver Flashabou, silver Krystal Flash,
pearlescent Flashabou, and pearlescent Krystal Flash. Use only
four to six strands of each.
Back: Gray bucktail topped with a little hair from the brown
portion of the tail. [bucktail above]
Instructions - Deep Minnow:
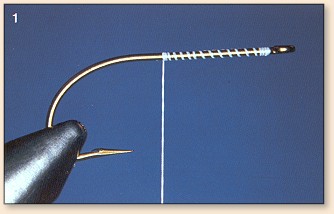
1. Attach the thread behind the eye of the hook and wrap
a spiral over two-thirds to three-quarters of the shank.
Apply a smear of superglue to the spiral of thread.
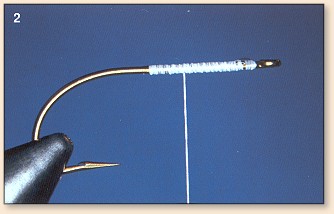
2. Wrap a layer of thread forward over the wet
superflue. Reverse direction and wrap to about
the middle of the shank. The superglue will bond
the thread to the hook.

3. Attach the dumbbell with a few X-wraps of thread
as shown here. Make sure that it's straight, and then
secure it by wrapping diagonally in one direction and
then the other. Keep the thread tight as you wrap.
Finish with a few more X-wraps.
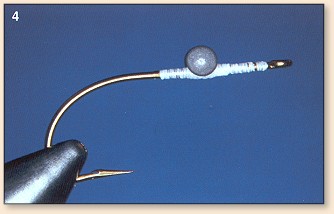
4. Whip-finish the thread and cut it. Check the
alignment of the eyes one more time, and then coat
all the threads with superglue.

5. Give the eyes a coat of white vinyl jig paint. Let
the white paint dry, and apply a coat of yellow or red.
After that dries, give the entire dumbbell a coat of
clear vinyl jig paint. Let the clear coat dry most of
the way, and then apply the black pupils.
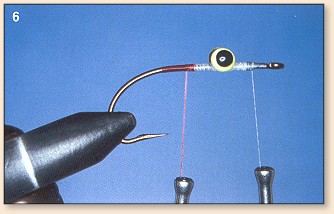
6. You need two bobbins for this operation. Load one
with red thread and the other with whatever color you
want to use for the nose of the fly. Attach the red
thread behind the eyes. Tie on with the other thread
at the front of the shank.
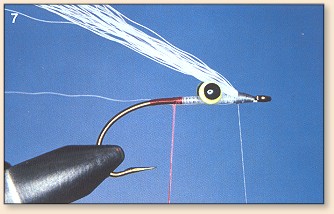
7. Attach a sparse clump of white bucktail at the
front of the hook. Trim the butt ends and bind them
down.
8. Whip-finish and clip the front thread. Pull
the hair down behind the eyes and secure it with
the red thread.
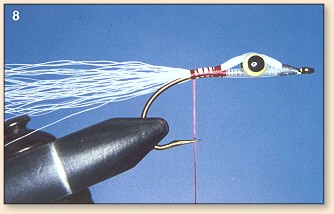
9. Wrap a band of red thread. Whip-finish and cut the
thread. Give the red band two coats of good head cement
or one coat of superglue. Let the cement dry.
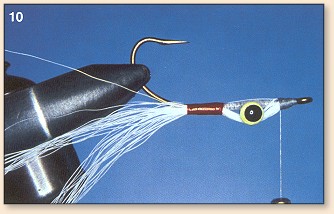
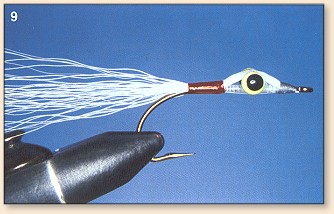
10. Invert the hook and reattach the nose thread.

11. Tie on the flash material. The flashy stuff should
be at least as long as the bucktail.
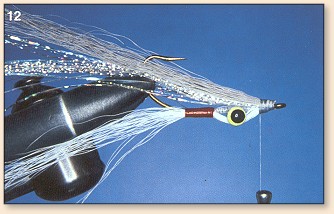
12. Attach a sparse clump of bucktail (gray, on this fly).
Trim the butts, give them a drop of cement, and bind them
down.
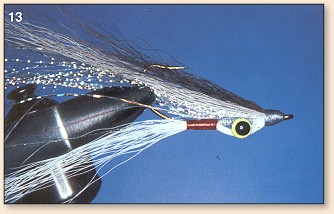
13. This step is optional, but it adds a nice touch.
Cut a very small bundle of hair from the brown portion
of the bucktail. Tie this dark hair on top of the
previous bunch. Not that the dark hair is shorter than
the material beneath it. Trim the butts, bind them down,
and finish the fly's nose.
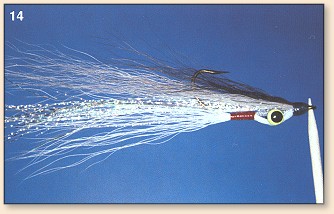
14. Cement the fly's nose, allowing a little
cement to run back into the butts of the bucktail.
One the finished fly, the band of red thread
suggest a baitfish's gills. Since all of the thread
has been cemented, the fly will hold up very well.
Options and Variations
Fly tiers make Deep Minnows in every imaginable
color scheme, and they catch fish with all of them.
Saltwater anglers have been particularly creative in
cooking up new versions of this design, and I have
nothing to add to their contributions. My only
observation is that a lot of freshwater anglers still
don't appreciate the value of small - tiny, even - Deep
Minnows. A Deep Minnow tied on a size 8 nymph hook
and with an extra-small dumbbell or small bead-chain
eyes is a deadly panfish and trout fly. It's no
harder to cast than, say a weighted Muddler or
Woolly Bugger, but it snags much less often.

In sizes small than 6, standard-length hooks
don't have enough room to permit the construction
of a good Deep Minnow. Even a size 6 is often
marginal. That's why I use 1X - or, more often,
2X-long nymph hooks for the smallest version of
these flies. The longer shank has enough room
for me to mount the eyes and tie down the belly
hair. And a nymph hook's turned-down eye (which
becomes a turned-up eye with this type of fly)
helps a baby Deep Minnow flip over in the water,
which lets me use lighter eyes. Small Aberdeen
jig hooks are also good, especially if you want
to tie miniature Deep Minnows for crappies, perch,
or bluegills. ~ Art Scheck
Credits: From Tying Better Flies,
by Art Scheck, published by The Countryman Press.
We appreciate use permission.
|