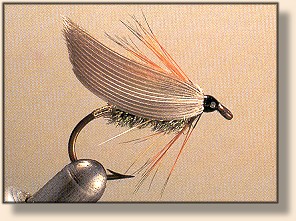
Leadwing Coachman
By Skip Morris
Wet flies were once supremely popular, but they came to seem primitive
and outdated as anglers learned more about the aquatic insects upon which
trout feed. In place of such wet flies as the Black Gnat, Gray Hackle Peacock,
amd Cowdung there came plausable nymph imitations such as the Atherton
Medium, Trueblood Otter, and Stone-Fly Creeper. All that most anglers now
recall of wet flies are images of weepy rods, three-fly cast, and swift, unnatural
fly retrieves.
But how accurate is that image? Trout, written by Ray
Bergman and first published in 1952, then considered virtually the bible of trout
fishing says that "One of the most important methods of fishing the wet fly is the
'natural drift.'" Bergman goes on to explain that natural drift is what we now call
dead drift, and dead drift is today generally considered a sophisticated, natural
way to fish an artificial fly. Perhaps the wet fly hasn't such a crude history after all.
But if we forget history and look at the flies themselves, do they resemble real
trout-food insects? With what we now know about aquatic insects, the answer
appears to be yes. My friend Dave Hughes has long been a follower of the wet
fly; he is one of those rare fellows who never gave it up. Dave sees the wet fly's
obvious resemblence to a drowned winged insect, but he also sees more. From
his studies into entomology, Dave found that some mayflies emerge from their
shucks well under the surface; this leaves a fully winged adult swimming upwards -
sound anything like a wet fly? Some caddisfly adults actually dive underwater to
lay their eggs, and these too make fine models for the wet fly (though a diving
caddis would probably be more a submerger than an emerger).
The Leadwing Coachman is a favorite of Dave's. He usually coaxes it weakly
across the current or fishes it dead drift.
Materials: Leadwing Coachman
Hook: Heavy wire, regular length, sizes 16 to 10 (the hook
shown is a Partridge L2A.
Thread: Black 8/0 or 6/0.
Tag: Gold tinsel (optional nowadays).
Body: Peacock herl.
Hackle: Brown hen neck.
Wing: Natural gray duck-quill sections.
Tying Steps:
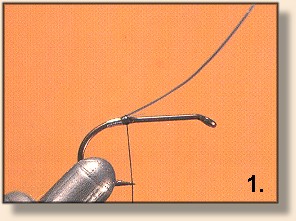
1. Start the thread just ahead of the bend. At the bend, tie in a section of gold tinsel at a slight
angle, long end back and away, short end forward and towards you. Trim the short end if
necessary.
Wrap the tinsel in a few close turns down the bend, and then wind the tinsel
forward in close turns to its tie-in point. Secure the tinsel under a few tight thread turns,
and then trim the tinsel. With that the tag is complete. (Or just skip the tag altogether.)
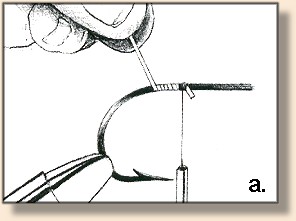
1a. Tie the tinsel at the bend. Wrap the tinsel down the bend in a few close turns,
neither overlapping nor spacing turns.
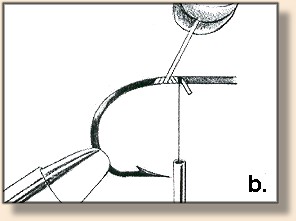
1b. Reverse the wrapping direction of the tinsel and wrap it forward over the
first turns. Again, the edges of the turns should just touch. Upon reaching the
thread, secure the tinsel's end with tight thread turns.

2. Unse the pinch to tie in two or three (depending on hook size) peacock herls
at the bend. Trim the herls' ends. Spin the herls around the thread and wind
the herls around the thread and wind this herl-thread rope up the shank. Secure
the herls with thread turns about 1/8 inch back from the eye. Trim the ends of
the herls.
3. Select a hackle that is, by dry-fly standards, slightly small for your hook size;
that is, a size-11 hackle on a size-12 hook. If you are measuring hackle-fiber length
against the hook, the fibers should be slightly short of 1 1/2 times the gape. Strip
the fibers from the hackle's base. Advance the thread 1/16" and tie in the hackle.
Snip off the hackle's stem, and return the thread to the front of the body.
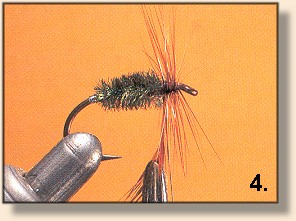
4. Wind the hackle back in two to four close turns to the front of the body.
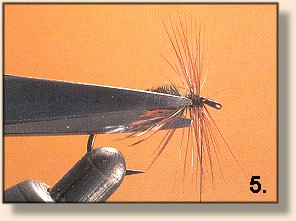
5. Secure the hackle's tip with two thread turns, and then sprial the thread forward
through the hackle to just behind the hook's eye. Snip out the Hackle's tip.
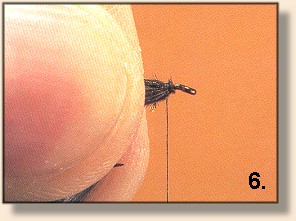
6. Stroke back the hacle fibers. Take two or three thread turns back over the
fibers to set them sweeping back.
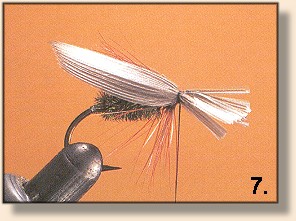
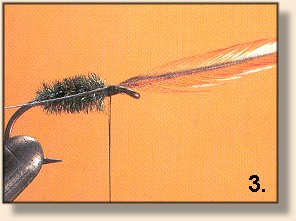
7. Use the wing pinch to tie in a matched pair of duck-quill sections; the sections
should be about one-half to three-quarters as wide as the gape. The sections
should be cupped together, long edge up (long edge down is optionsal). There
is room for personal preference regarding wing length - wings may end at the far
edge of the bend, or they may extend slightly beyond. Trim the butts and build
a thread head over them. Complete the thread head as usual.
~ Skip Morris
|
