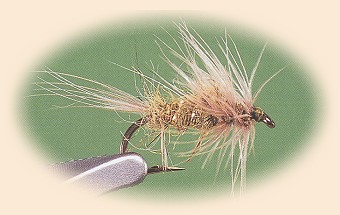
Little Olive Flymph
By Dave Hughes
When trout refuse your dries during a hatch, back away
from casting and observe the water for a few moments.
Follow closely the careers of a few duns as they float
down through the rising trout. Small binoculars will
be a big help. Do any duns disappear in those swirls?
Quite often, none will. That is the first indication
trout are taking almost invisible emergers rather than
visible duns. Next concentrate your watching on a single
rising trout, and observe it through a cycle of two or
three rises. Does it take duns that you can see, or
does it seem to be rising to nothing? If the trout
appears to rise for naught, it is your assurance that
at least one trout is focused on emergers. You'll
have to change flies, and probably your presentation as well,
to catch it.
Trout send rise rings up to the top even when they take
emergers inches beneath the surface. When you determine
that trout are focused on emergers rather than duns, the
next step is to notice whether they're taking the emergers
awash in the surface film or a few inches to a foot beneath
it. If a trout is taking on top, it will break the surface
film with each rise, and one to several bubbles of air will
be left floating in the center of the rise. If a trout is
feeding beneath the surface, it will not break the surface
plain, and no bubbles will be left in the rise.
Materials List:
Hook: Standard wet fly, 1x or 2x stout size 12 to 16.
Thread: Olive 6/0 or 8/0.
Hackle: Medium blue dun hen.
Tail: Medium blue dun hen.
Rib: Oval gold tinsel.
Body: Mix of olive fur and Antron.
Instructions - Little Olive Flymph:
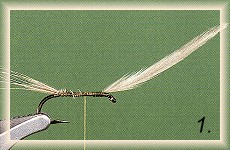
1. Fix hook in vise, and start thread behind the eye.
Select a hen hackle with fibers 1-1/2 to two times the
hook gap. Strip fuzzy excess from the lower stem, and
tie the feather in with the tip over the front of the hook,
the convex side against the shank. Measure six to ten
hackle fibers the length of the body and tie them in at
the bend.

2. Tie in two to three inches of oval tinsel at the base
of the tail. Dress the thread liberally with sticky
dubbing wax. Spread dubbing along the thread loosely.
Capture the thread over your fingertip and return it to
the vise, to form a dubbing loop. Twist this to form a
very spiky dubbing rope.
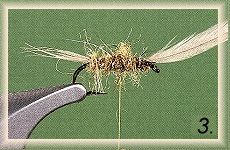
3. Wind the dubbing forward to the hacke tie-in point. It
should be very loose and spiky. Wind the ribbing forward in
four to six evenly-spaced turns, without matting down any
more of the body fur than necessary. Tie it off and clip
the excess at the end of the body. Return your working
thread to the mid-point of the body in one long turn.
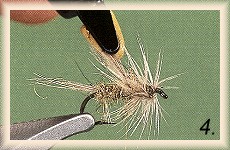
4. Take one turn of hackle at the hook eye. Place a
second turn just behind the first. Take another turn of
hackle halfway to the thread, then a final turn at the
mid-point of the body. Capture the hackle tip under a
couple of turns of thread, cut or break off the excess, then
work the thread forward through the hackle to the eye.
Finish the head. If the fly looks tidy, you've made a
mistake.

Pale Watery Flymph
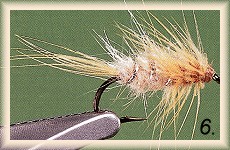
The Pale Watery Flymph is tied with the same steps listed
for the Little Olive Flymph. [above] The mix of fur and
Antron fibers give the body some sparkle, capturing the
affect of bubbles of air trapped in the wings of the natural.
If you cannot find a pre-blended mix in the right color, cut
Antron yarm into eight-inch segments and blend it with fur.
Materials List:
Hook: Standard wet fly, 1x or 2x stout size 12 to 16.
Thread: Tan 6/0 or 8/0.
Hackle: Ginger hen.
Tail: Ginger hen hackle fibers.
Rib: Oval silver tinsel.
Body: Mix of cream fur and tan Antron.
~ DH
Credits: From Matching Mayflies,
by Dave Hughes, published by Frank Amato Publications.
We appreciate use permission.
|