Sac Fry
By Mike Mercer
Like most anglers, I'd always been content to use
simple pink or orange egg imitations - I now realized
the trout were seeing a lot more involved variations
on those themes. As I perused the other stages, my
eye was drawn repeatedly to the sac fry. I wasn't
sure why, but I found something about it intriguing.
Then it dawned on me: While I'd tied dozens of
variations of eggs, and more than a few smolt
patterns. I'd never considered the sec-fry stage.
In fact, I'd never even seen a fly designed specifically
for it.
The more I thought about this, the more excited I
became. Here was a prominent food source present
whenever trout and spawning salmon coexist, yet few if
any fly-fishers were taking advantage of it. Moreover,
it the old adage, "50 days at 50 degrees" (the average
time in optimum conditions between the eggs being laid
and the sac fry's emergence from the gravel) was correct,
then the fat rainbows in the lower Sacramento River
behind my house should be gorging on them at that very
moment. If my conclusion was accurate, this could be
like discovering a new major insect hatch on a familiar
stream - in other words, nearly unthinkable. I'd
already planned a drift on the river the next day,
figuring most peopoe would be sleeping late and nursing
hangovers - now I had a chance to turn it into a truly
exciting experiment. But first, I'd need a fly.
Materials List: Sac Fry
Hook: TMC 2457, size 12.
Thread: 3/0 white Monocord or equivalent.
Body Tubing: Tan Ultra Lace Tubing.
Body Inser and Tail: Pearl Angel Hair.
Egg Sac: Glo Bug Yarn or equivalent, your
choice of color.
Eggs: Silver prismatic 3-D stick-on eyes.
Epoxy: Devcon 5 Minute Epoxy or equivalent.
Tying the Sac Fry
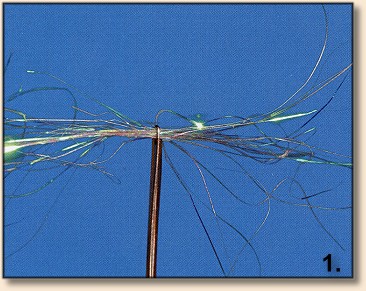
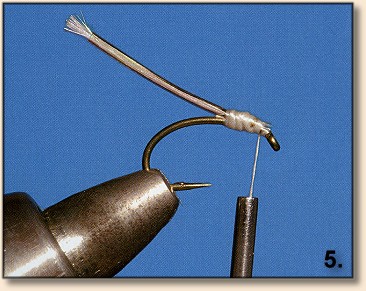
1. Cut a short (approximately 3/4 of an inch) length of
tan tubing. Push a wire bobbin threader through it, so that the
end sticks well out one end. Insert a sparse clump of pearl
Angel Hair into the end of the threader.
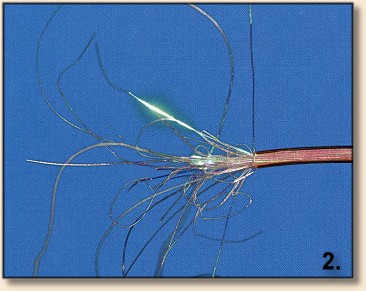
2. Pull the threader back into the tubing, drawing the
Angel Hair with it.
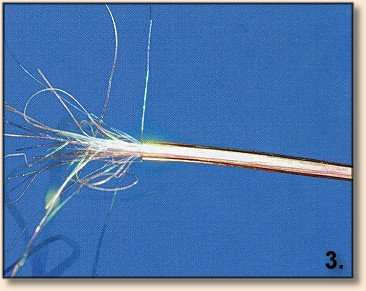
3. Once the threader has completely exited the tubing
a short distance, trim the Angel Hair between the tip of
the threader and the tubing - this abbreviated clump will
form the "tail" at the end of the Sac Fry's body. Trim
the Angel Hair at the other end flush with the tubing.
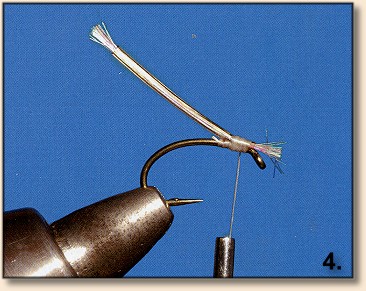
4. Form a thread base just behind the eye of the hook
- remember, most of the hook shank will not be utilized
with this pattern. Tie in the preformed body just
behind the hook eye. You'll notice the tubing usually
has a natural curvature it it - tie the body in so that
it curves upward between the hook shank and the tail.
5. Use thread wraps to cover all of the loose ends of
tubing and Angel Hair right behind the hook eye. Unlike
most trout flies you'll ever tie, go ahead and strive for
a bulky build-up of thread here - it forms a larger, more
desirable base to attach your stick-on eyes to.
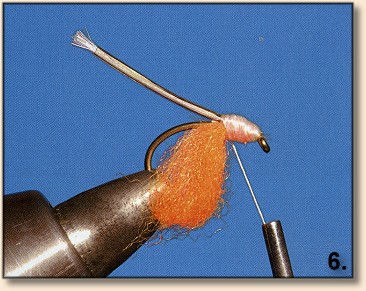
6. Take a short length of egg year and fold it over,
creating a "solid loop" - a teardrop-shaped loop with
no space in the middle. Tie this loop in beneath the
hook shank so that the folded end faces rearward. The
yarn loop should be long and bulky enough so that, if
pushed upward against the hook shank, it covers virtually
the entire remaining bare hook. Again, thread build-up
while tying this yarn in is a good thing! Whip-finish
and clip your thread.
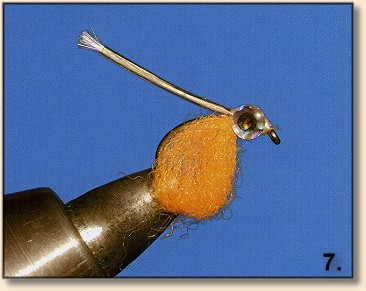
7. Attach one stick-on eye to each side of the thread head.
There should be just a slight bit of the thread-covered
shank showing between the hook eye and the forward edge
of the eyes. I find putting a drop of epoxy or super glue
onto the backs of the eyes before sticking them in place
helpful - otherwise, they tend to move around the next step,
when you cover the head with epoxy.
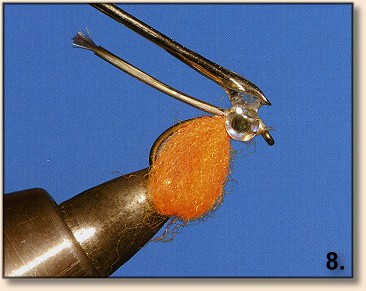
8. Use a fine-tipped bodkin or needle to apply
5 Minute Eposy to the head of the fly. I generally
coat the entire head, essentially forming a round
"bubble" of epoxy encompassing the head and eye. If you
prefer not to coat the face of the stick-on eyes with
epoxy, you can choose to simply fill in the gaps on
the top and bottom of the head, between the thread base
and the inner, flat surfaces of the eyes. This is a bit
more tedious, but some may prefer the finished look.
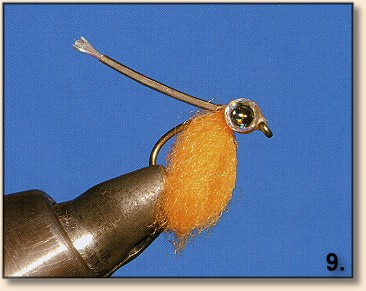
9. The finished Sac Fry.
How to Fish the Sac Fry
 First, trout seem to prefer this fly when presented in
and around spawning redds, or in the deeper run immediately
below. This makes sense, when you realize sac fry actually
spend most of their early days buried in, or swimming
immediately above, these cobbled nests.
First, trout seem to prefer this fly when presented in
and around spawning redds, or in the deeper run immediately
below. This makes sense, when you realize sac fry actually
spend most of their early days buried in, or swimming
immediately above, these cobbled nests.
Second, remember that, being encumbered with such outsized
egg sacs, salmon fry aren't particularly agile swimmers.
Consequently, unlike many baitfish techniques, a dead-drift
nymphing presentation is often the most effective. I prefer
to fish the sac fry beneath an indicator, allowing long,
uninterrupted presentations, though tightline swinging one
through a run can produce some unfortgettable grabs.
Finally, in most rivers, fish seem to key into this "hatch"
for specific windows of time, then largely ignore them for
other, more plentiful, food sources. ~ Mike Mercer
|

