
 |
|
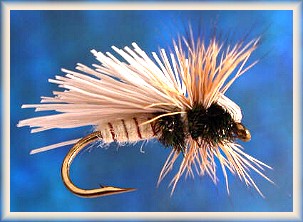
Flutter Bug
|
|
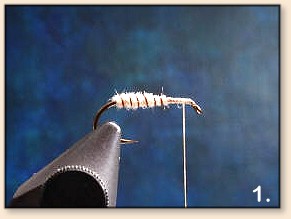 1. Secure the thread to the hook just behind the eye and wrap back to the bend. Tie in the brown thread ribbing. Here I've used Uni-Thread 6/0, which is slightly thicker than Danville's 6/0. Dub a "reversed taper" body, similar in shape to a caddis, covering the rear two-thirds of the shank. Counter wrap the thread ribbing. Counter-wrapping the thread ensures that it doesn't sink too far into the dubbing and will show up better. It is also helpful to twist the thread prior to wrapping to prevent it from flattening out when wound (for an even look and added durability). Bring the thread to one hook eye width behind the eye.
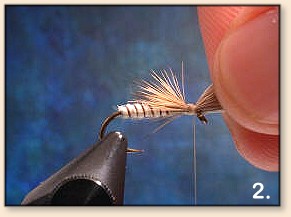 2. Now we'll tie in the deer hair that is to become the back/top and hind wing. This is tied in very near to the tips of the hair, so that when it's pulled over, the head does not become overly large. Select deer hair as long as you can find. The longer this hair is, the easier it will make some of the tying steps later on. Clip a bundle about a matchstick in diameter, clean out the underfur, and even up the tips, and tie in on top of the shank close to the tips. Keep the hair from spinning around the shank by first taking a couple loose turns of thread, then pulling down to tighten while pinching the hair bundle to keep it on top. Wind the tying thread tightly all the way to the hook eye while holding the butt ends in place.
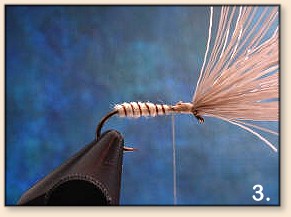 3. Trim the tips and cover any exposed clipped ends with three or four tight turns of thread. Keeping the thread wraps as tight as possible will help hold the hair in place. If you spin the thread clockwise (when looking down on the hanging bobbin), you can strengthen the thread slightly. In addition, add a drop of cement to the thread wraps. Bring the thread to the middle of the thorax area (half way between hook eye and front end of dubbed abdomen).
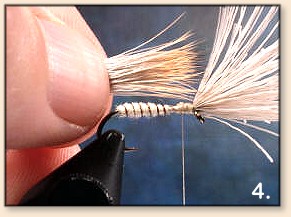 4. Now select the deer hair that will become the fore wings. You can use the same deer as used in the last step, or another color or type. This can be shorter, so you have many options. Clip a bundle about one and a half matchsticks in diameter. Clean out the underfur and even up the tips in a stacker. Hold the bundle against the hook to measure for length, equal to the hook shank plus the hook eye. Note in the photo how the edge of the thumb marks the length. This is exactly where you want to wrap the thread to maintain the proper length.
 5. Tie in the wing hair with the tips forward in the same manner as previously used for the hind wing... couple of loose turns, pinch the hair to hold on top while tightening the thread. Take four or five tight turns toward the rear, sliding your fingers back as you go. Keep a hold of the hair, and when the tips are secure, hold up the butt ends and clip as close as possible.
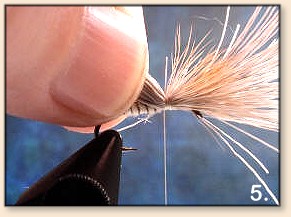
 6. Cover any exposed clipped ends with tight turns of thread. You can add a drop of cement to help hold everything in.
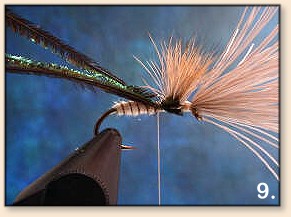
 7. Now we need to prop the fore wing up. Separate the fore and aft wing hair by stroking the hair protruding out over the eye with your right hand, and use your left hand to stroke the tips of the fore wing up and back gently. Do this several times until most or all of the tips are standing up and clearly separated from aft wing hair. Bring the tying thread in front of the hair tips and take several wraps to help prop them up.
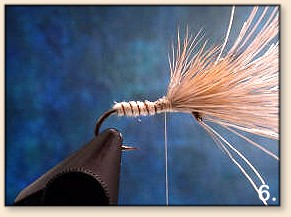
 8. Divide the fore wing into two even bundles by stroking half the hair tips to one side, the other half to the other side of the fly. Hold the bundle on the near side and bring the thread diagonally over the top between the two bundles to behind the hair on the far side. Moderate thread tension is adequate... we just want to provide a general separation. Bring the thread around and cross between the bundles to the far side in front of the hair tips. Take one turn in front, then bring the thread back to behind the wings and take a couple turns to the very front of the abdomen.
 9. For the thorax, tie in three peacock herls by tips, ending with the thread just behind the wings. You could also use a dark dubbing in place of the peacock herl.
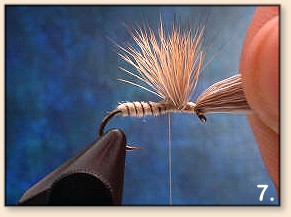
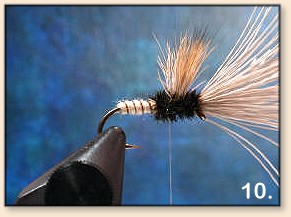 10. Twist the peacock herls to form a rope and wrap this all the way to the eye, then back to just behind the wing where the thread is waiting. Move the wing bundles as necessary to avoid binding any stray fibers out of place. Secure with three tight turns of thread, each wrap right over the previous one, and clip the excess. This is also where you should end the dubbing if you opt to use that. At this point, none or barely any of the thread should be visible in the thorax.
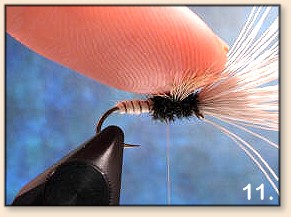 11. Our next step will be to fold the aft hair back, but first, flatten and further divide the fore wings. Stroke each one out to the side, then press down with your finger between them. The top of the fly should look like this, with adequate room for folding the aft wing hair between them.
 12. Stroke the aft wing hairs to gather them together and pull back gently between the fore wings.
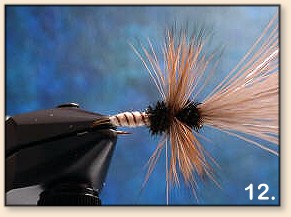
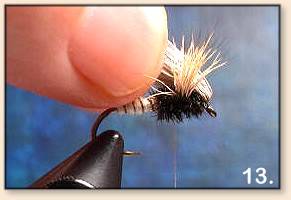 13. To help pull all the fibers even, hold the butt ends gently, just enough that fibers don't come free of your hold. Use the finger of your right hand to "push" any loose fibers near the hook eye into alignment with the others. Readjust your hold and repeat as necessary.
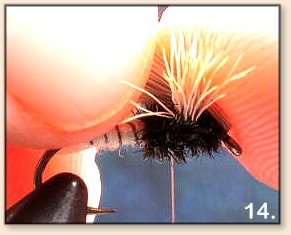 14. When the top/back is evenly tight, bring the thread up over the bundle (maintaining your grip on the butt ends) a couple times. Pull down to tighten while holding the wing slightly toward you. Take two more tight turns. The thread tension should compress the hair bundle around the top half of the hook shank.
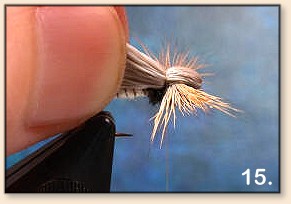 15. Keeping hold of the butt ends, slide your fingers back and hold the hair up at a slight angle. Trim the hairs at a "height" about equal to the hook gap at an angle slightly sloping down toward the rear (as shown in photo).
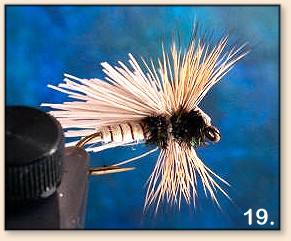
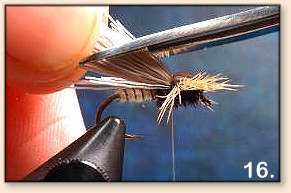 16. Take another tight turn of thread to further flare the aft wing hair. Carefully tie a five-turn whip finish knot directly over the previous thread wraps, avoiding the tips of the fore wings. Clip the thread.
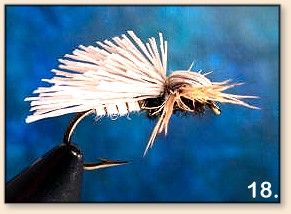
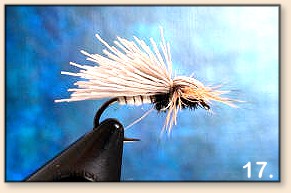 17. Trim any stray fibers in the aft wing and shape it. The side profile should look like this. From below, the aft wing should look rounded, with fibers near the fore wings about two-thirds the fore wing length, and those point back at a length past the bend. This provides the illusion of the aft wings fluttering. Let some of the hairs vary in length (as shown in the photo) to add to the illusion.
 18. Apply cement carefully to the thread wraps behind the fore wings, and on the hair covering the back/head.
 ~ Rob Knisely
|
|
|
|
|