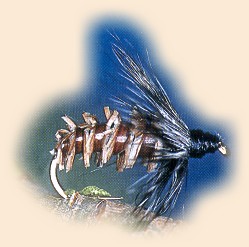
Breadcrust Nymph
By Marty Bartholomew, Auroro, Colorado,
Contributed by Pat Dorsey
The incredible Breadcrust Nymph was developed in northeastern
Pennsylvania in the Pocono Mountains by Rudy Sentiwany, who is
credited with inventing the original pattern in the early 1940s.
The nymph basically imitates both a cased and a free-living
caddis. "It was THE fly back East," says Ed Rolka, a fly tier
in the area. Rolka tied his first Breadcrust at the age of
thirteen and popularized the pattern by tying it commercially,
making it available to shops all over the country.
In 1970, Rolka moved his family to Denver after being transferred
with the Johns Manville Company. Shortly after his move to the
Rocky Mountains, Bill Logan, outdoor editor of the Rocky Mountain
News wrote a column on the Breadcrust Nymph. The piece focused
on two very popular streams in the Glenwood Springs Valley, the
Roaring Fork and the Frying Pan rivers. Both of these streams
have large populations of caddisflies so it was only fitting
that the fly would produce there. The Breadcrust consistently
fooled the selective, hard-fished trout residing in these two
rivers. "After the article, I sold twenty dozen of the flies
to Ken Walters at the Flyfisher LTD. He reordered the day after
I delivered them because they were all gone," replied Rolka. The
word spread quickly and soon Rolka was delivering flies to shops
all over the central Rockies as they filled their bins with this
productive fly.
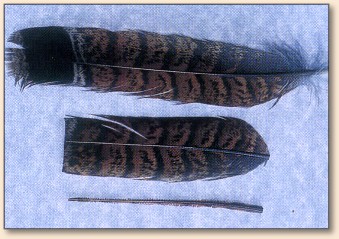
The secret of tying this creative pattern is in the preparation
of the quills used for the body of the fly. The quill of a
red-phased ruffed grouse tail feather is used. These birds
are found in the Eastern and Midwestern United States, so
if you hunt these birds, save the tail clump. If you don't
hunt, then find someone who does. Pat says that he has about
forty hunters he contacts every year for his supply of tails.
These feathers may be available at your local fly shop and
should be sold as a whole tail clump. Pluck the feathers
from the clump. Clip off the top inch of the feather and
then clip the butt end as well. Take a sharp pair of scissors
and trim the barbules off each side of the feather. Make sure
to leave 1/16 inch of the barbs attached to the quill.
The following steps in preparing the quills are the reason
most fly anglers acquire the Breadcrust at a fly shop. I used
to buy them until I learned this process, and I never buy
flies. Most fly tiers have a difficult time with these quills,
but there is an easy way to get them ready to use. You will
wreck a few of the first quills you try, but it does get
easier. First, soak the trimmed quills in water for quite
a while. Take a double-edged razor blade and cut the quill
in half. By "in half" I mean split the top of the quill from
the bottom not one side from the other. In other words, cut
the whitish side of the quill off while leaving the
reddish-brown side of the feather with the nubs intact.
 Throw the white half of the feather away. Now, soak the split
quill. The longer you soak them the better. Remove the pith
from the quill. The pith is the white core remaining inside
the brown half of the quill. Pat uses a paint scraper for
this step. Lay the quill on a table, pith side up. With the
paint scraper and scrape the white spongy substance off the
quill. If the pith does not come off fairly easy and wants
to tear the quills, soak them longer. When the pith is removed,
you end up with what I would describe as a half round,
hollowed-out quill. Drop them back in the water so they stay
soft while you tie the flies. Once you start tying with these
quills, you will be amazed at how easy they are to tie with
and the remarkable durability they provide the finished fly.
Throw the white half of the feather away. Now, soak the split
quill. The longer you soak them the better. Remove the pith
from the quill. The pith is the white core remaining inside
the brown half of the quill. Pat uses a paint scraper for
this step. Lay the quill on a table, pith side up. With the
paint scraper and scrape the white spongy substance off the
quill. If the pith does not come off fairly easy and wants
to tear the quills, soak them longer. When the pith is removed,
you end up with what I would describe as a half round,
hollowed-out quill. Drop them back in the water so they stay
soft while you tie the flies. Once you start tying with these
quills, you will be amazed at how easy they are to tie with
and the remarkable durability they provide the finished fly.
The keys to prepping these tails and reducing the overall time
it takes to tie the fly:
- Do as many tails as you can at one time.
- Basically keep the quills in water at all times.
- Plan around the soaking time. There are lots of things
to do while these things are softening.
- Scrape all the quills at once.
- Tie smaller flies first, using the thin tip of the quill.
Often you can tie another, larger fly with the remaining
section of the quill.
Ed Rolka will always be known as "the guy" who tied the
Breadcrust Nymph, however, since his retirement from
commercial tying, Pat Dorsey has been very fortunate to
take over tying the Breadcrust. "I hope I live up to Ed's
expectations. Thank you Ed for the opportunity to carry
the Breadcrust tradition into the twenty-first century,"
says Pat.
The Bead-Head Breadcrust is a very popular version of this
nymph. Many considered bead-headed flies the most productive
flies of the 1990s. One school of thought suggests their
effectiveness stems from the sparkle of the solid brass bead.
Others feel that the fly gets down to the fish more quickly
than flies without beads. Pat says, "I think bead-heads work
best in tumbling riffles where the flash can be accentuated.
They can be especially effective in off-colored water,
especially during spring run-off, again because of the better
visibility of the fly because of the added flash the bead provides."
The first bead-head patterns were fished in the picturesque
Alps of northern Italy. Roman Moser, one of Austria's most
innovative fly tiers, is credited with many of the initial
bead-head patterns commonly found in fly-fishers' vests today.
Tom Rosenbauer introduced this new nymphing concept in the July
1993 issue of Fly Fisherman magazine with a story titled
"Bead Heads."
Bead-heads have been 'Stream Rolling" ever since.
Materials for the Breadcrust Nymph:
Hook: Nymph 2X long, size 10-18, Dai Riki 730 or Tiemco 5262.
Thread: 6/0 UNI-Thread, black.
Underbody: Black yarn.
Body: Ruffed grouse.
Tail: Feather in the red phase, trimmed and pith removed.
Hackle and Grizzly hen neck feather.
Tying Instructions for the Breadcrust Nymph:
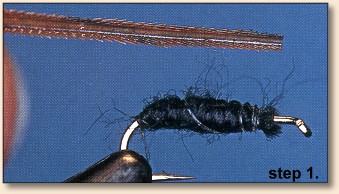

1. Start thread at the 1/4 point of the hook and tie in a
length of yarn. Wrap the yarn back to the bend of the hook
and then wrap forward to the 3/4 point again. Secure with
thread and trim excess yarn. Wrap back through the yarn with
thread, locking it in place. Tie in the tip of the grouse
quill near the 1/4 point of the hook and wrap back around
the bend slightly. Move thread to the 3/4 point of the hook.
2. Wrap quill forward, making sure one wrap is right next
to the last one, thus forming the segmentation. Notice how
the 1/16-inch nubs of the barbules stand up. I think this
is one awesome looking body!


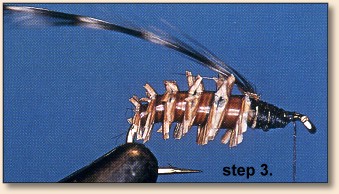
3. Prepare a grizzly hackle from a hen neck. A hen neck
feather should be used so the hackle size can be gauged
more easily. As with a rooster neck, the size of the hackle
varies from the bottom of the neck, where the smaller
hackles are, to the top of the neck, where the larger
hackles are. You are looking for a soft hackle that the
hen provides but also the ability to change the size of
the hackle with the size of the hook. The hackle should
be about twice the size of times the hook gape. Trim off
the butt end of the feather, pull a few barbs off to
expose the stem, and tie in the hackle on top of the hook
in front of the body. Wrap hackle forward, using as much
of it as possible, and secure behind the eye. Sweep the
hackle back with your right hand, lock into place with a
few wraps of thread and whip finish.
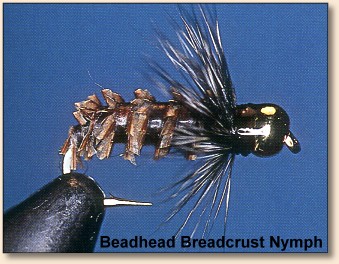
4. Beadhead version above.
~ MB
 Credits:
The Breadcrust Nymph is an excerpt from Tying Flies
Like A Pro by Marty Bartholomew, published by
Frank Amato Publications. Just out, the book has many
step-by-step tutorials on all types of flies. It also
has good sections on material preparation and 'tricks' of
the trade. Many professional tiers contributed their
'name' flies. Softbound, full color, (lots of photos)
the book is 184 pages, and priced at $29.95 US. ~ DLB
Credits:
The Breadcrust Nymph is an excerpt from Tying Flies
Like A Pro by Marty Bartholomew, published by
Frank Amato Publications. Just out, the book has many
step-by-step tutorials on all types of flies. It also
has good sections on material preparation and 'tricks' of
the trade. Many professional tiers contributed their
'name' flies. Softbound, full color, (lots of photos)
the book is 184 pages, and priced at $29.95 US. ~ DLB
|