Creative Foam Fly Tying
Dremel Bugs
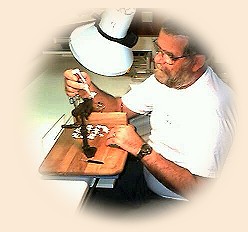
By Jim Hatch
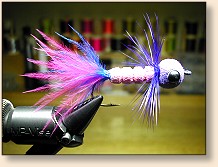
Photo Shad Slider by Bruce Harang
I'm not sure who first came up with the idea of using
a Dremel motor to spin foam plugs while turning them
into buggy critters with a common emery board. Capt.
Paul "Qrrfish1" planted the seed in my mind last spring.
Since then I have spent hundreds of hours doing just that.
I have made some money at it as well as a number of new
friends while sharing information on the process. I
continue to get requests for information and hope that
you too will find this useful.
Generally, the top water foam flies are thought of as
warm water bluegill and bass patterns. Nothing could
be further from the truth. There are few fisheries
that do not entail some surface fishing. That said,
foam flies do NOT have to be fished exclusively on
the surface. A bit of lead wire can make sinking
or suspending flies of most patterns. It may well
be that you are committed to fishing creations of
fur and feathers exclusively. The fact is fur,
feathers and foam can be combined to create some
very effective flies. It is an area that has not
been fully explored and there are many patterns begging
to be created. This article is intended to provide the
basics of working with foam as well as a few ideas for
effective fly patterns. It is intended to provide you
the tier with another tool and perhaps spark an interest
in creating something a bit different.
1. Dremel: The dremel is a motorized tool that
is well designed, readily available, economical, and easily
repaired or rebuilt with readily available parts if necessary.
There are other brands of rotary tools on the market that
can be used but my preference is for the Dremel for the
above mentioned reasons. I do not recommend the battery
powered models based on my experiences with them. The usual
disclaimers apply.
2. Foot Control: A foot control for your motor is
a very handy accessory which leaves both hands free for
working on your creations. The variable speed foot
control made by Dremel is pricey and is used only with
the single speed Dremel. The variable speed Dremel however
can be rigged up with a simple spring loaded foot switch
to turn it off and on. This is more than adequate and much
less expensive.
3. Extended Flex Shaft: Using the extended flex
shaft sold by Dremel will simplify construction of a Dremel
lathe as well as extend the capabilities of the Dremel for
other tasks.
4. Foam: There are many sources of closed cell foam
available for making foam bodied flies. My favorite is the
foam flip flops (not to be confused with the sponge rubber ones)
and they are available at many locations in season. They come
in a multitude of colors. Childrens foam puzzles are another
colorful source of foam. They can often be found in the
toy sections of thrift shops quite inexpensively. I have
also found colored foam garden kneeling pads to be suitable
and very economical.
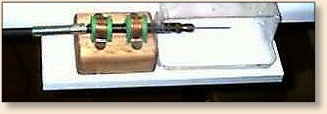
Constructing your Lathe
The photo below shows a very simple design for a foam
turning lathe. It uses a piece of scrap 2" x 4" wood
stock, two conduit clamps, 4 wood screws, and two small
pieces of flip flop foam. Simply attach the chuck end
of the Dremel flex shaft to the 2x4 with the two conduit
clamps and 4 screws using the foam to pad the shaft.
If you elected to use Dremels variable speed foot switch,
you can skip this part. If not, you can purchase a
simple push switch, not unlike a doorbell switch, that
makes contact when depressed and turns off when pressure
is removed. This is a very handy feature to have while
turning foam as it will leave both hands free to work with.
For simplicity you can wire such a switch into either leg
of a simple extension cord and plug your Dremel motor into
it. Place the switch on the floor where it is comfortable
to reach. Take care to ensure compliance with local
electrical codes as well as common sense. An exposed
electrical connection is an accident looking for a place
to happen.
Lathe Setup
The first step in setting up your lathe is attaching an
upholstery needle to support your foam stock for turning.
I purchased a Dremel collett from my local hardware store
to fit the 2 � " straight upholstery needle I selected from
an assortment at Walmart. It is imperative that the collett
fit the needle to prevent unwanted vibration. I have used
the one needle for several hundred hours without the need
for replacement. The tools you use with this lathe for
removing the unwanted material from your creations is a
common emery board. A package of 10 should be under
$1.00 and will last for some time.
Preparing Foam Plugs for Shaping
Initially, I used short sections of sharpened copper tubing
chucked in my drill press or electric hand drill motor to
punch plugs of foam for shaping on my lathe. I recently
found a set of gasket punches that work much better and
the plugs are self extracting. They came in a set of 12
ranging in size from 1/8" all the way up to �" at a price
of only $5.50 for the set. I am told that Harbor Freight
has them as well and I know that they are sometimes available
on E-Bay for similar prices. Highly recommended! The
larger four sizes of punches were too large to chuck in
my drill press. A friend turned them down for me on a
metal lathe. He charged me a dozen foam flies for doing so.
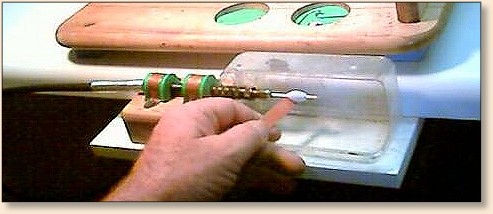
Making "Dremel Bugs"
If you have stuck it out this far, you are now down to the
meat and potatoes of dremel bugs. You will begin by
attaching a suitable foam plug to the needle chucked in
your lathe. Carefully push the plug onto the needle
while applying several taps to the foot controller
supplying power to the dremel. After you do a few,
you will find they are centering much better and you
will be more competent at doing so. Begin your shaping
by running the rough flat side of the emery board lightly
across the spinning foam plug. This will quickly center
the plug should it be off a bit. Now, by applying either
a rough edge or a smooth edge of the emery board to the
plug, you will be removing material at a good rate. You
should ensure that your emery board remains 90 degrees
in relation to the needle. Of course the rough edge will
remove material more quickly where as the smoother edge
of the emery board will provide more control. You will
quickly be able to discern which is appropriate and when.
A smooth steady hand lightly applying pressure is the key
to success. If you are too heavy handed either the foam
will spin on the shaft glazing it and causing further
spinning or the material will disappear quicker than
the speed of thought resulting in very unusual designs.
A few plugs turned on the lathe will quickly show you what
works much better than I can put into words. Just keep in
mind that a light smooth touch will result in a much nicer
finished product.
Okay, that jerk has talked you into buying a Dremel, building
a lathe, and spending considerable time searching department
stores for suitable foam. Let's make something useful!
Set the speed on your Dremel to about half speed. Chuck
a foam plug. Lightly center it by applying pressure with
a flat emery board. Not too much. Start at one end with
the emery board at an angle and apply a taper to the foam.
You just made a popper body. It should have taken you about
15 seconds. Have you priced unfinished popper bodies lately?
You just saved some money. Do it again. This time add a bit
more shape to it. Now with any luck at all, you have a "sexy"
popper body. Not the standard taper, but something just a bit
nicer. How about that. Just saved more money. Let's try
another. Remember the old Hula Popper by Fred Abergast? Piece
of cake. But yours will be a genuine light-weight fly, not
a hunk of wood or plastic that would take your head off.
If you rest the end of the emery board against the needle and
the foam where the hook eye will eventually protrude, you can
cup it like the original Hula Popper. Zara Spooks, diving
crank baits, floating clousers, jitterbugs, floating nymphs,
or sinking nymphs with a bit of lead wire. The sky is the
limit. Remember those neat round headed sliders that worked
so well on your gills before they got so hard to get? I think
they were called Dennies or some such. Well, they just got
easier to find. Pop another piece of foam in the lathe and
turn some balls.
 How about a mayfly imitation that really
will float all day? Yep, it's hiding the same place these
other kritters were. Right there on your little foam lathe.
Add a bit of imagination and the possibilities are virtually
endless. I have worked my way through a book of entomology
with foam reproductions of the kritters within and have yet
to be stymied. Shape got you stumped? Think multiple shapes.
Yes, you can easily and permanantly attach different shapes
together with CA adhesive.
How about a mayfly imitation that really
will float all day? Yep, it's hiding the same place these
other kritters were. Right there on your little foam lathe.
Add a bit of imagination and the possibilities are virtually
endless. I have worked my way through a book of entomology
with foam reproductions of the kritters within and have yet
to be stymied. Shape got you stumped? Think multiple shapes.
Yes, you can easily and permanantly attach different shapes
together with CA adhesive.
You can also use it to attach your foam bodies to a thread
wrapped hook with your choice of hackle or hair. The CA
purchased from model hobby shops is available in different
viscosities and drying times. I find that the 25 second
thick CA is ideal for use with foam. Not only is the
marriage permanent but the 25 second drying time should
allow you to position the body on the hook before it cures.
 Speaking of hooks, I find that the standard Aberdeen style
hooks are well suited for almost all of my foamies. And at
about $3.00 per hundred instead of what you have been paying
for hooks. The Mustad or Eagle Claw Aberdeen hooks are stocked
by almost all angler or bait shops. See, you just saved some
more money. It want be long before you are in the black on
this new foamie lathe setup. Go ahead and play with it for
a bit and don't be afraid to try different shapes. They
will become easier with practice.
Speaking of hooks, I find that the standard Aberdeen style
hooks are well suited for almost all of my foamies. And at
about $3.00 per hundred instead of what you have been paying
for hooks. The Mustad or Eagle Claw Aberdeen hooks are stocked
by almost all angler or bait shops. See, you just saved some
more money. It want be long before you are in the black on
this new foamie lathe setup. Go ahead and play with it for
a bit and don't be afraid to try different shapes. They
will become easier with practice.
Finishing your Creations
Well, here you are with a pile of foam bodies. Now we need
to convert them to flies. Many of you need no further
coaxing but I will elaborate anyway. Even though you were
just playing, er, uh, practicing with your new Dremel lathe,
you undoubtedly came up with some neat new bodies that just
happen to match the desired hook size. Oops, didn't I mention
that? Yes, it is entirely possible and highly recommended
that you design your Dremel bugs to fit specific hooks. With
the Aberdeen style hooks you need concern yourself only with
the length of the shank and the hook gap. Got to have room
for Moby Fish to get to the point. In the case of many fly
styles, you will begin by making a thread wrap on the hook
shank and tying in suitable hackle or hair for tailing.
Then after applying a scant drop of CA adhesive to the
thread wrapped hook shank, you can slip the body over
the eye of the hook and quickly position it before the
glue sets.
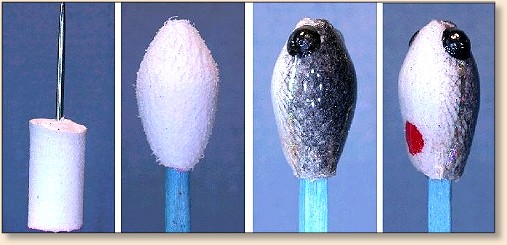
Whenever possible, I prefer to pre-finish my bodies prior to
gluing them to the hook. In some cases this is simply
gluing on or painting on eyes or in others applying a
scale effect through a piece of sheer curtain fabric
with canned spray paint. On some flies you may desire
to add other details with pens or paint sticks. Often
times I will apply an epoxy finish to a completed body.
The epoxy results in a high sheen and provides long term
protection for the body. In any case I prefer to make my
flies using foam of the desired color for my basic body
color and adding the accents I deem necessary or appropriate
for the pattern. When I have glued the body to an already
thread wrapped and tailed hook, the fly is completed unless
legs are desired. You can insert a needle through the bodies
in the desired locations to add appropriate rubber legging
materials. I like to apply glue to the legs near the body
and pull the glued area back into the body to ensure they
stay put.

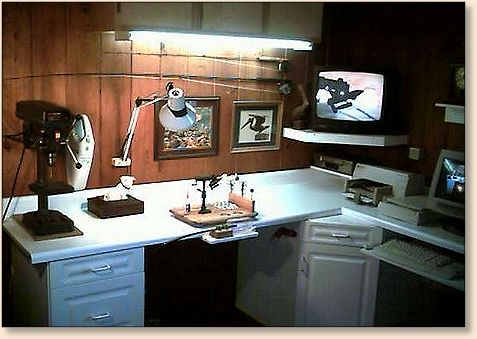
Here's my set-up:
I have found fly tying with foam to be very enjoyable and
every bit as addictive as any other style. I do hope you
will decide to give it a try. If you have questions or
comments please email me at: ~
Jim Hatch
Happy Tying

|