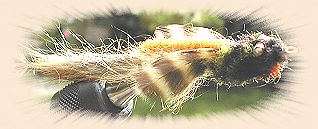
Upside Down Sculpin
By Bob Shaffer
Origin: A 1991 or 1992 experimental combination of Bob Clouser's Minnow and
a Woolhead Sculpin. I do not fish streamers nearly enough, especially
sculpin imitations. This fly, in size and color variations has caught
crappie, trout, Dolly Varden, bass and salmon. A friend fished it before I
had a chance and it's hard to believe that two salmon moved a couple
of feet forward and sideways to take them while he was
fishing for searun cutthroat in fresh water!
This fly is an expression of the tyer's preferences, vision and judgements.
It is expected that proportions, materials, colors and technique will vary.
The original pattern that nailed the salmon and others was almost black
Dorsal and tail with a black head mottled with brown and green. Dark green
head-fins-tail with a copper body works great as does lighter colors with
silver or a light pink body. I like smaller sizes 12-6 and non-absorbent
body material because 90 plus percent of my fishing is with a 3 and a 5 wt.
The fly shown is a size 4 as I recall. ~ Bob
[Publisher's Note: This fly and the instructions were hand delivered by
Mike Grinsell (Mike G.) to us at the Fish-In 2001. The Fraternity of Fly
Fishers is alive and well.]
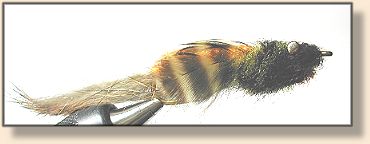
Recipe: Upside Down Sculpin
Hook: Longish streamer style, I use size 12 to 2 . Your choice.
Thread: Sturdy, color of head material or black like I use.
Weight: Dumbbell or chain eye.
Tail and Dorsal: Zonker Rabbit Strips.
Body: Diamond braid, flash chenille, tinsel or antron yarn.
Pectoral Fins: Soft Hackle or Hen Hackle.
Head: Clipped wool, synthetic equivalent or yarn.
Tying Steps:
1. Mount hook in normal position. Try a large hook first.
2. Dumbell eye is tied on top 1/4 to 1/3 shank length back from eye.
Coat dumbbell thread with head cement or fingernail polish.
3. Tail - Pull about 1/16 inch hair off the end of a Zonker strip where the
hair lays back along the strip. Lay a thread base on the hook to just
slightly around the beginning of the bend where you tie the bald part of the
strip firmly to the hook so the hair is oriented down. Trim tail to about
1/2 shank length or your preference by sliding scissors between the hair to
the skin. Cut only the skin. Wrap thread forward to 1/4 inch behind
dumbbell.
4. Remove the hook from the vice, turn it over so the shank is parallel to
the table and the dumbbell is is on the bottom.
5. Body Ł Tie in body material about 1/4 inch behind dumbbell, wrap thread
over material on shank back to tail. Wrap thread body material forward and
tie off at its tie-in place.
6. Strip barbs from stem of 2 matched large soft hackle or hen feathers till
they are the same and leave an inch plus of bare stem. Cover the shank between
the dumbbell and body material with thread. Tie feathers in at rear edge of
this space. Cupped (concave) forward on each side. Tie and trim feather
stems.
7. Dorsal Strip- Pull the hair off another zonker strip like the tail
section and tie on top the hook so the hair begins at the front of the body
material. Trim the dorsal so that the skin will clear the hook point by 1/4
inch. The hair will extend well beyond the hook point.
8. Head- Cut wool 1/2 to 1 plus inch long as needed and about an un-squeezed
pencil's thickness; work from dorsal tie in toward hook eye as follows: hold
wool parallel to shank, add two thread wraps at front edge of body material
in center of the wool section, tighten; twist wool sideways and wrap thread
twice tight against base of its tie in spot to securely bind it. (Keep wool
on top of shank for fishing flies or tie bundle underneath or help it spin
for demo flies.) If more thickness is desired, put another layer on top of
first before the binding wraps and/or make the first pile of wool thicker.
Fluff and even the wool bundles before adding the next. Repeat this toward eye, you
may wish to dub a little wool on the thread and wrap the last 1/8 inch
before the whip finish area.
9. Trimming - There are lots of shapes. I like a flat bottomed wide shape.
It's easy to accidentally cut a pectoral fin or the dorsal fin so I
generally hold them in and down against the shank with my left hand as I
trim with a scissors in the right.
10. Trim bottom flat. Cut equal angles to the side and back from the eye. Cut
and shape the top of the head Ł usually fairly flat but slightly up and
back. Carefully cut a notch in the top back of the wool to allow maximum
dorsal movement. Carefully cut a notch in front of each pectoral fin to
allow its full lateral position.

Variations
Make large black eyes with long black yarn plies tied perpendicular to
shank in a lighter color head. Use small dumbbells for lightly weighted flies.
Mottled heads by using more than one wool color. To make a light colored
bottom, stack lighter color on bottom with darker on top. Use closely wrapped
and trimmed hackle for the head. On smaller flies remove rabbit hair from
the skin or cut narrower strips. Use chain eyes for un-weighted versions.
I like non-absorbent slender, shiny material for the body. You may wish
to counter wrap thin wire over body material. Both light and dark colors work.
My impression is that the side fins provide the appearance of life and bulk
of weight; I'm not convinced they are essential but they do look cool. I am
convinced the unique movement of the dual zonker strips, wide head and
jigging action of the fly differentiate it. ~ Bob Shaffer
|