Building Miniature Sailboats
The Hexagenia and Drake
Extended Body Mayflies
By Jack Pangburn, Westbury, NY
Look at a real Mayfly and study the basic characteristics
or, peruse a flyfishing book that portrays the natural fly
and tied imitations. (Ex., Dave Whitlock's Guide to
Aquatic Trout Foods, or the Hatch Guide for
New England Streams by Thomas Ames, Jr.)
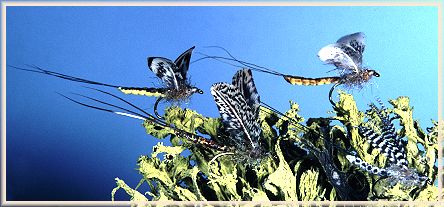
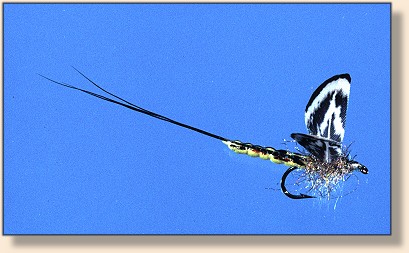
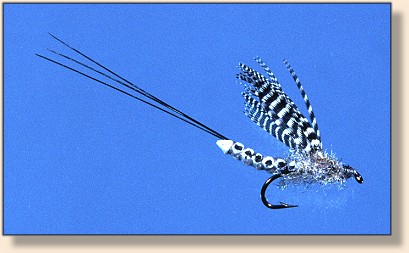
The naturals set low on the water surface and float like small
sailboats with wings like sails and thin curved, extended bodies
(abdomen) tapering to a fuller forward section (thorax).
The following illustrations and information will give you (the
Tyer) direction on how to make a good facsimile. You will finish
with a realistic looking fly that has the characteristics of
the natural.
A starter list of extended body flies follows with suggested hook
size for a particular Mayfly. The color and type of materials used
will vary but, the tying procedure and sequence remains the same.
If you tie one you can tie them all.
· Giant Mayfly Hexagenia #8 2xl
· Green Drake Ephemera #8 2xl
· Brown Drake Ephemera #10 2xl
· Western Greene Ephemerella #10 2xl
· Western Gray Drake Siphonurus #12 2xl
· Eastern Yellow Drake Ephemera #12xl
· March Brown Stenonema #12xl
· Gray Fox Stenonema #12xl
· White Mayfly Ephoron #14
· Light Cahill Stenacron #14
· Hendrickson Ephemerella #14
List of Materials for the Extended Body Mayfly
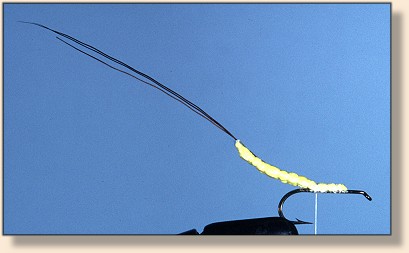
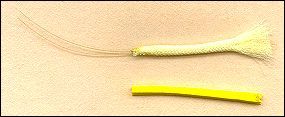 1. (illustration #1) To accomplish the elongated
body or abdomen, closed cell foam strip or vernille is
used. Color is Tyer's choice. Prepare to build the extended
body by tying on the foam strip and tail material (2 or 3
strands) to a needle or hat pin that has been clamped in
the tying vise. Some potential tailing materials are Cock
Pheasant tail barbs, Peccary bristles, paintbrush bristles
(often Pig hair), Moose mane, Elk mane, Micro Fibetts. Palmer
the thread the length of the foam with equal spaces. Return
palmer the thread X-crossing the first turns. Tie off thread
at butt end of the abdomen.
1. (illustration #1) To accomplish the elongated
body or abdomen, closed cell foam strip or vernille is
used. Color is Tyer's choice. Prepare to build the extended
body by tying on the foam strip and tail material (2 or 3
strands) to a needle or hat pin that has been clamped in
the tying vise. Some potential tailing materials are Cock
Pheasant tail barbs, Peccary bristles, paintbrush bristles
(often Pig hair), Moose mane, Elk mane, Micro Fibetts. Palmer
the thread the length of the foam with equal spaces. Return
palmer the thread X-crossing the first turns. Tie off thread
at butt end of the abdomen.
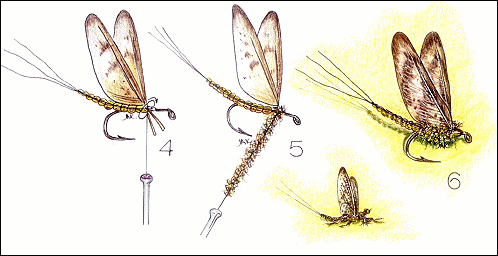
To complete illustration #1, slide the body off the needle,
adjust and set the body curve, coat with cement and, let dry.
2. Illustration #2 shows the attachment of the just
completed body to the hook shank. First, cocoon the shank
with thread and coat with cement before tying on the extended
body. This will keep the body from rolling and traveling
around the hook shank. Tie the body to the hook at about
mid shank. Trim the excess body length as shown with sharp
scissors or sharp blade.
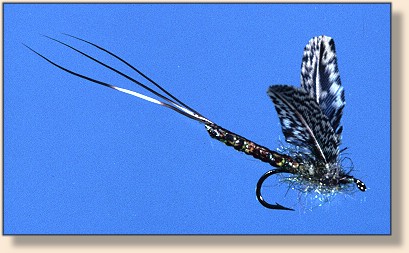
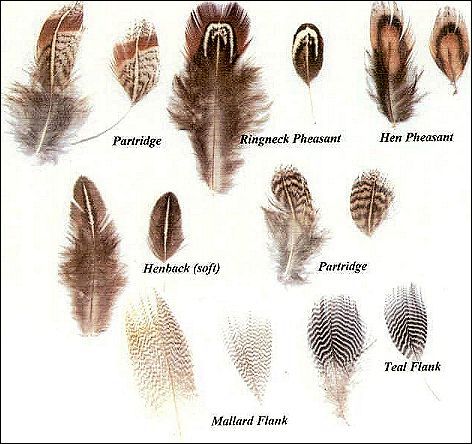
The wings are the sails for your fly and again many options
exist. (Note the feather sample sheet) Some of the suitable
feathers for this kind of wing come from the following, Cock
and Hen Ringneck Pheasant, Hen back, Woodcock, Mallard flank
and Teal flank. Really, just about any upland game bird or
Duck will have suitable feathers. Remember though, they must
be matching pairs, that is, one from the left side and one
from the right. When possible, always buy a full skin so you
will have a source for several options with regard to pattern,
color, size and suitability.
3. Wing feather preparation. Choose a matching pair of
feathers of the color, size and general appearance desired.
ull off the unwanted fluff and barbs then hold the pair together
with a piece of masking tape on the shafts or, use a drop of hot
glue. The wing feathers can be mounted with the curves facing
each other )( or opposite to each other (). Using a sharp pair
of scissors, the two wing feathers can be cut to the desired
shape at the same time.
|